Explore Data 360 Core Functionality
Connect, Map, Unify, Analyze, and Activate A Hands-On Journey Through Data 360
01 Create Data Streams
Connect Your Data • Data Streams • Data Lake Objects
Sales & Service Bundles • Verify Your Data Streams
Learning Objectives — Unit 01
In this project step, you will:
• Learn how to connect data using data streams
• Define data lake objects (DLOs)
• Create data streams from Salesforce CRM
Everything Begins with Data
Data is the FOUNDATION of our world and work. It helps you
make discoveries, answer questions, drive decisions, and
connect with customers.
But just having mountains of information is not what sets
you up for success. What really matters is being able to
EASILY, ACCURATELY, and QUICKLY categorize that data.
Salesforce Data 360 makes it possible to quickly bring data
to your fingertips using the power of the Salesforce Platform
and a scalable infrastructure.
In this project, you explore:
• BRINGING data into Data 360
• MAPPING and UNIFYING that data
• QUERYING and ACTING on that data
Sign Up for a Developer Edition with Data 360
To complete this module, you need a custom playground that
contains Data 360 and our sample data.
[Image: Note]
QUICK SETUP:
1. Click Create Playground
2. Your new org is automatically attached to your
Trailhead account
3. Make note of your org’s expiration date and complete
this badge before then
This Developer Edition is designed to work with the
challenges in THIS badge specifically, and might not
work for other badges. Always check that you are using
the recommended Trailhead Playground or special
Developer Edition org.
Connect Your Data
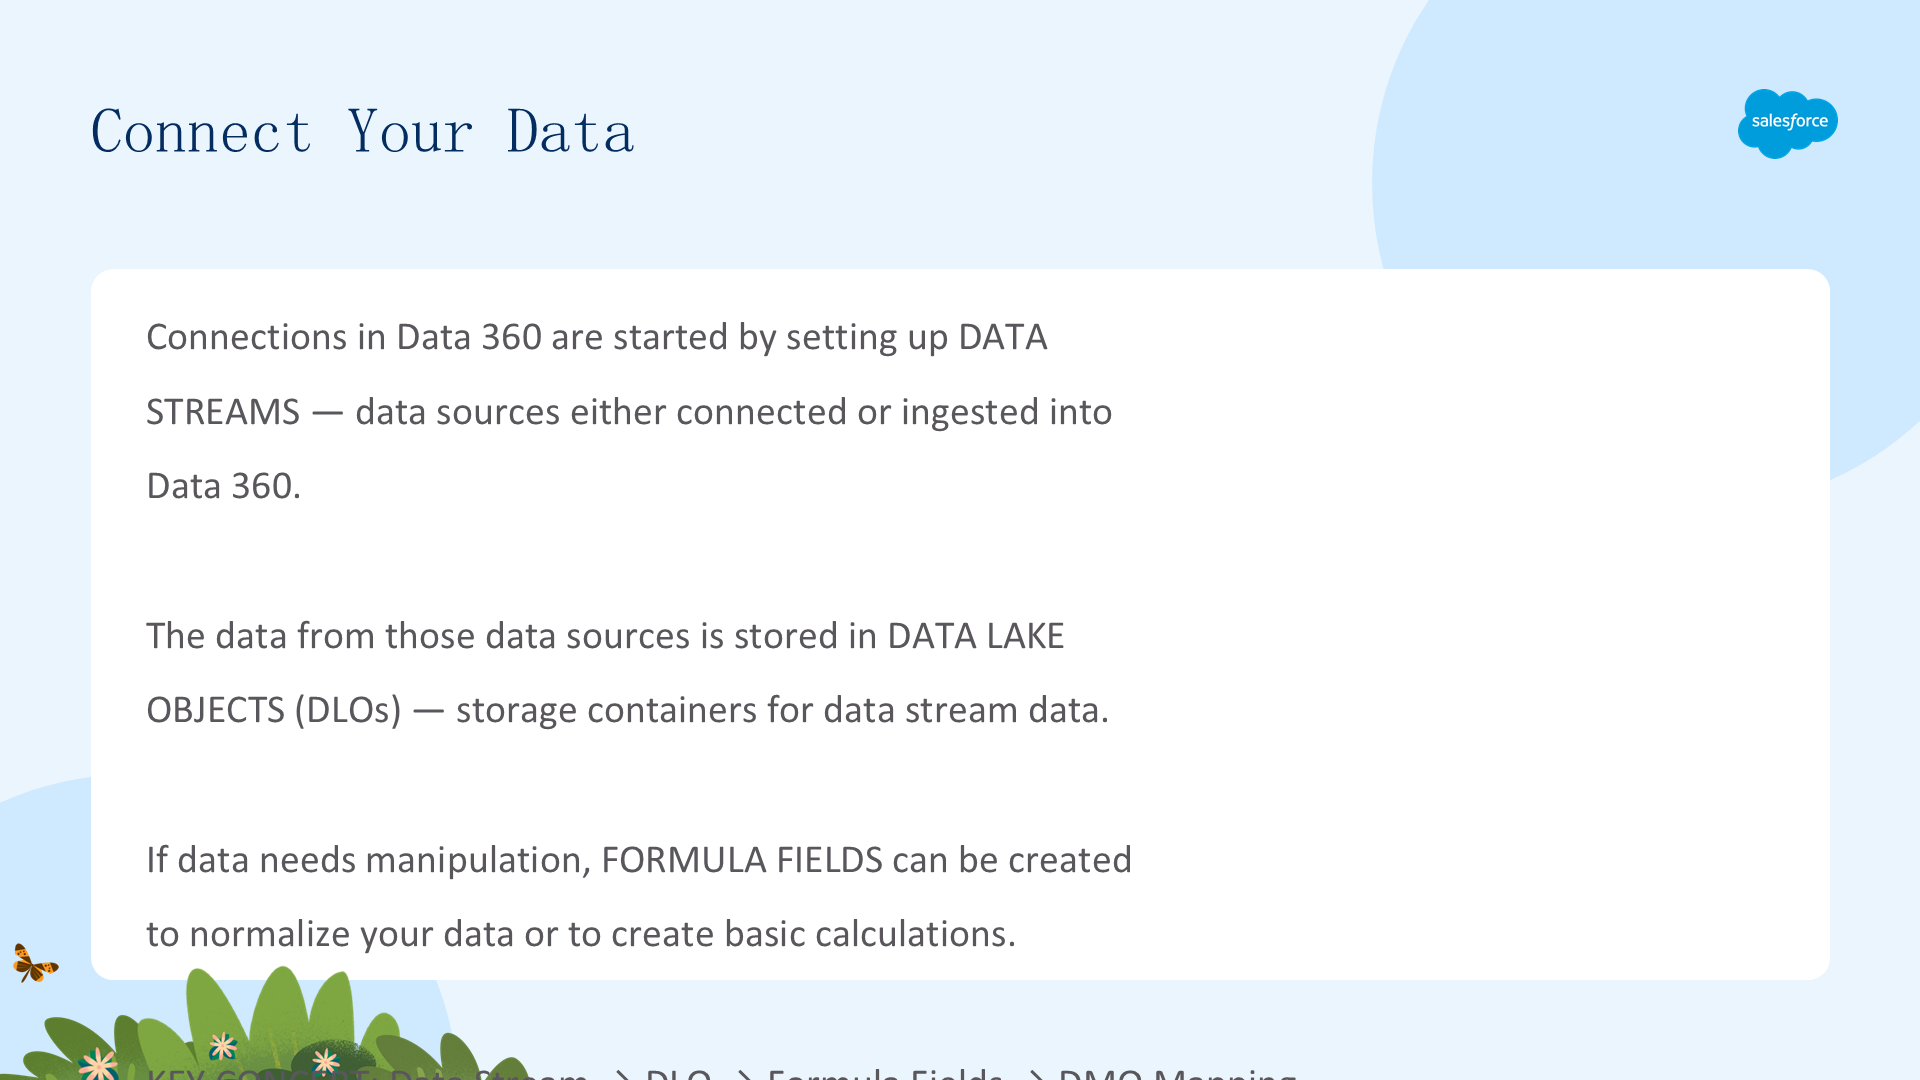
Connections in Data 360 are started by setting up DATA
STREAMS — data sources either connected or ingested into
Data 360.
The data from those data sources is stored in DATA LAKE
OBJECTS (DLOs) — storage containers for data stream data.
If data needs manipulation, FORMULA FIELDS can be created
to normalize your data or to create basic calculations.
KEY CONCEPT: Data Stream → DLO → Formula Fields → DMO Mapping
The data stream is the pipeline. The DLO is the container.
Formula fields transform. Mapping connects to the
Customer 360 Data Model.
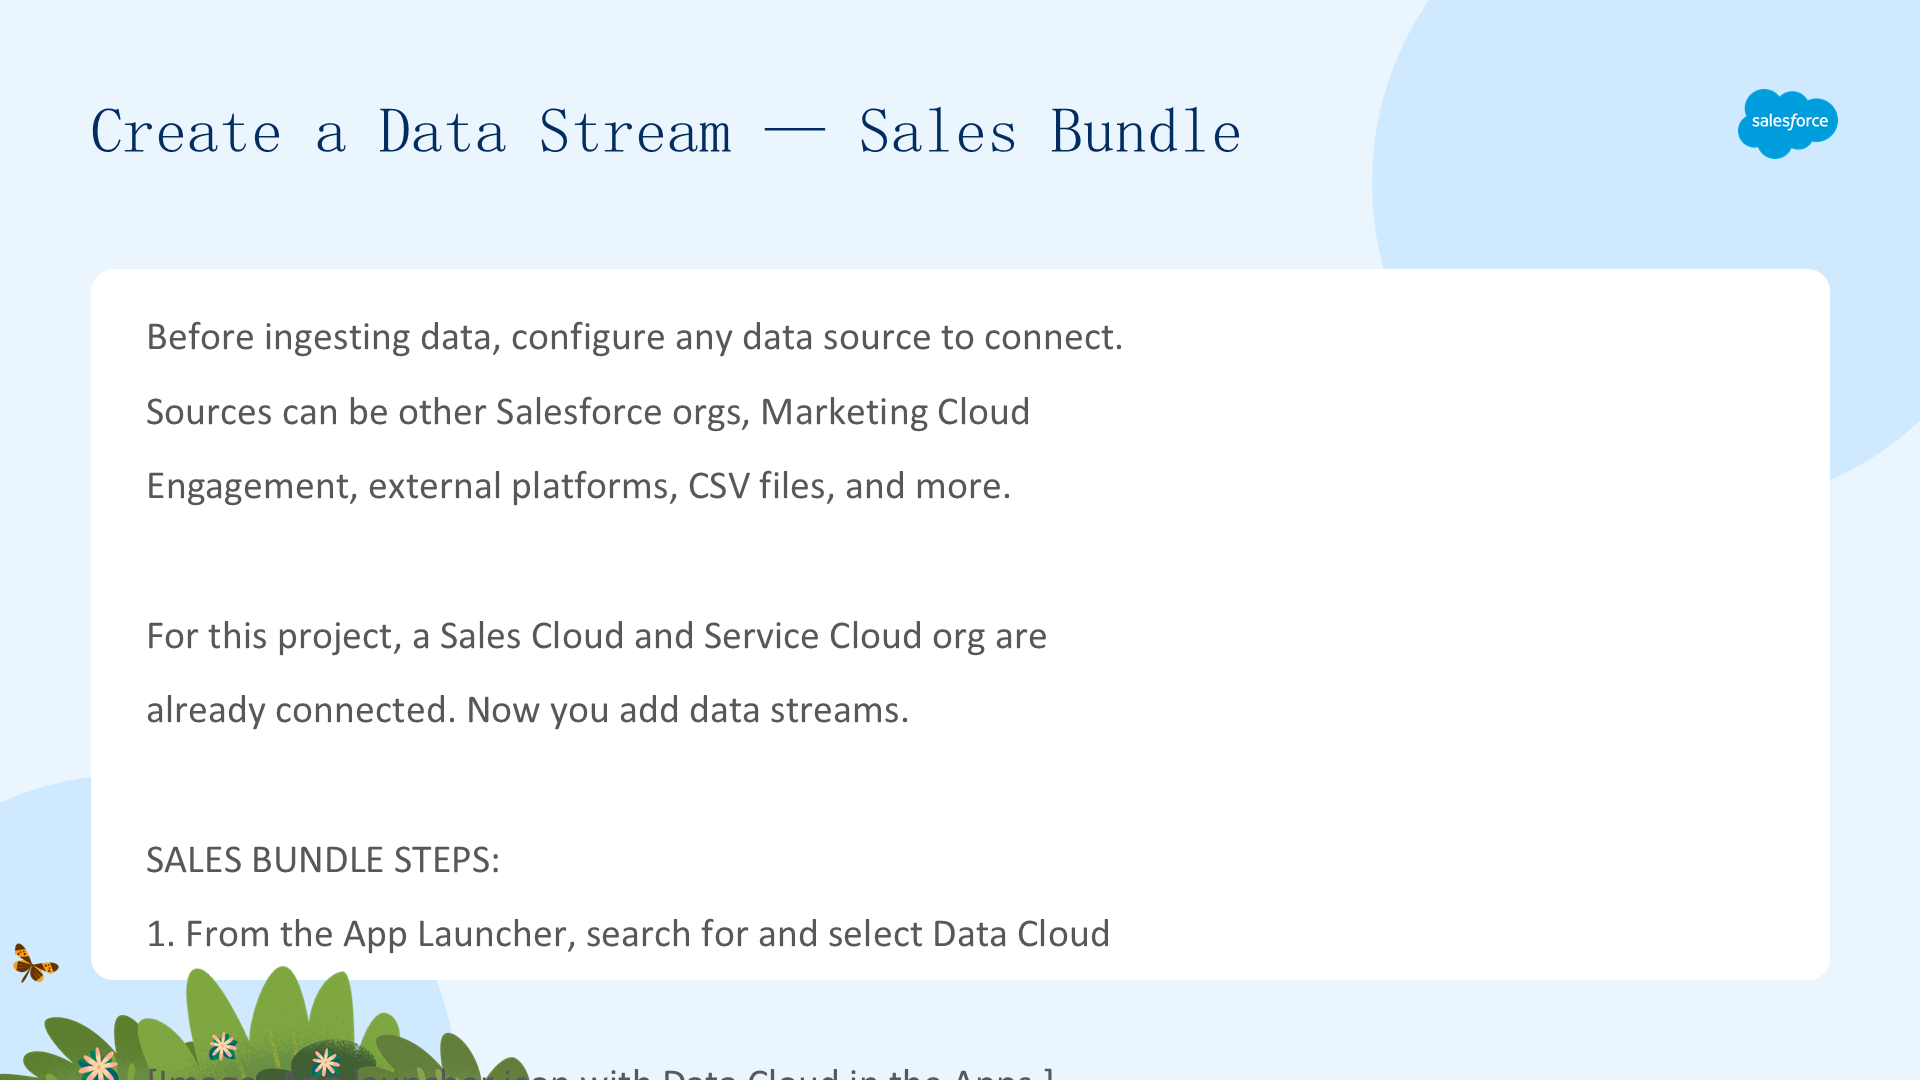
Create a Data Stream — Sales Bundle
Before ingesting data, configure any data source to connect.
Sources can be other Salesforce orgs, Marketing Cloud
Engagement, external platforms, CSV files, and more.
For this project, a Sales Cloud and Service Cloud org are
already connected. Now you add data streams.
SALES BUNDLE STEPS:
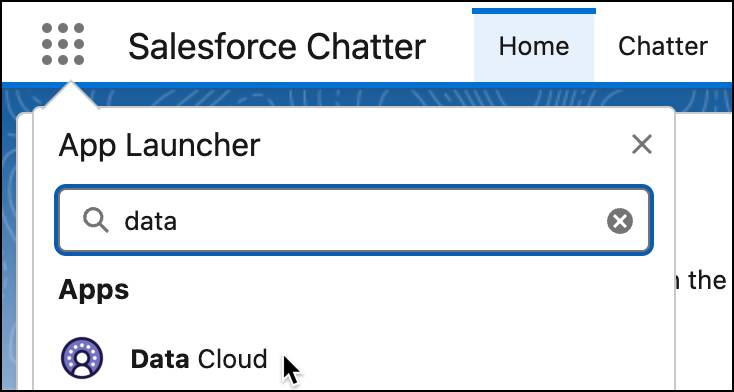
1. From the App Launcher, search for and select Data Cloud
[Image: App launcher icon with Data Cloud in the Apps.]
2. Go to the Data Streams tab, click New
3. Click Salesforce CRM under Connected Sources, click Next
4. From View Bundles, choose the Sales data bundle, click Next
5. View associated fields, click Next (may take a few minutes)
6. Default Data Space is preselected — leave as is, click Deploy
Six new data streams are now created from the Sales bundle.
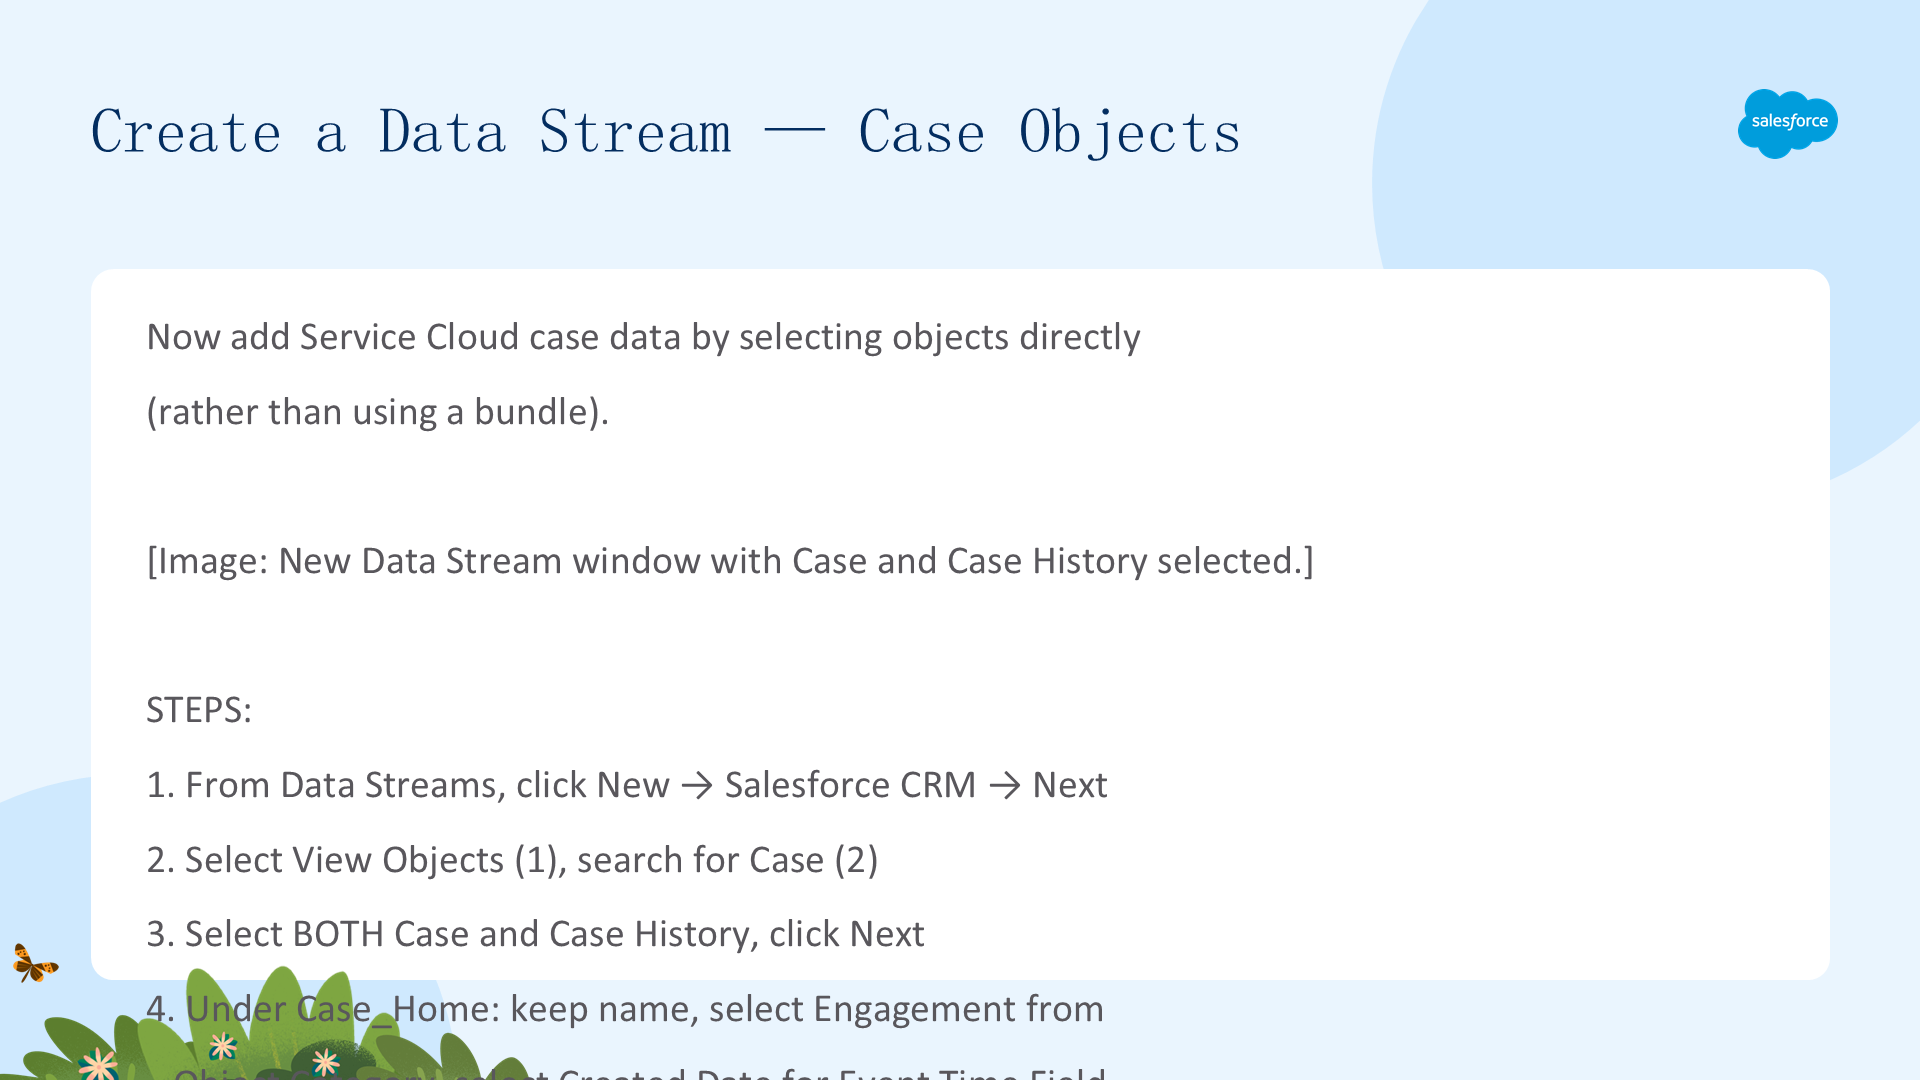
Create a Data Stream — Case Objects
Now add Service Cloud case data by selecting objects directly
(rather than using a bundle).
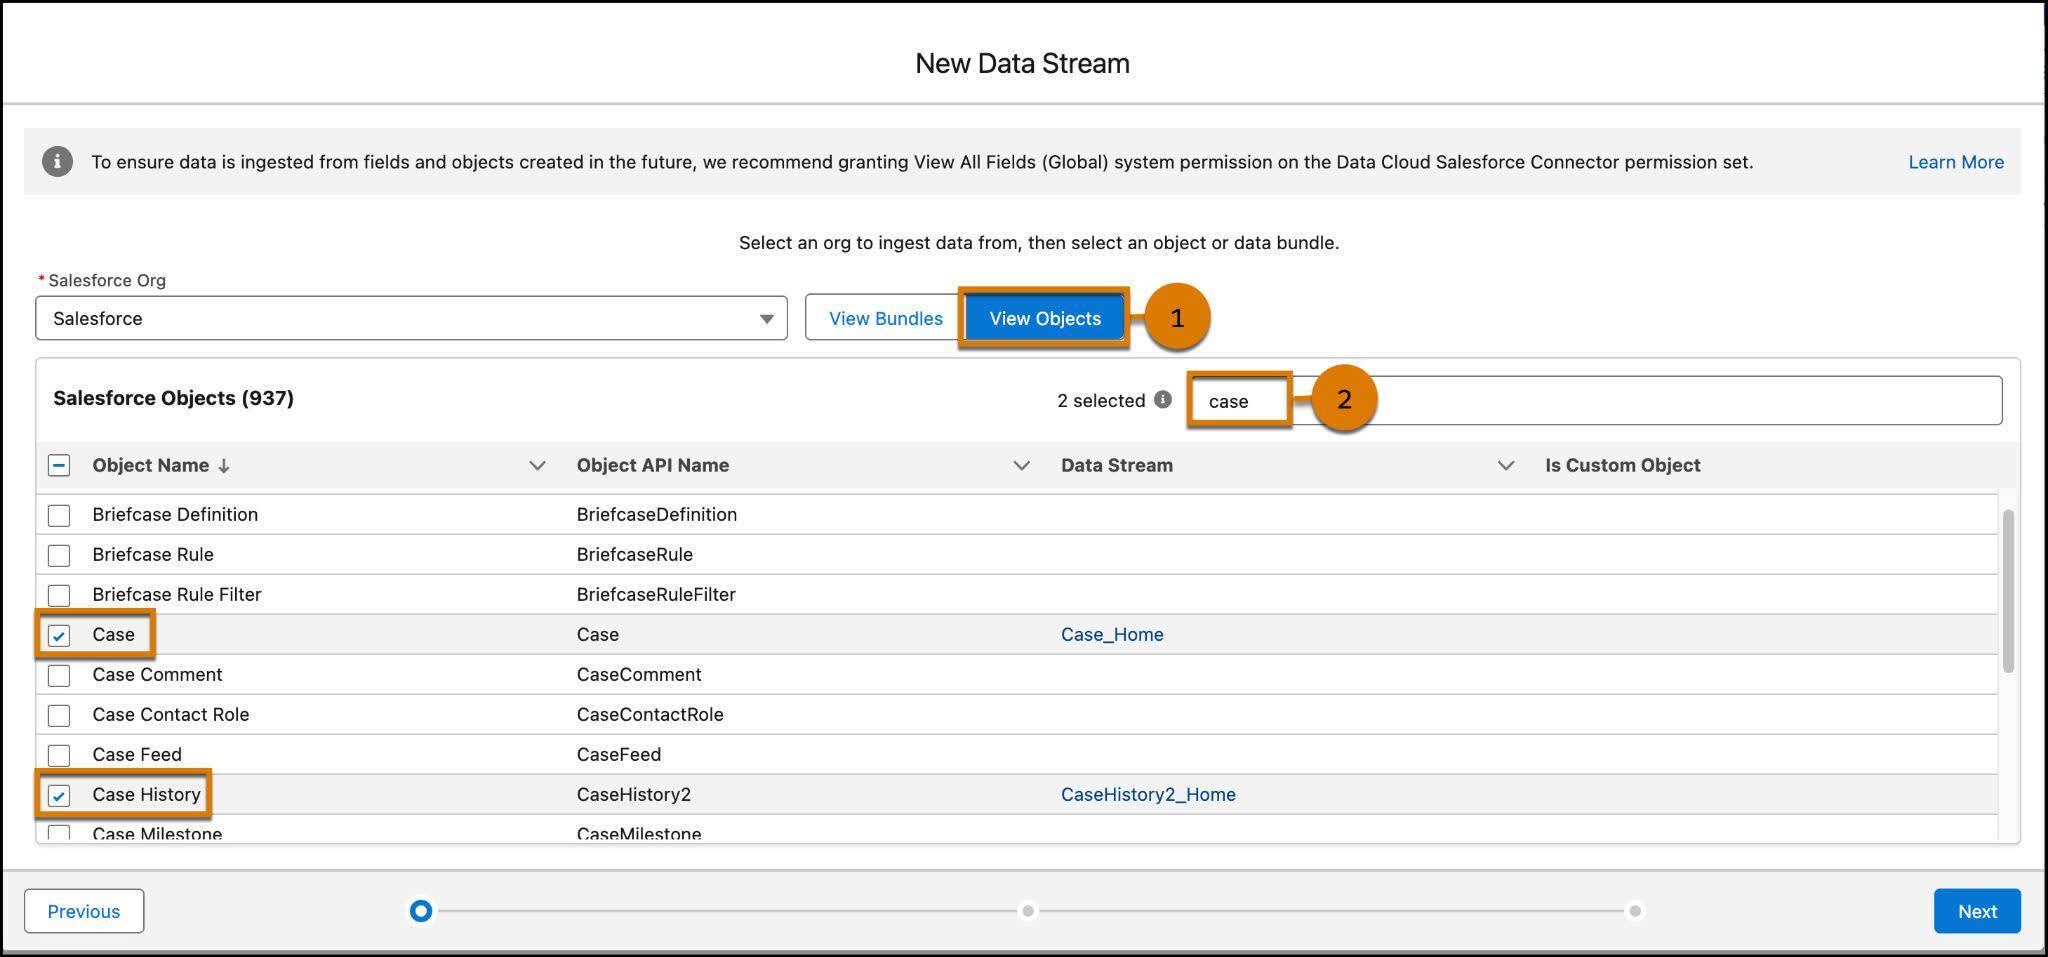
[Image: New Data Stream window with Case and Case History selected.]
STEPS:
1. From Data Streams, click New → Salesforce CRM → Next
2. Select View Objects (1), search for Case (2)
3. Select BOTH Case and Case History, click Next
4. Under Case_Home: keep name, select Engagement from
Object Category, select Created Date for Event Time Field
5. Under CaseHistory2_Home: keep name, select Other for
Object Category
6. Click Next, confirm default data space, click Deploy
You have now added both Sales data (via bundle) and Service
data (via direct object selection) to Data 360.
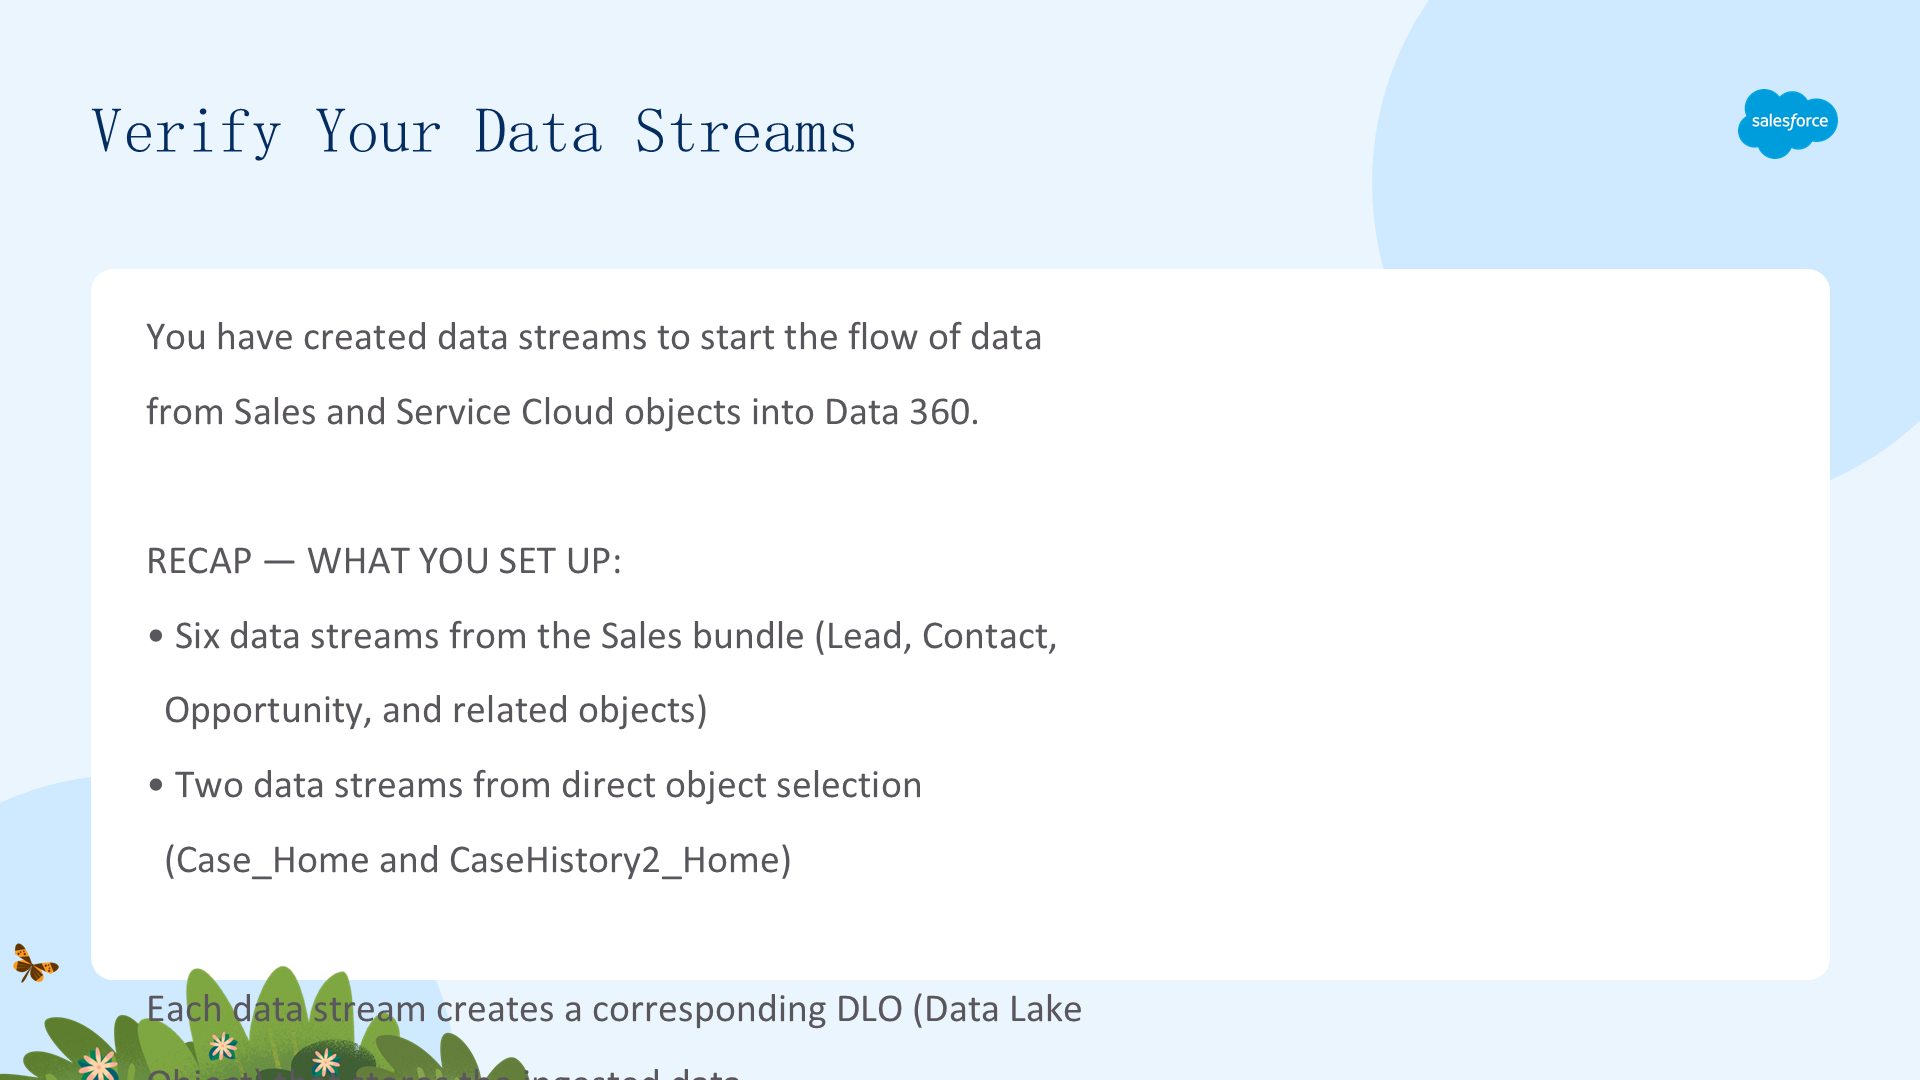
Verify Your Data Streams
You have created data streams to start the flow of data
from Sales and Service Cloud objects into Data 360.
RECAP — WHAT YOU SET UP:
• Six data streams from the Sales bundle (Lead, Contact,
Opportunity, and related objects)
• Two data streams from direct object selection
(Case_Home and CaseHistory2_Home)
Each data stream creates a corresponding DLO (Data Lake
Object) that stores the ingested data.
Click Verify Step to check your work before moving to
the next step. In the next unit, you add formula fields
and map data to the Customer 360 Data Model.
02 Create Fields and Map Your Data
Formula Fields • DLO to DMO Mapping
Custom Fields • Map Case & Case History
Learning Objectives — Unit 02
In this step, you will:
• Create a formula field with validation
• Add a custom field to a data model object
• Map fields to the Customer 360 Data Model
Create a Formula Field
Formula fields are optional fields you can generate during
or after data stream creation. They help you:
• STANDARDIZE data formatting
• UPDATE unique identifiers
• ADD FLAGS for data that meets specific criteria
For this project, create a formula field to identify leads
located in the United States.
STEPS 1–6:
1. From Data Streams, click the Lead_Home data stream
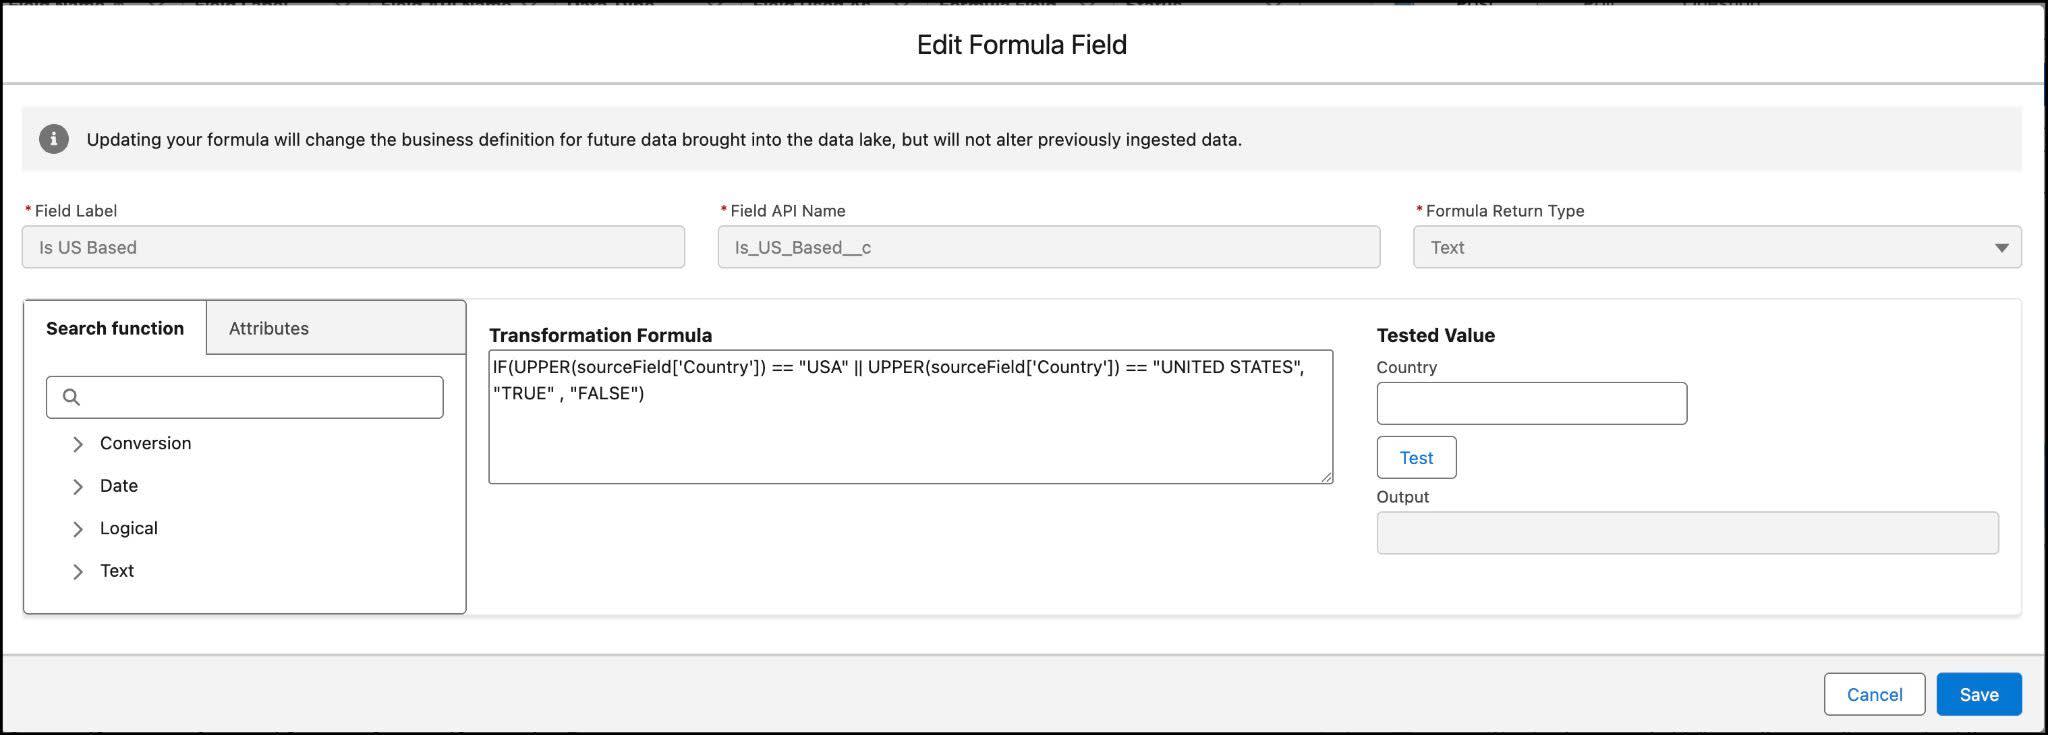
2. Select New Formula Field from the top options
3. Field Label: Is US Based
4. Field API Name: Is_US_Based (auto-populated)
5. Formula Return Type: Text
6. Enter the transformation formula (see next slide)
[Image: New formula field screen]
Validate and Save the Formula Field
VALIDATE your formula using the Tested Value panel:
• Type Japan into the country field → click Test
Output: FALSE (correct — Japan is not the US)
• Type USA into the country field → click Test
Output: TRUE (correct — USA matches)
Once you have successful validation on both test cases,
click Save.
The Is US Based formula field is now available in the
Lead_Home DLO and can be mapped to a DMO.
WHY THIS MATTERS: Clean, validated formula fields become
reliable inputs for segmentation, identity resolution,
and calculated insights downstream.
Harmonize and Map
Once DLOs are created, fields must be mapped to DATA MODEL
OBJECTS (DMOs) in the Customer 360 Data Model — Data 360’s
standard canonical data model.
BUNDLES prepopulate many mappings automatically. But CUSTOM
FIELDS (like Is US Based) and some unification-required
fields must be manually mapped.
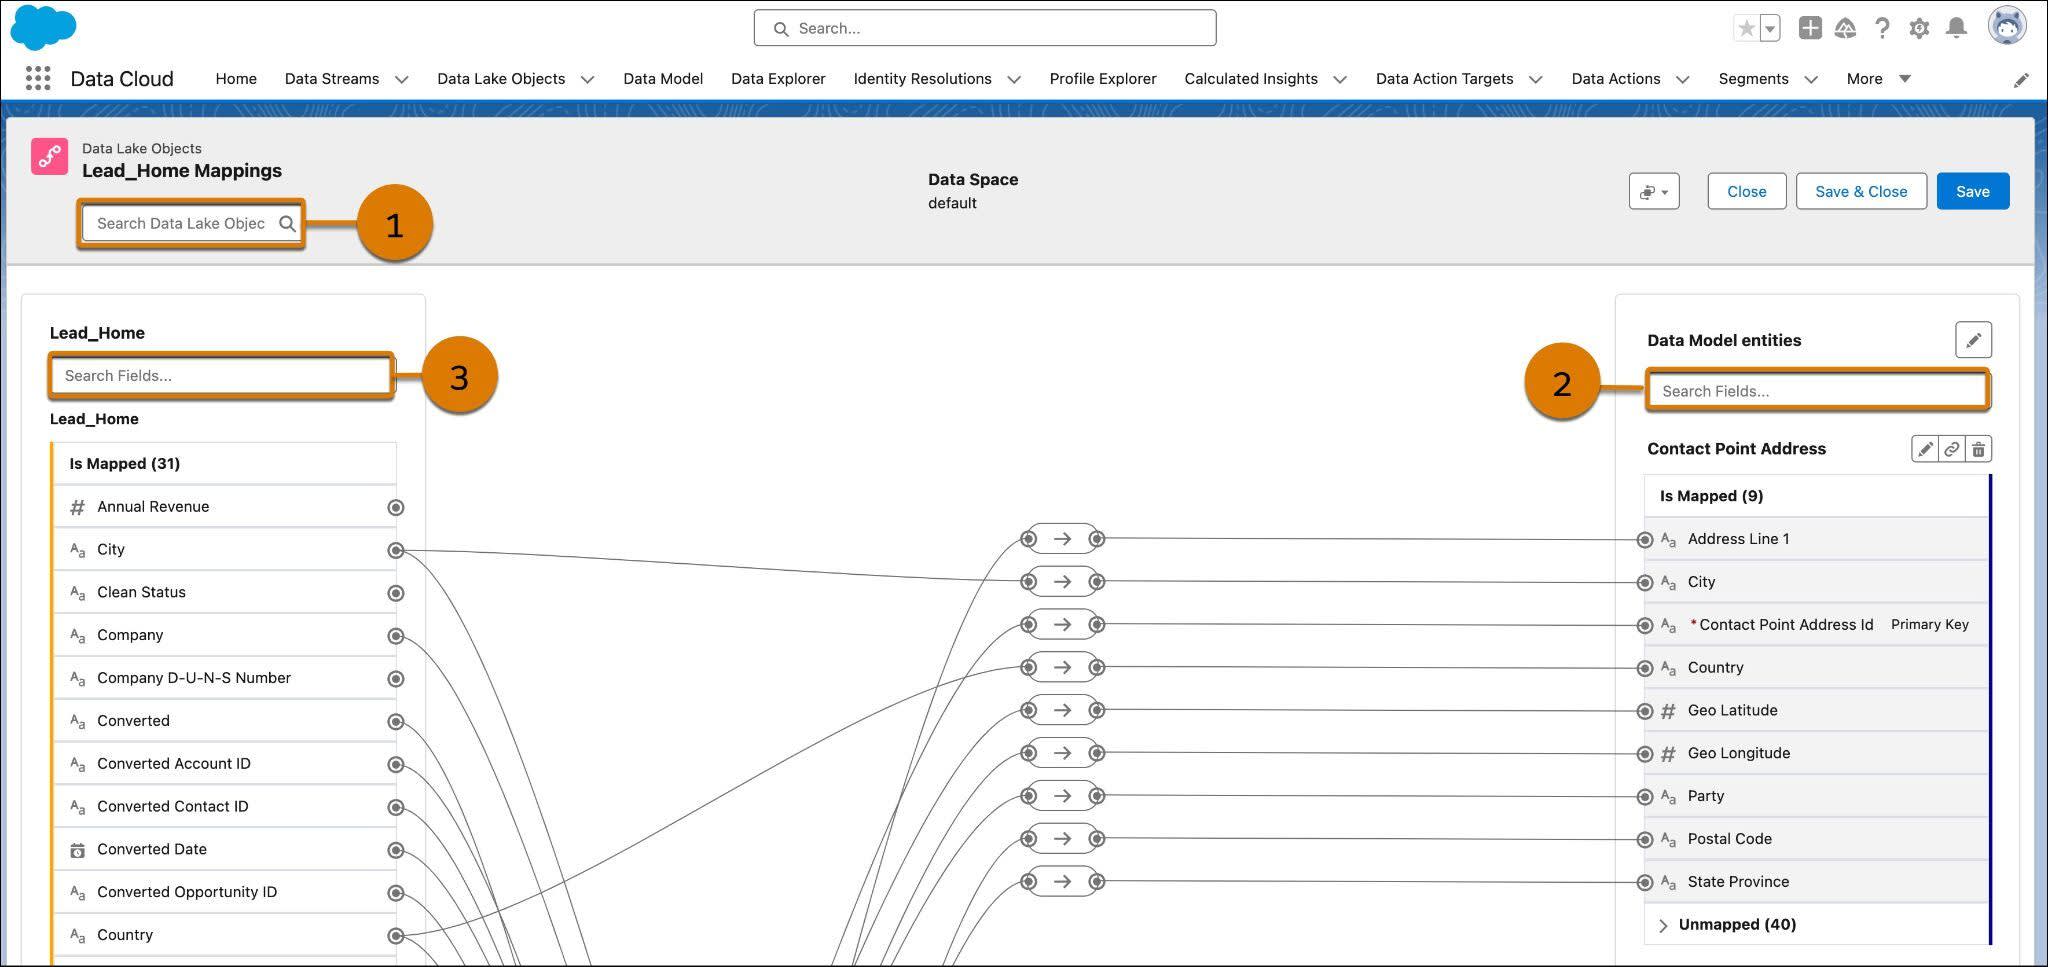
[Image: DLO mapping screen for the Lead data stream.]
THE MAPPING INTERFACE:
• Left side: searchable DLOs (1) with their fields
• Right side: searchable DMOs (2), called Data Model
entities in-app
• Use the DLO search bar (3) to find fields within
a specific DLO, e.g., Lead_Home
First, map Is US Based: create a new DMO field under Lead,
name it Is US Based (Text type), then connect the DLO field
to the new DMO field. Click Save.
Map Required Fields for Unification
Now map a field that is REQUIRED for identity resolution:
the formatted phone number.
STEPS:
1. Under Lead_Home, search for and select Phone
2. Under Data Model entities, search for
Formatted E164 Phone Number under Contact Point Phone
3. Verify a line connects Phone → Formatted E164 Phone Number
4. Click Save & Close
This mapping is CRITICAL: without contact point mappings
like phone or email, identity resolution cannot match
and unify profiles across data sources.
Next, we map the Case objects that were not added via bundle.
Map Case to a Data Model Object
Since Case objects were NOT added using a bundle, NO mappings
have been created. Map them manually so they can be used in
insights and segments.
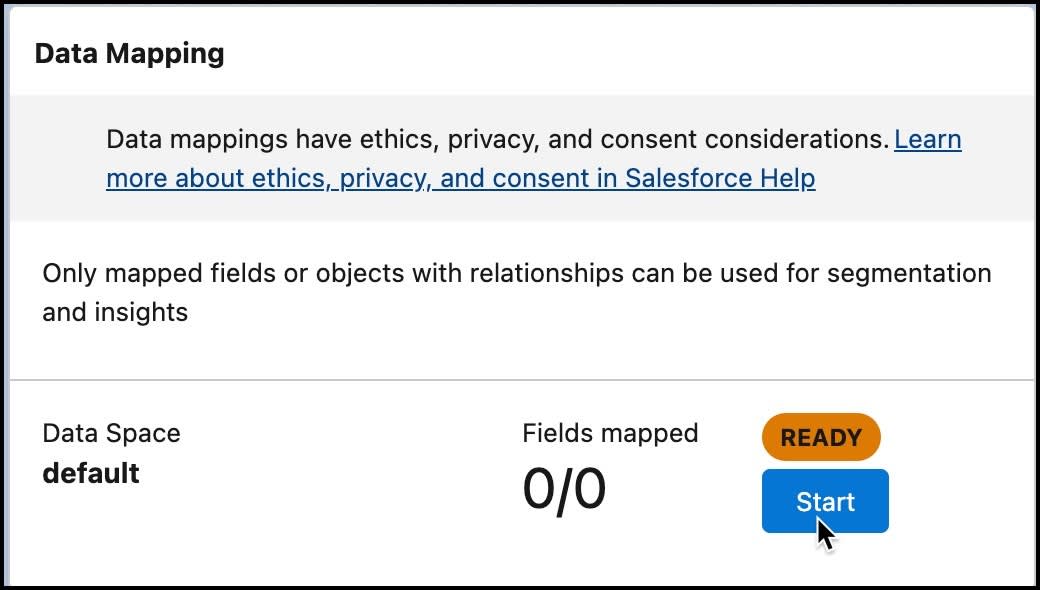
[Image: Data Mapping Start button.]
MAP CASE:
1. On Case_Home data stream, in Data Mapping, click Start
2. From Data Model entities, click Select Objects
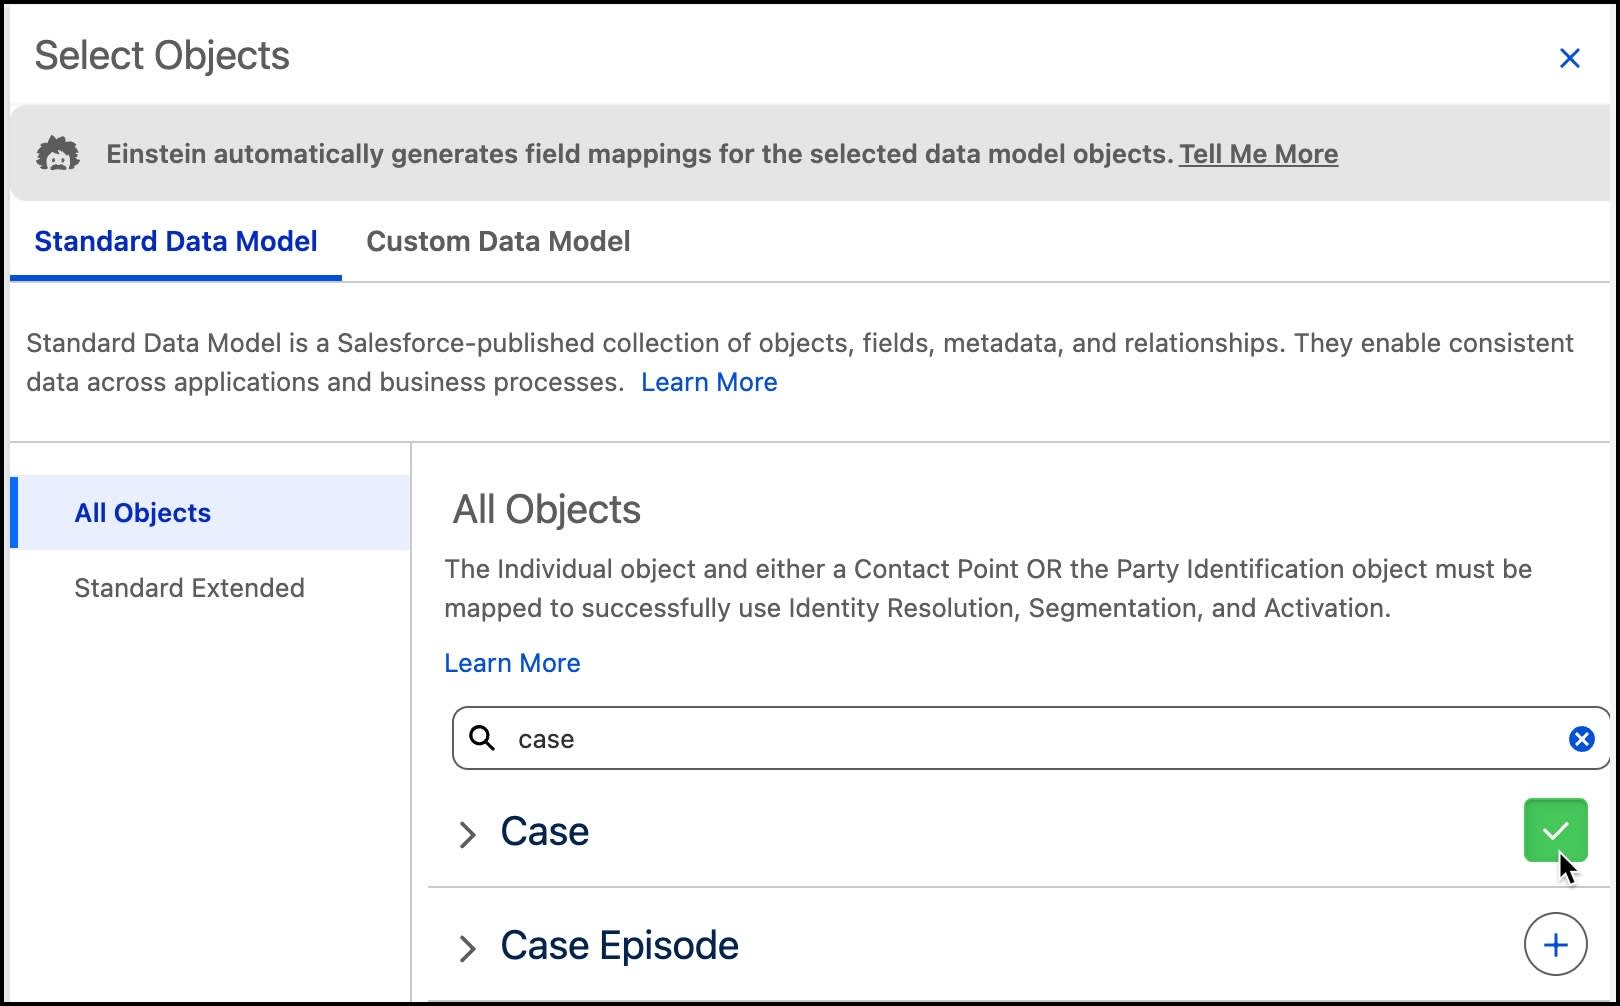
3. Search for Case, click the + icon to add it (green check)
[Image: Map Case objects by clicking the plus button.]
4. Click Done — this automatically maps several fields
5. Manually map the remaining fields:
• Status → Case Status
• Account Id → Account
• Contact Id → Individual
6. Click Save & Close
Map Case History
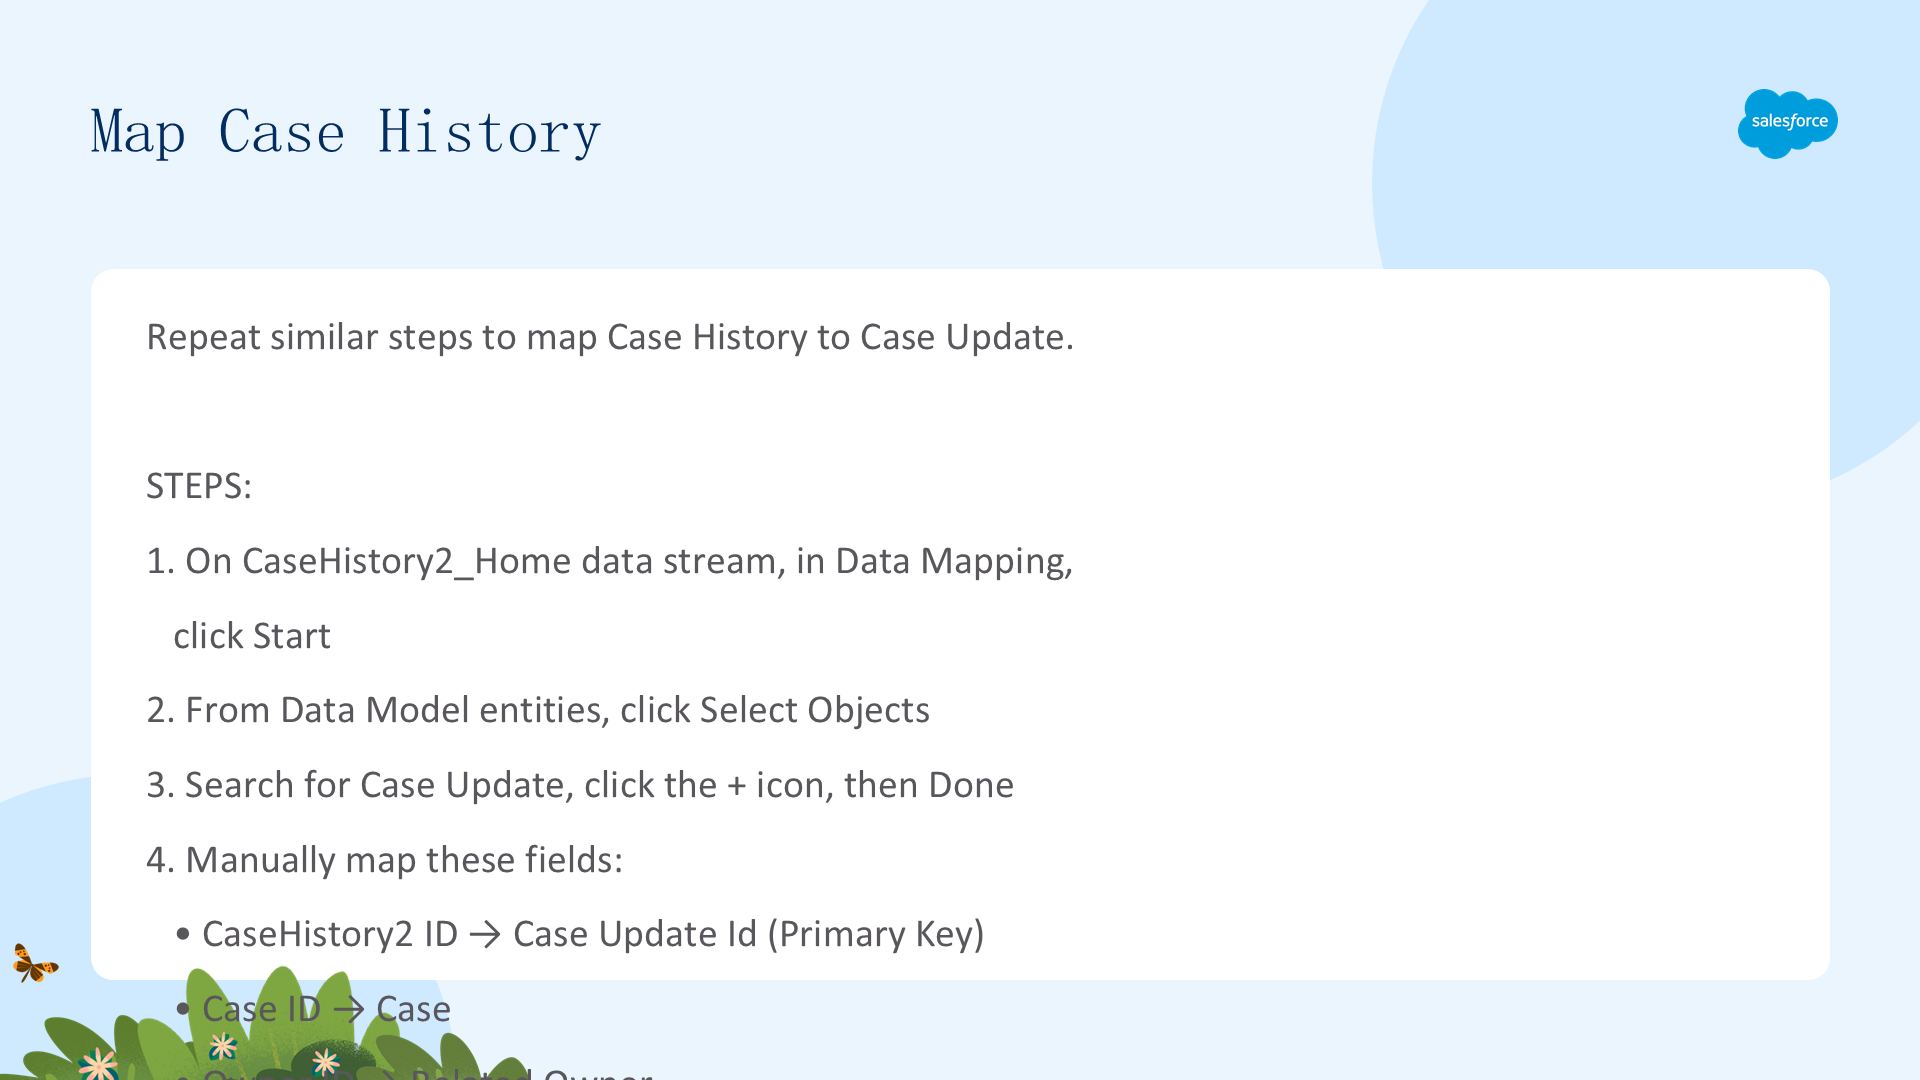
Repeat similar steps to map Case History to Case Update.
STEPS:
1. On CaseHistory2_Home data stream, in Data Mapping,
click Start
2. From Data Model entities, click Select Objects
3. Search for Case Update, click the + icon, then Done
4. Manually map these fields:
• CaseHistory2 ID → Case Update Id (Primary Key)
• Case ID → Case
• Owner ID → Related Owner
• Last Modified By ID → Last Modified By
• Previous Update → Previous Update Date
5. Click Save & Close
Both Case and Case History are now fully mapped to the
Customer 360 Data Model and ready for identity resolution,
insights, and segmentation.
Verify Your Work
Now that you have completed these mapping steps, click
Verify Step to check your work before moving on.
RECAP — WHAT YOU ACCOMPLISHED:
• Created the Is US Based formula field on Lead_Home
with validated TRUE/FALSE output
• Added a custom Is US Based field to the Lead DMO
and mapped the formula field to it
• Mapped Phone to Formatted E164 Phone Number on
Contact Point Phone (required for unification)
• Mapped Case to the Case DMO with Status, Account Id,
and Contact Id (linking cases to Individual)
• Mapped CaseHistory2 to the Case Update DMO with all
required foreign key relationships
All data streams are now mapped and ready for the next step:
identity resolution and unification.
03 Unify Your Data
Identity Resolution Rulesets • Match Rules
Reconciliation Rules • Run and Validate
Learning Objectives — Unit 03
In this step, you will:
• Create an identity resolution ruleset from scratch
• Configure match rules and reconciliation rules
• Validate the output unified profile data
Unify Your Data
Unifying data using identity resolution is the ESSENTIAL
step that turns bits of data into deep insights.
To take advantage of identity resolution, you must first
DEFINE THE RULES that Data 360 uses to determine:
• Which records MATCH across data sources
• Which bits of data are INCLUDED in a customer’s
unified profile
When rulesets run, UNIFIED LINK OBJECTS act as a BRIDGE
between your source data and unified profile data. This
ensures you can always TRACE the origin of each piece of
a unified profile back to its original source.
[Image: Note]
You control the balance: high consolidation rates for
broader matching, or a more conservative approach for
higher precision. The unified link objects preserve
data lineage regardless of which approach you choose.
Map Required Fields
Before configuring identity resolution, check for any
MISSING required field mappings.
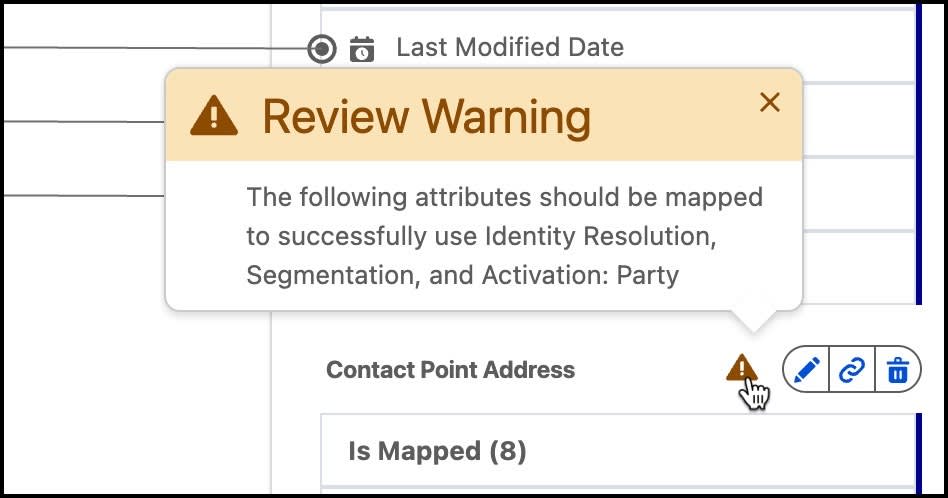
Look for the WARNING ICON indicating a required attribute
has not been mapped.
[Image: Review warning that a missing attribute needs to be mapped.]
STEPS TO FIX:
1. From Data Streams, select the Contact_Home data stream
2. Under Data Mapping, click Review
3. Map Phone from the Contact_Home DLO to Formatted E164
Phone Number under the Contact Point Phone entity
4. Click Save & Close
With all required contact point mappings in place, you
are ready to create the identity resolution ruleset.
Create an Identity Resolution Ruleset
You will create ONE ruleset that matches source records
from the Individual object. Once run, it creates unified
individual profiles plus the Unified Individual, unified
link, and unified contact point objects.
SETUP STEPS:
1. From Data Cloud, select the Identity Resolutions tab
and click New
2. Select Create New Ruleset, click Next
3. Default Data Space selected → choose Individual from
the Primary Data Model Object dropdown
4. Keep the Ruleset Id blank (only running one ruleset),
click Next
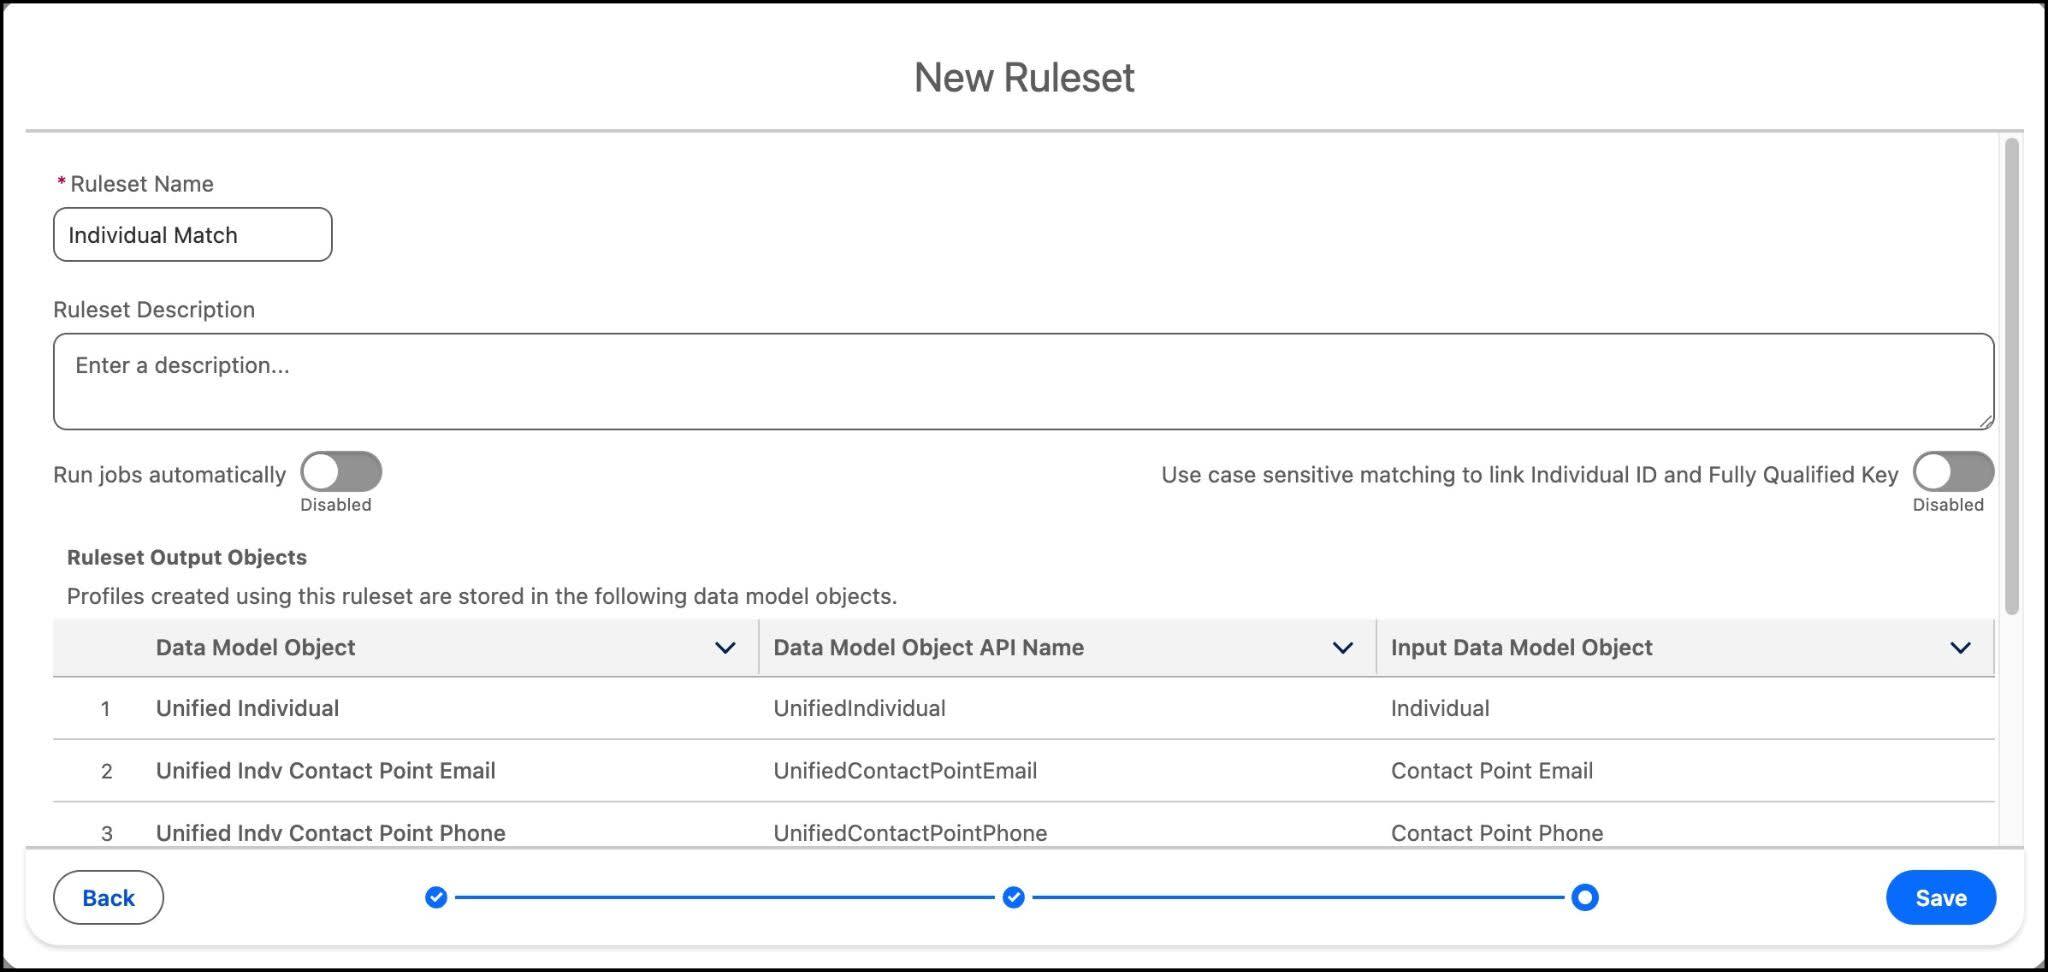
5. Name the ruleset: Individual Match
6. Disable Run jobs automatically to reduce costs.
Also disable the Use case sensitive matching toggle.
[Image: Create a new ruleset.]
7. Click Save
Now the ruleset exists but has no rules configured yet.
Configure Match Rules
Once saved, it is time to CONFIGURE your match rules.
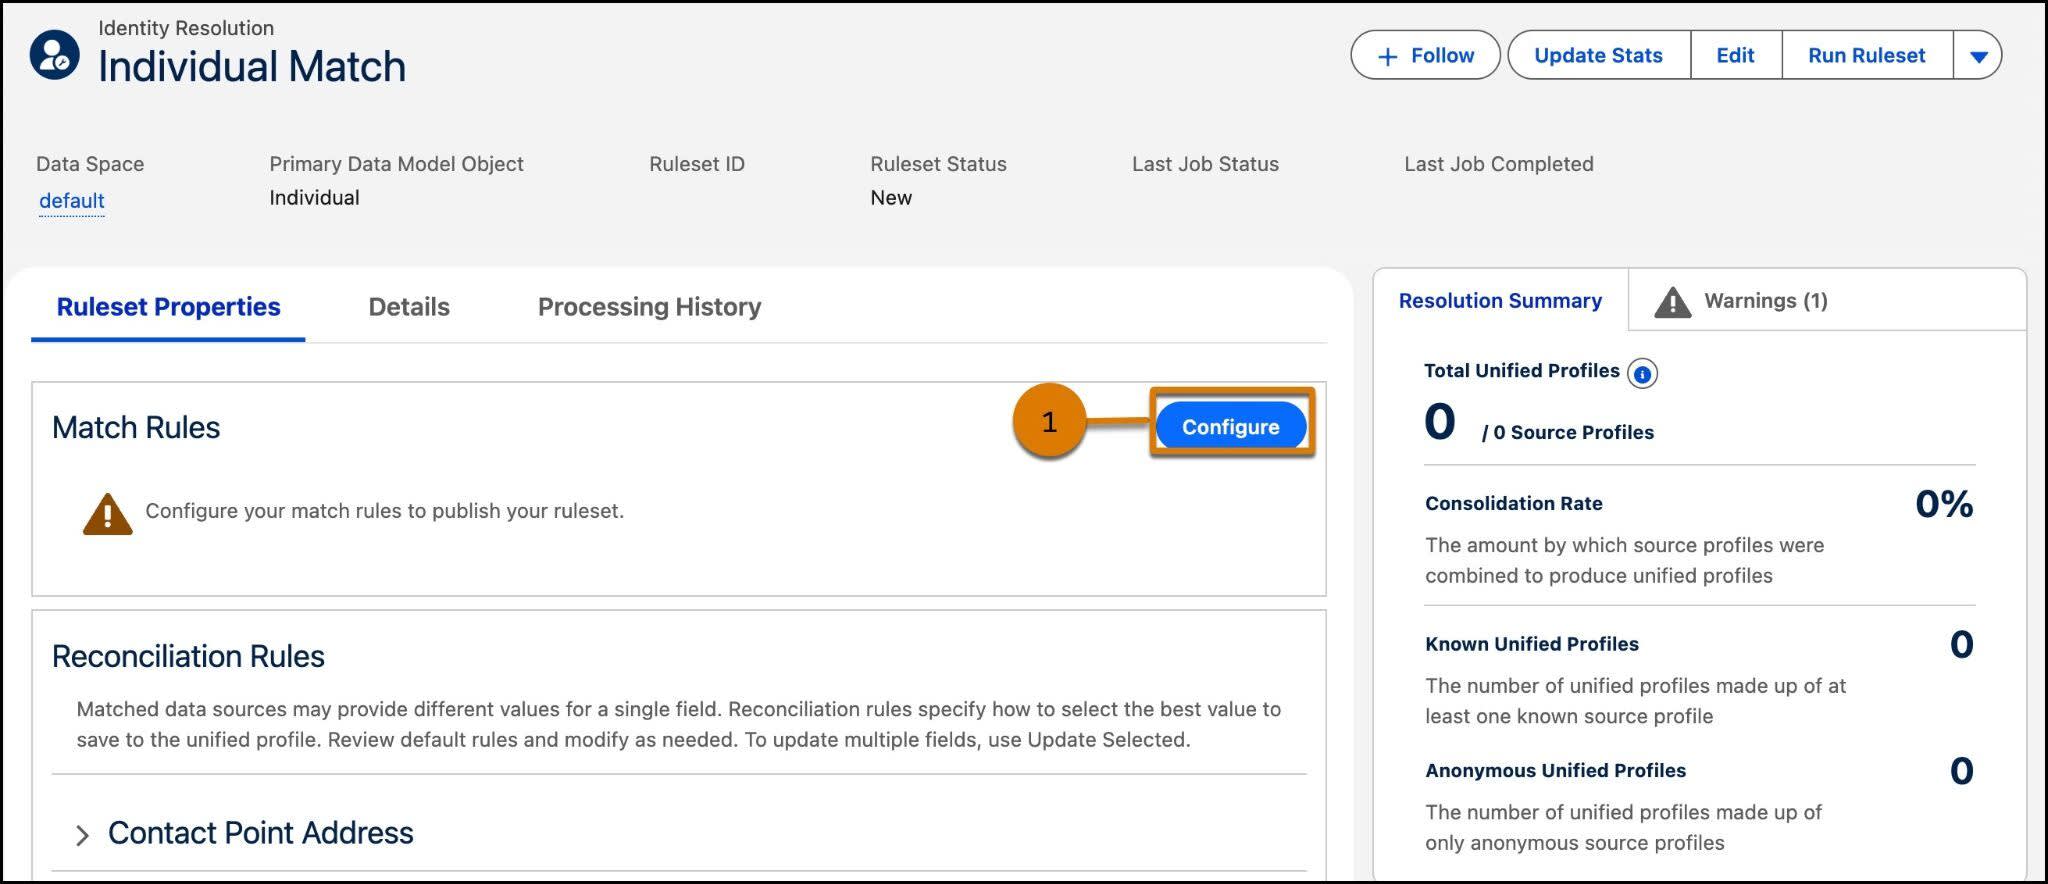
[Image: Screenshot showing the location of the Configure button.]
FIRST MATCH RULE — Fuzzy Name and Normalized Address:
1. From Ruleset Properties, under Match Rules, click
Configure (1)
2. Review the instructions, click Next
3. Click Configure to select your first match rule
4. Select Fuzzy Name and Normalized Address, click Next
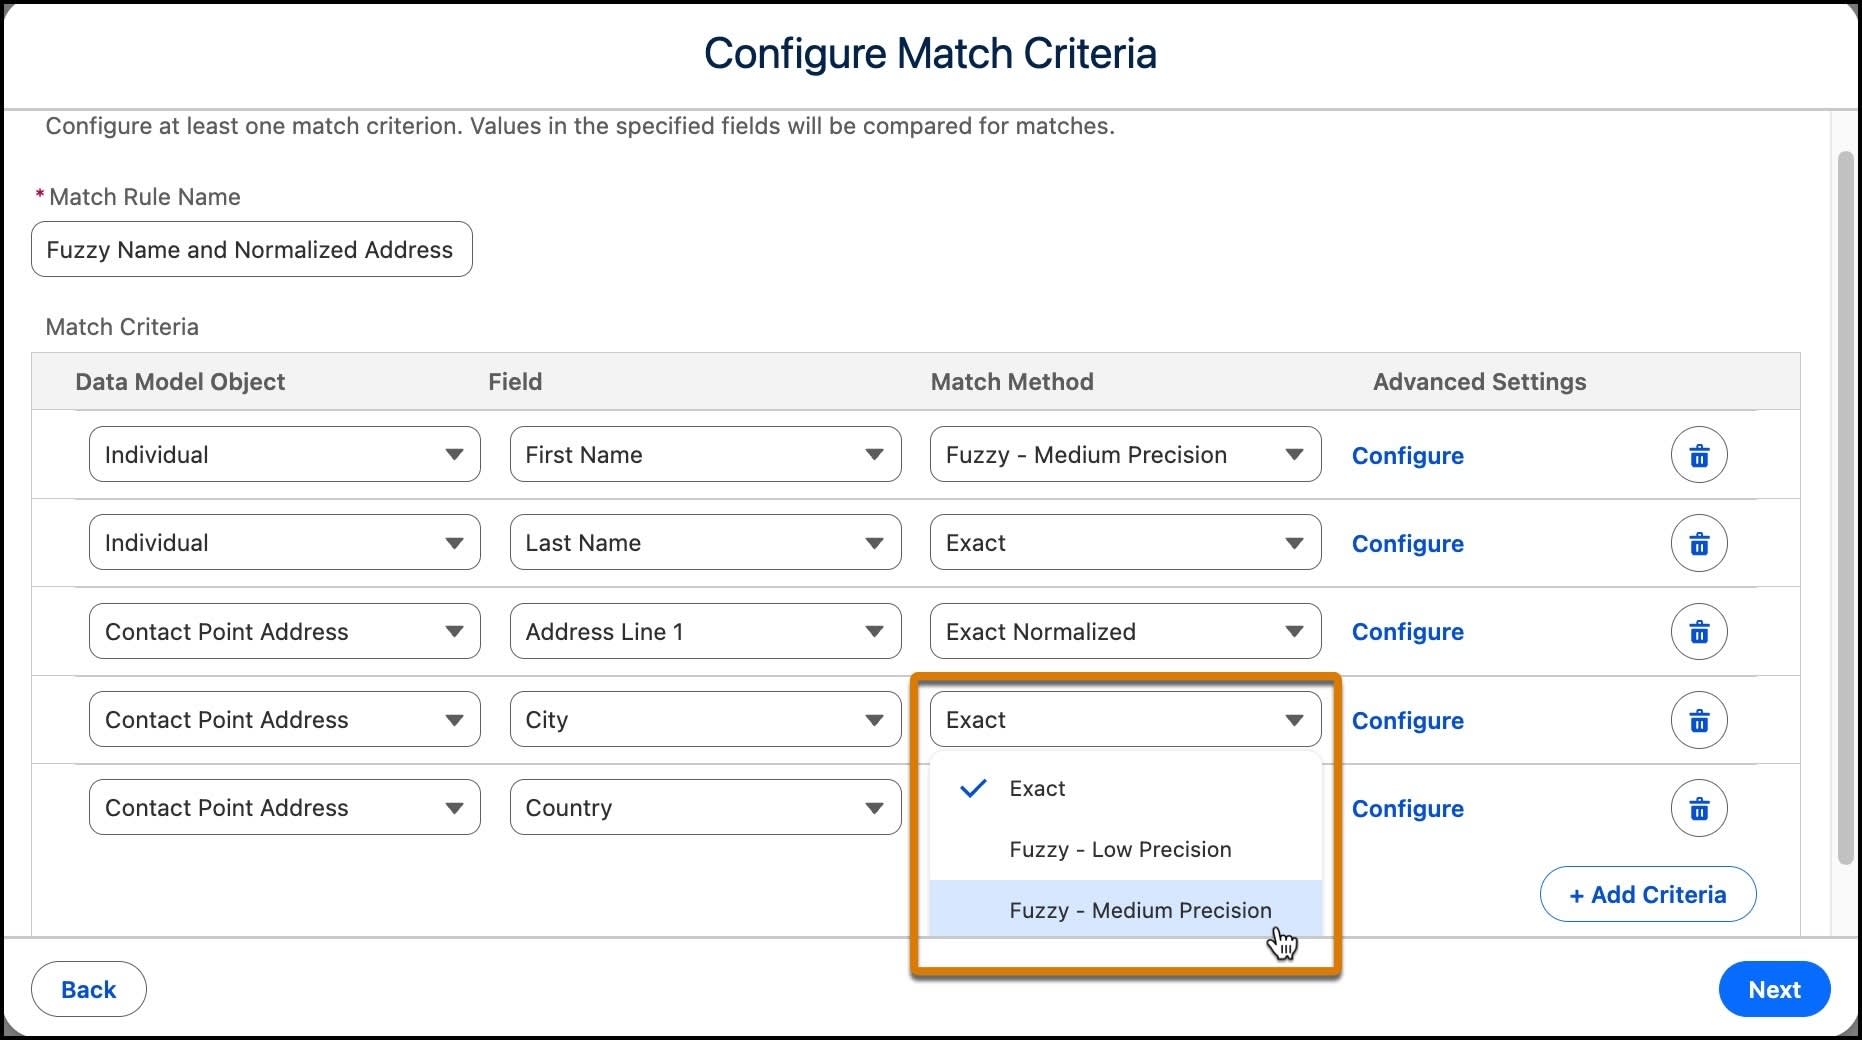
5. Change the Match Method for City from Exact to
Fuzzy – Medium Precision (cities can be misspelled!)
[Image: Selection of Fuzzy-Medium Precision for city.]
6. Click Next
This rule links profiles where the first name is a fuzzy
match AND the normalized address matches. The fuzzy city
match accounts for typos like "San Francicso."
Add a Second Match Rule
Now add a SECOND match rule to increase consolidation.
1. Click Add Match Rule
2. Select Fuzzy Name and Normalized Phone and
Normalized Email, click Next
[Image: Match rule selection.]
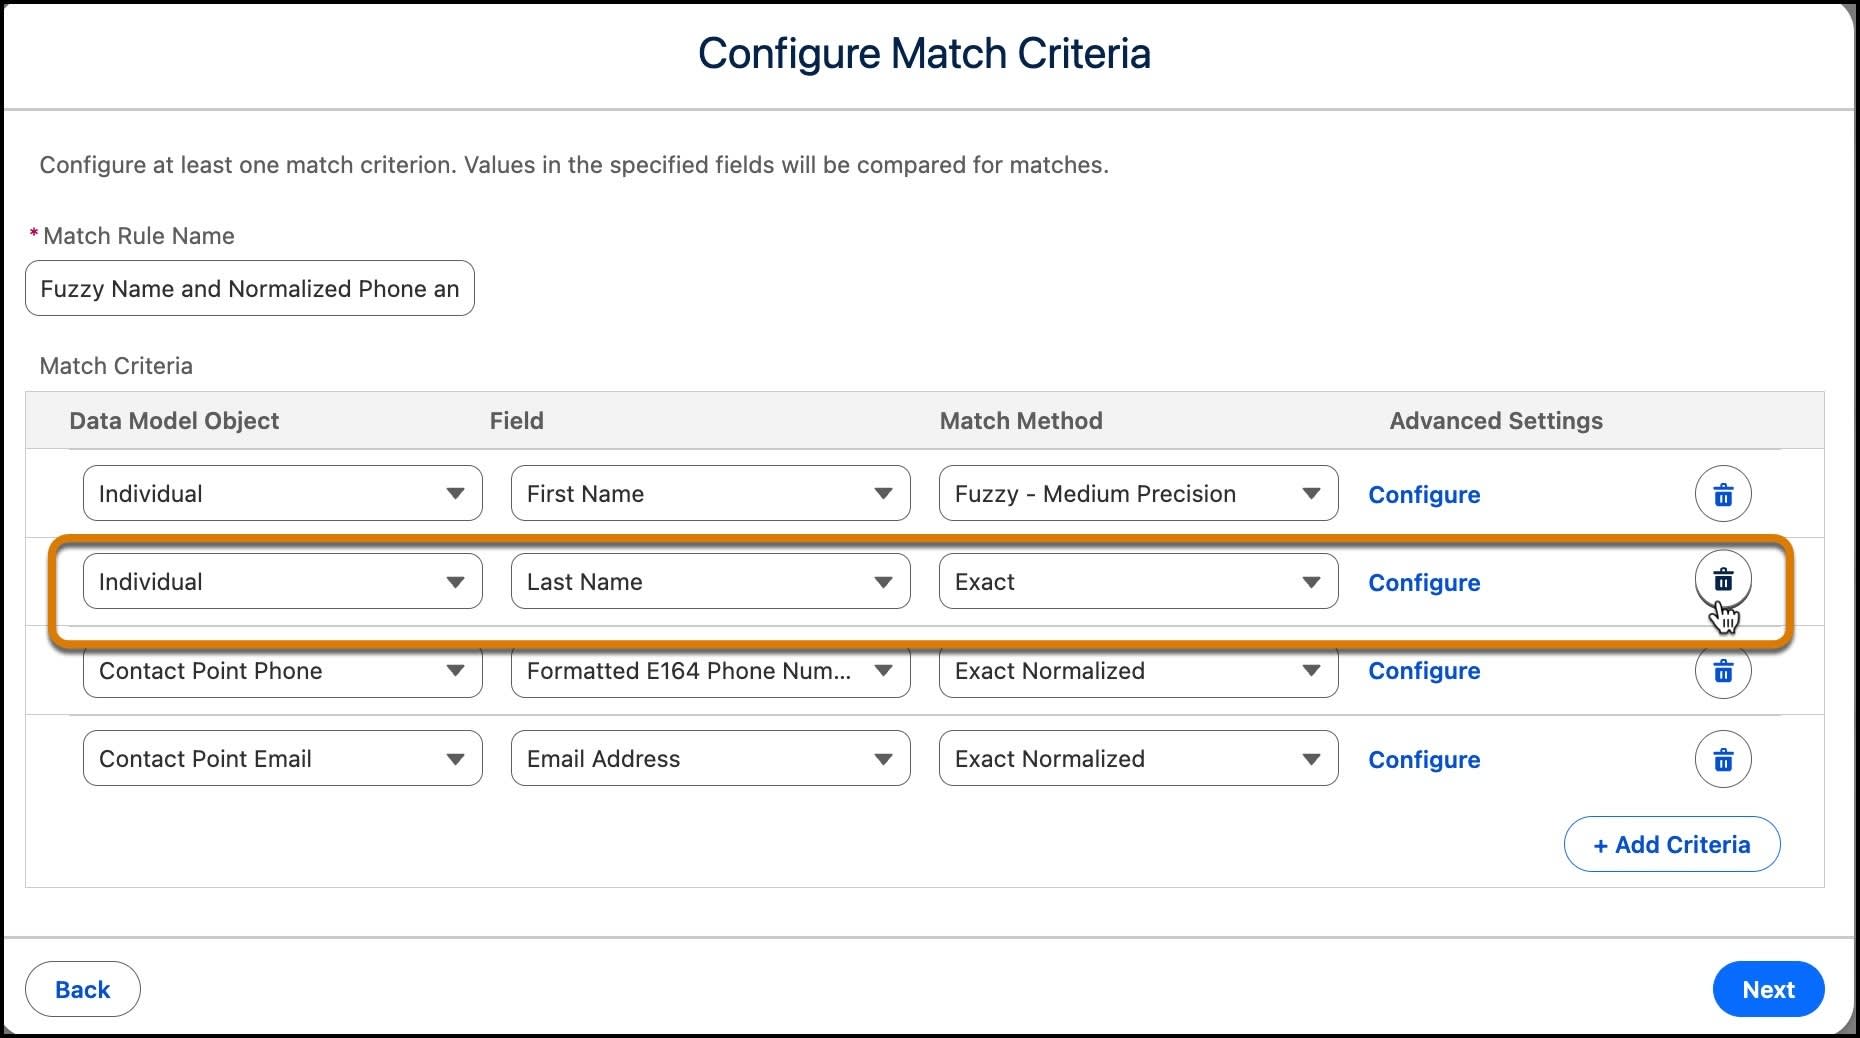
3. To customize and find MORE matches, remove Last Name
by clicking the trashcan icon
[Image: Select trashcan for the Last Name row.]
4. Click Next
5. Once done, click Save
WHY REMOVE LAST NAME? Last names change (marriage, divorce)
and removing it from this rule increases match flexibility.
The combination of fuzzy first name + normalized phone +
normalized email is already strong enough for confident
matching.
Review Reconciliation Rule Concepts
When matches are found for fields where only ONE value
makes sense (like a person’s first name), the RECONCILIATION
RULE determines which record contributes the value.
EXAMPLE: Three records match to the same email:
• Liz Berkeley — eberkeley@example.com
• Elizabeth Berkeley — eberkeley@example.com
• Eliza Berkeley — eberkeley@example.com
Data 360 creates ONE unified profile. The unified link
object links to ALL three first names, but only ONE can
be displayed as “First Name” in the unified profile.
RECONCILIATION OPTIONS:
• Most Recent → uses the name from the most recently
updated source record
• Most Frequent → uses the value that appears most often
• Source Priority → you RANK your data sources by trust
For ID fields, Source Priority helps standardize which
system’s identifier is used in the unified profile.
Update Reconciliation Rules
Now apply these concepts to fix the reconciliation warning
for Individual.Individual Id.
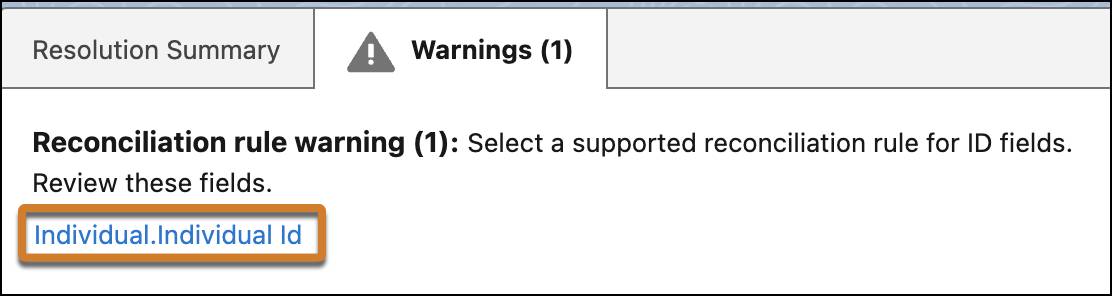
[Image: Screenshot of open warnings in the warnings tab.]
STEPS:
1. Click the Warnings tab on the right side of the page
2. Click Individual.Individual Id to modify
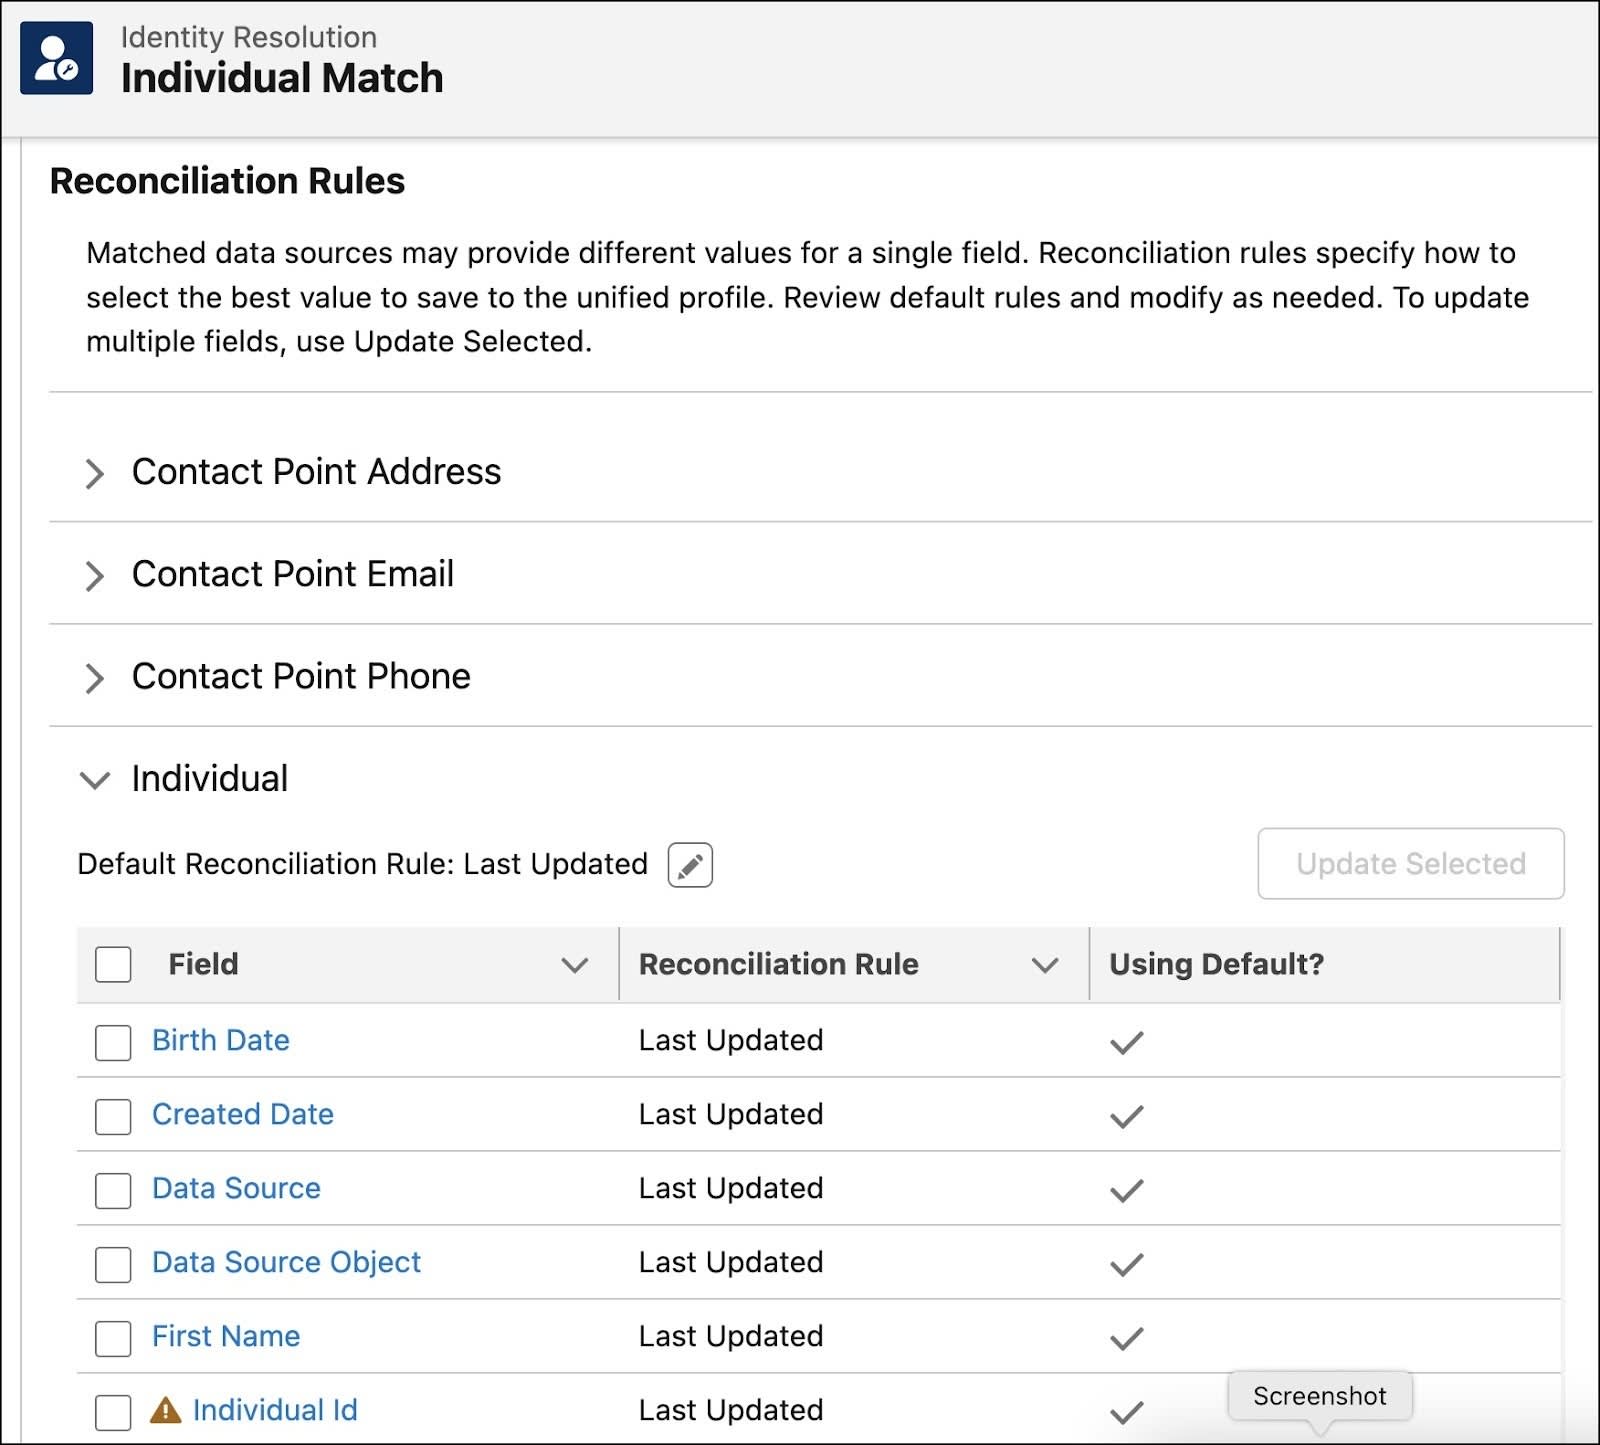
[Image: Reconciliation Rules.]
3. Select the checkbox next to Individual ID, then click
Update Selected (or click the field link)
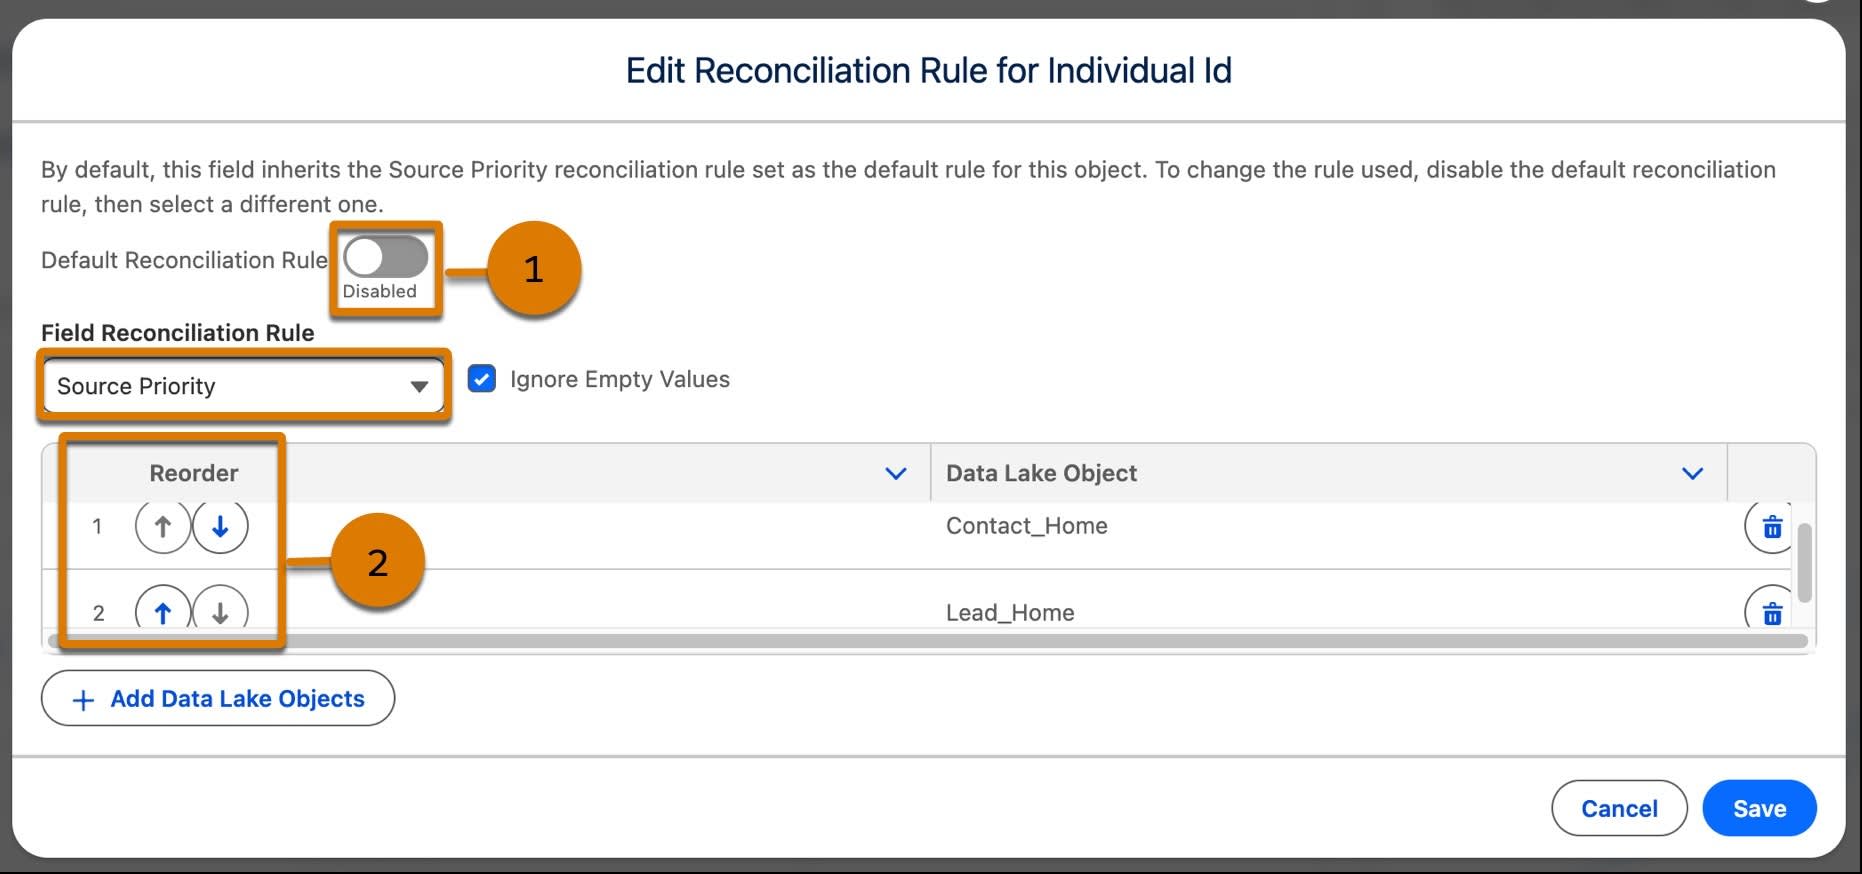
4. Disable the Default Reconciliation Rule (1)
5. Set the Field Reconciliation Rule to Source Priority
6. Use the arrows (2) to order sources:
Contact_Home FIRST, then Lead_Home SECOND
[Image: Setup of the Field Reconciliation Rule.]
7. Click Save
8. Click Run Ruleset (1)
[Image: Run Ruleset button highlighted.]
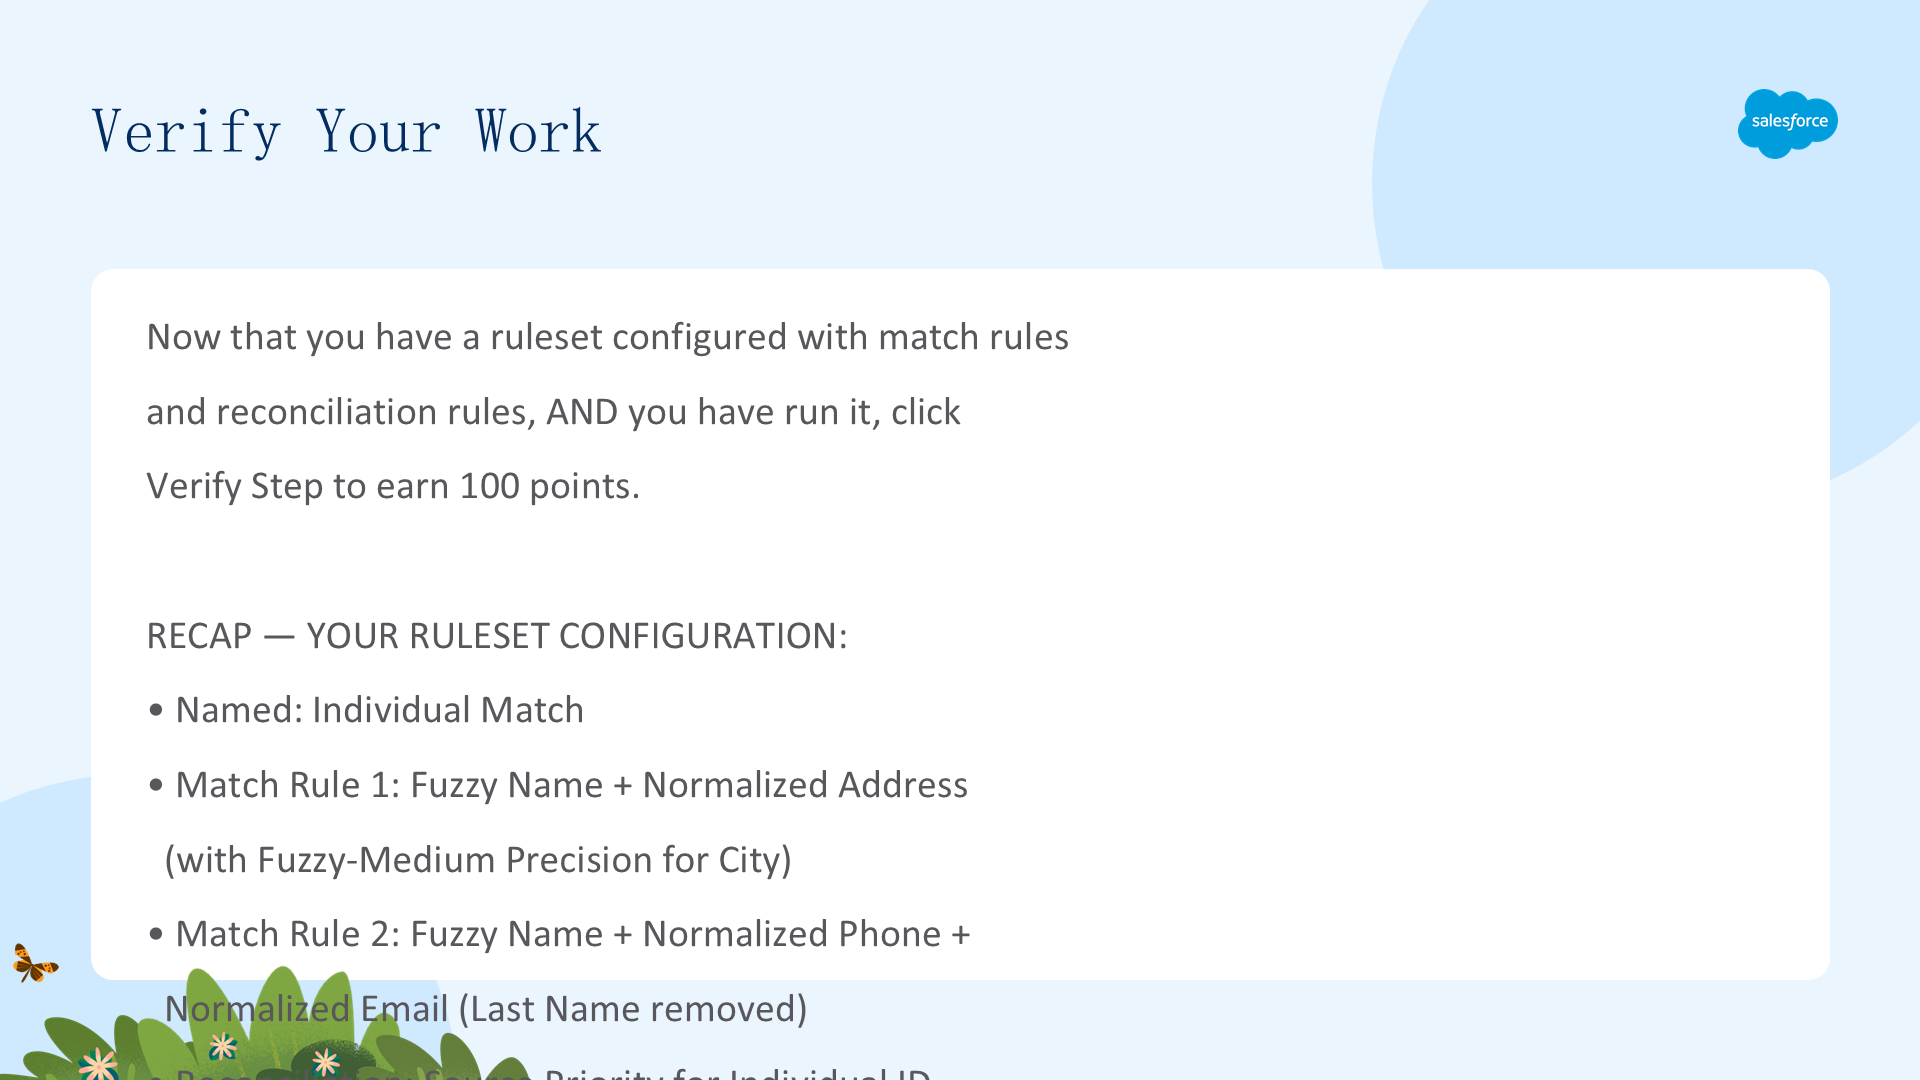
Verify Your Work
Now that you have a ruleset configured with match rules
and reconciliation rules, AND you have run it, click
Verify Step to earn 100 points.
RECAP — YOUR RULESET CONFIGURATION:
• Named: Individual Match
• Match Rule 1: Fuzzy Name + Normalized Address
(with Fuzzy-Medium Precision for City)
• Match Rule 2: Fuzzy Name + Normalized Phone +
Normalized Email (Last Name removed)
• Reconciliation: Source Priority for Individual ID
(Contact_Home first, then Lead_Home)
• Ruleset has been RUN
For this exercise, the verify step checks that the rule
was set up correctly. You do not have to wait for identity
resolution to finish processing before verifying.
04 Create an Insight
Calculated Insights • Visual Insights Builder
Join • Aggregate • Dimensions • View Results
Learning Objectives — Unit 04
In this project step, you will:
• Review calculated insight functionality
• Create a calculated insight with the visual builder
• View your insight results in Data Explorer
About Data 360 Insights
With a unified and harmonized dataset, Data 360 provides
POWERFUL TOOLS for analysis, insight generation, and
prediction.
This project focuses on CALCULATED INSIGHTS — used to:
• Evaluate PERFORMANCE
• Understand CUSTOMER BEHAVIOR
• SPEED UP complex queries
• SIMPLIFY segmentation
• Enrich data for activations and personalization
Calculated insights can define segment criteria and
personalization attributes using metrics, dimensions,
and filters. You can add them to activations to enable
journey decisions and message personalization in
Marketing Cloud Engagement.
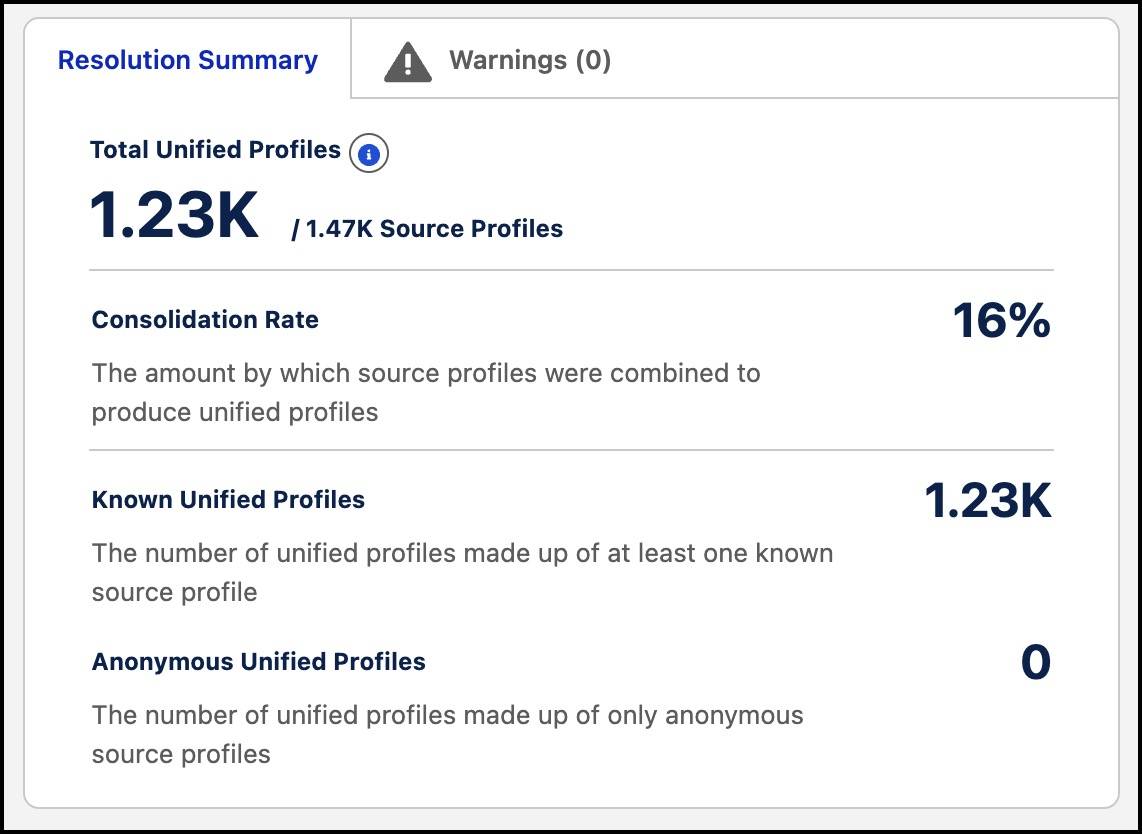
Verify Unification
Before creating an insight, make sure the identity resolution
ruleset from Unit 3 has COMPLETED processing.
You know it is done when data shows up in the RESOLUTION
SUMMARY section.
STEPS:
1. From Data Cloud, select the Identity Resolutions tab
2. Select the ruleset you created (Individual Match)
3. Verify data is displaying — this can take some time
[Image: Ruleset resolution summary showing total unified profiles.]
[Image: Note]
You may see a warning that some records were skipped. That
is EXPECTED behavior for this scenario.
Once the Resolution Summary shows data, you are ready to
create your calculated insight.
Create a Calculated Insight — Getting Started
Calculate the number of cases for EACH unified individual.
If you had connected data from multiple service systems
(e.g., Zendesk), having a total case count across ALL
systems would be extremely valuable.
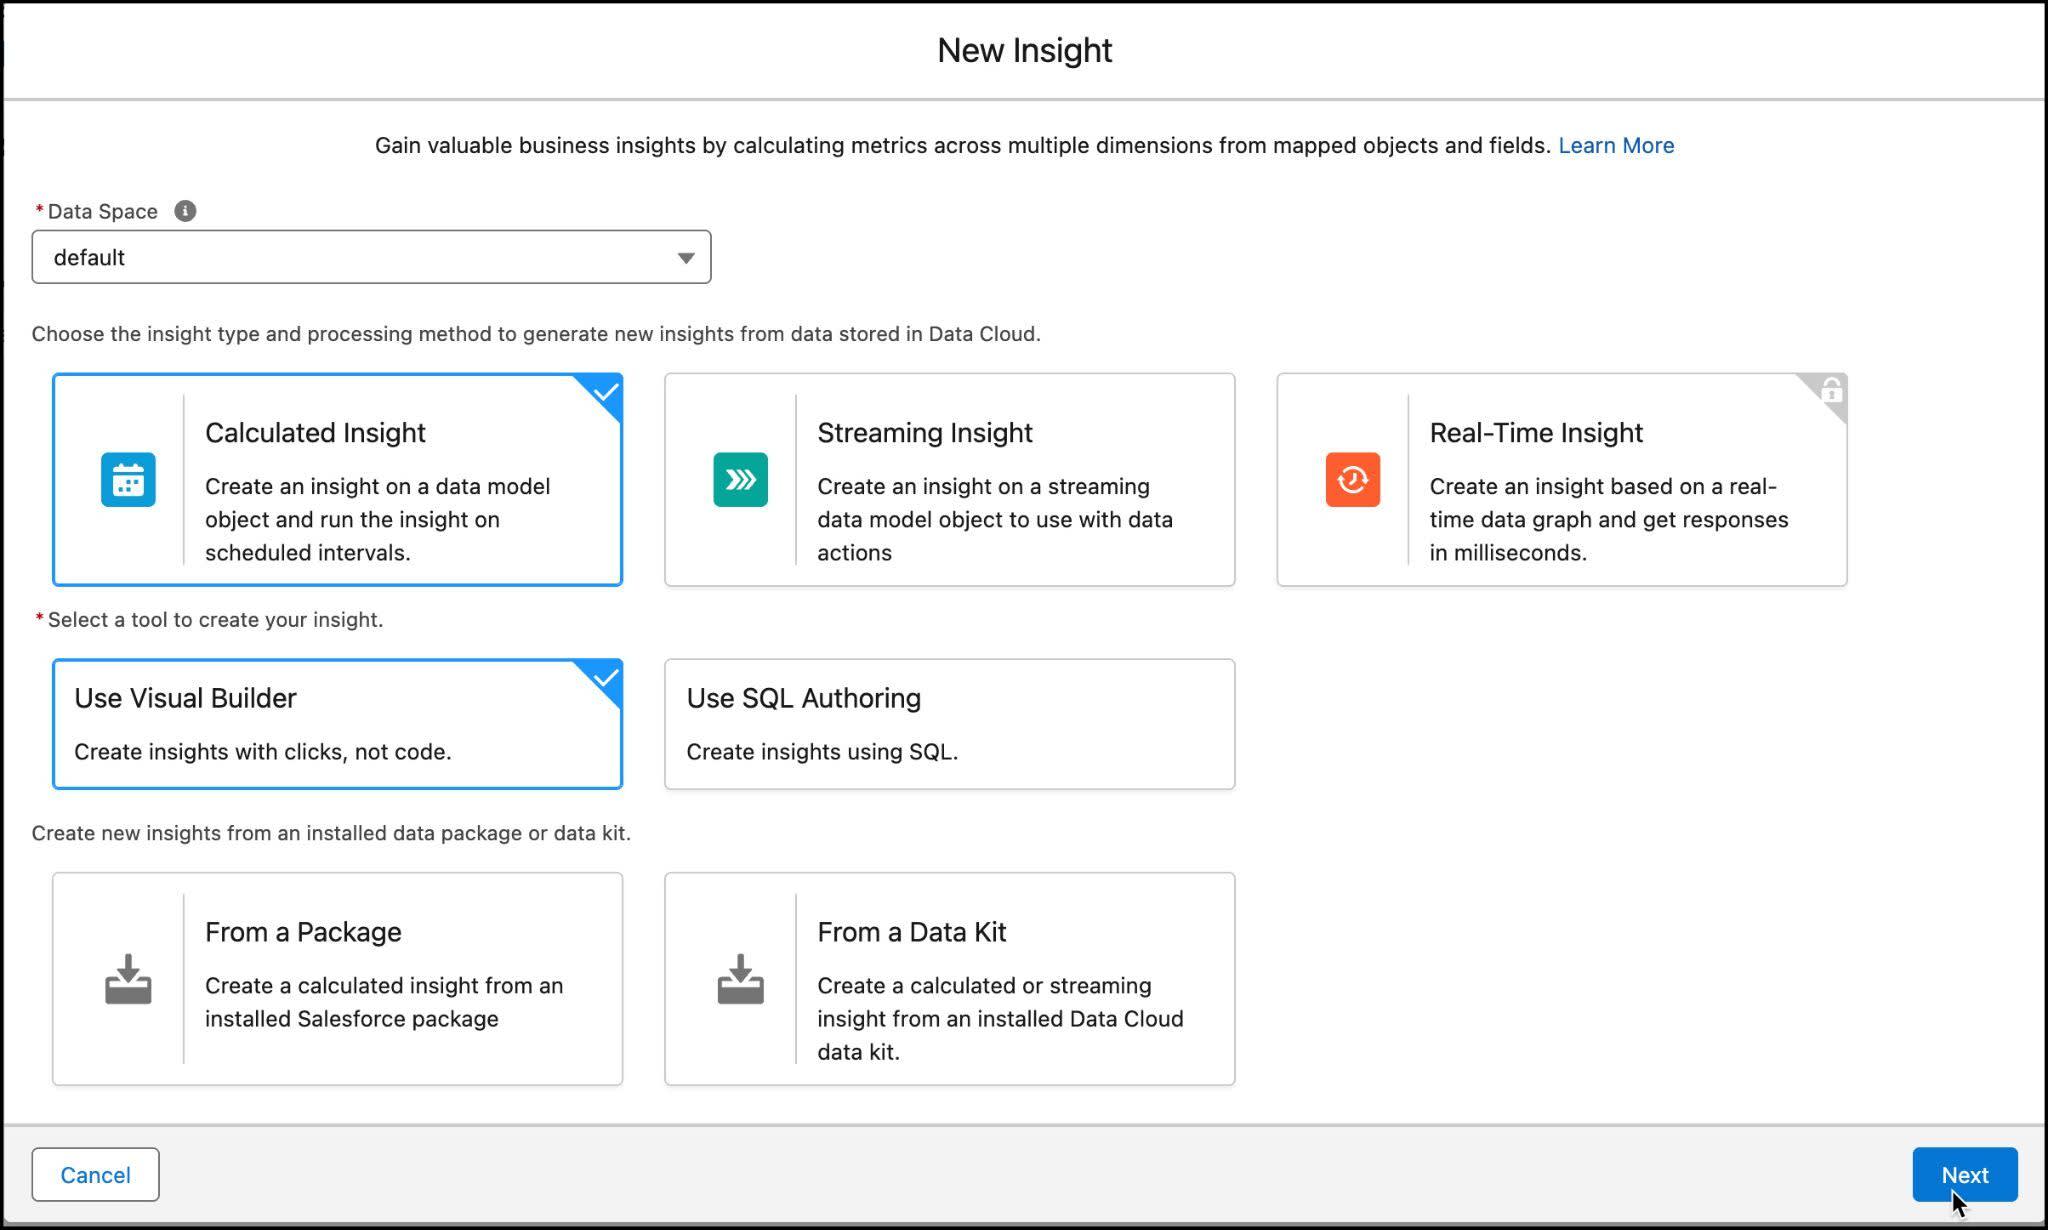
[Image: New Insight window with Create with Visual Builder selected.]
STEPS:
1. Go to the Calculated Insights tab, click New
2. Default data space prechosen → select Calculated
Insight and Use Visual Builder, click Next
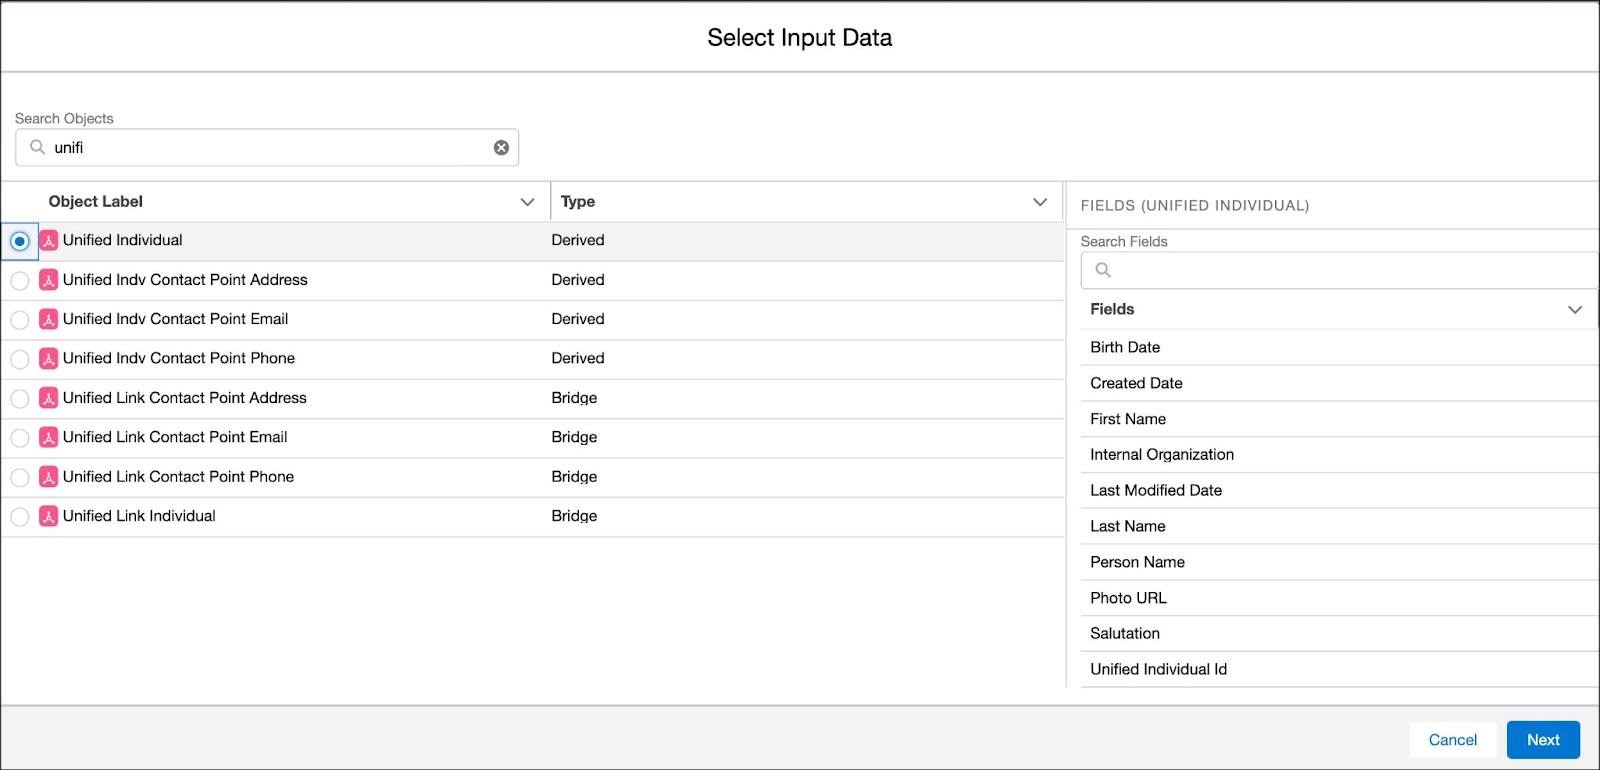
[Image: Select Input Data window with Individual selected.]
3. In the Select Input Data modal, search for and
select Unified Individual as the first object
4. Click Next
Unified Individual is the DMO created AFTER running
identity resolution — it contains reconciled data
from all linked source profiles.
Add a Join
Now connect Unified Individual to Case data using a JOIN.
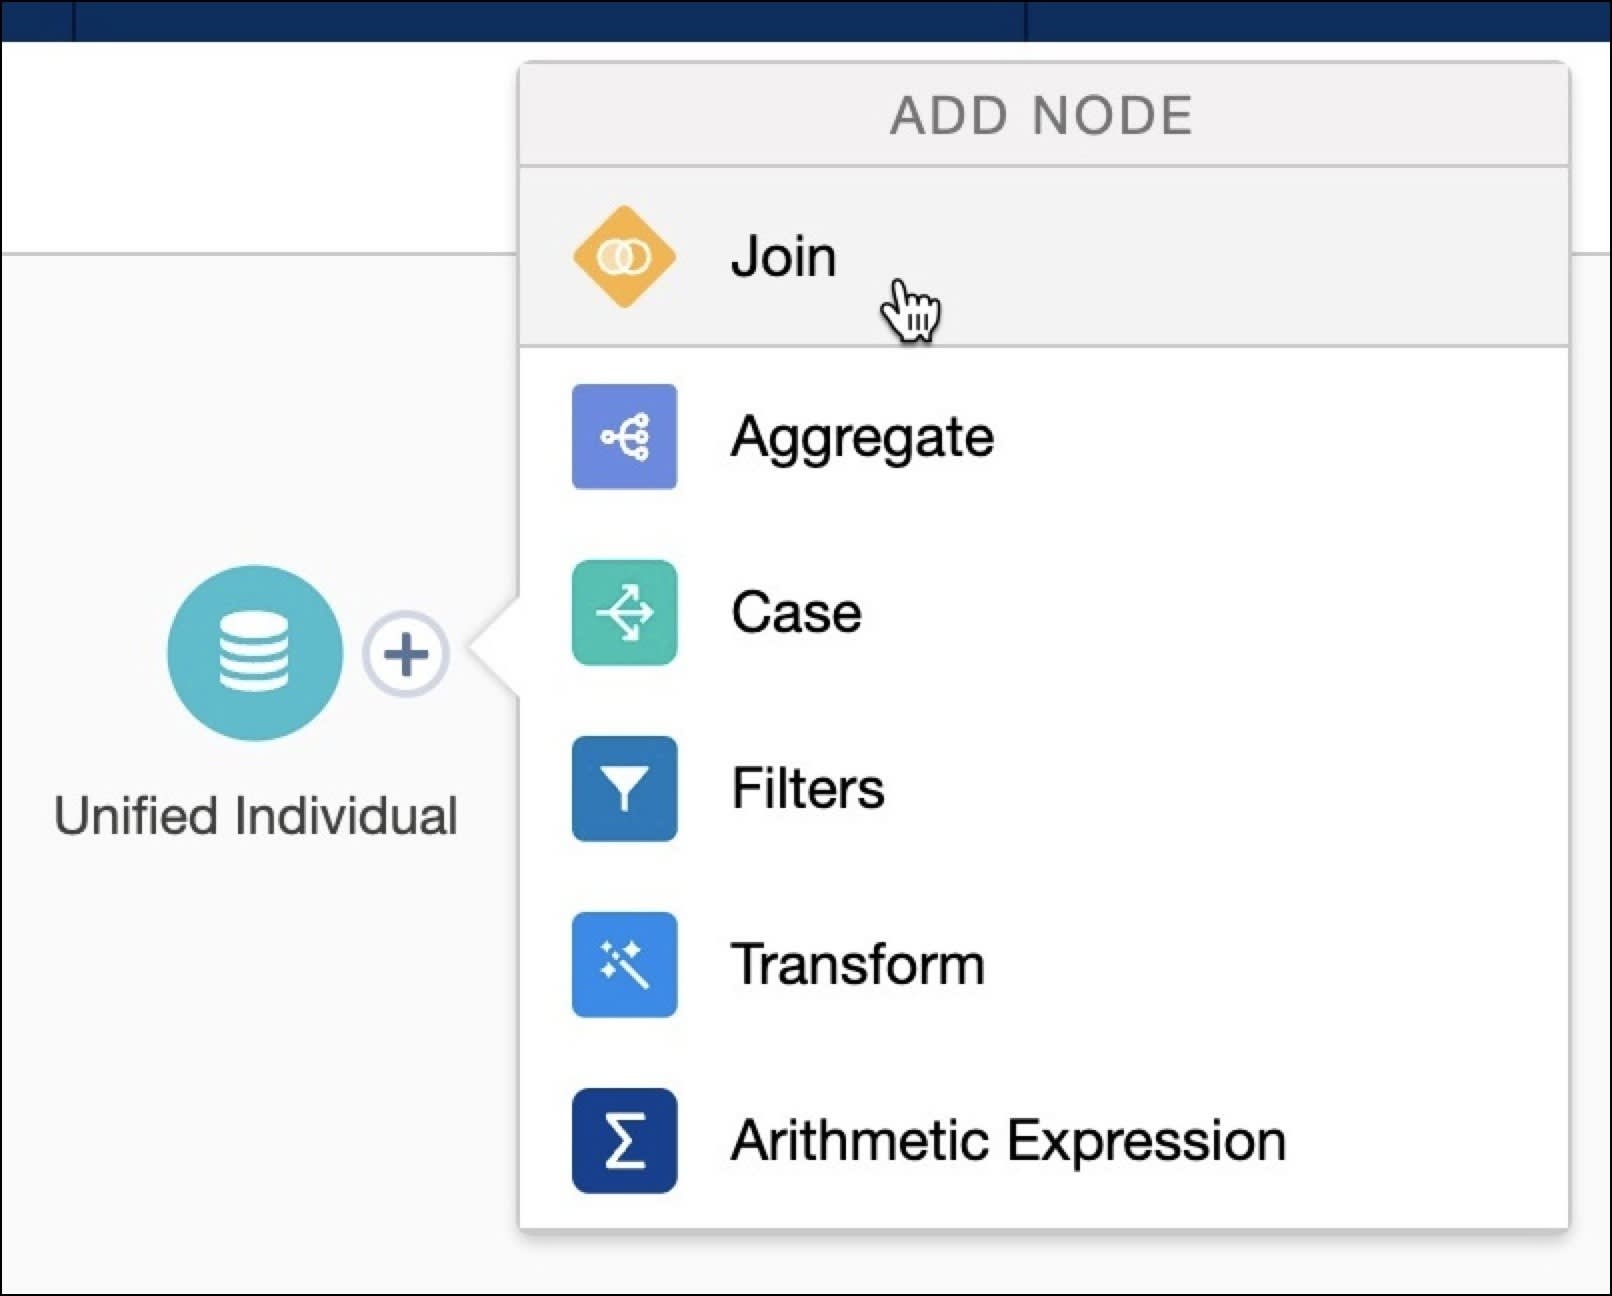
[Image: Calculated Insights Builder showing Add Node with Join option.]
STEPS:
1. In the Visual Insights Builder, click the + next to
Unified Individual and select Join
2. Select Case and click Next
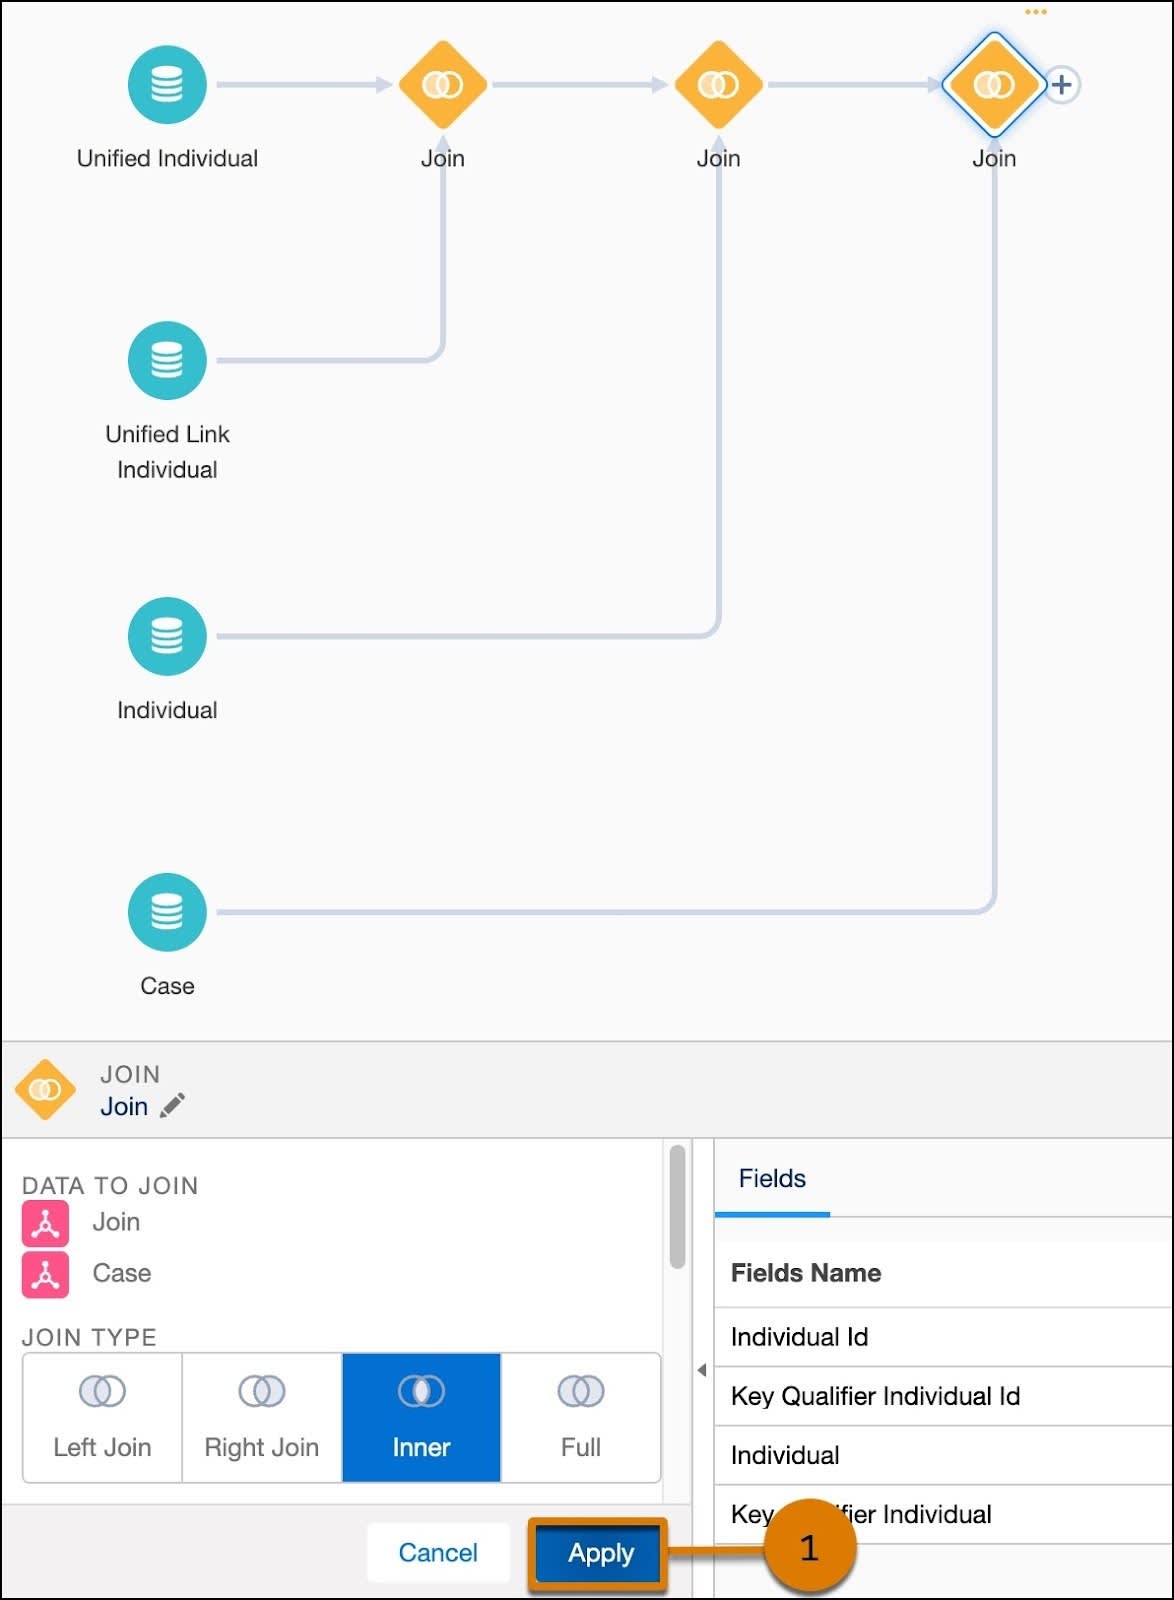
Notice that this AUTOMATICALLY adds and joins multiple
intermediate objects to create a proper join path from
Unified Individual to Case.
[Image: Visual Insights Builder with Unified Individual joined to Case.]
3. Click Apply (1) to verify your selection — nothing
changes on-screen, but this saves your work
The join creates the relationship bridge needed to
connect unified customer identities with their cases.
Add an Aggregate
Now add the METRIC you want to calculate: the number of
cases per unified individual.
[Image: Note]
TIP: Enter values manually or copy them in advance so you
can paste while working in the builder. If you click out
of the window, it closes and you must start again.
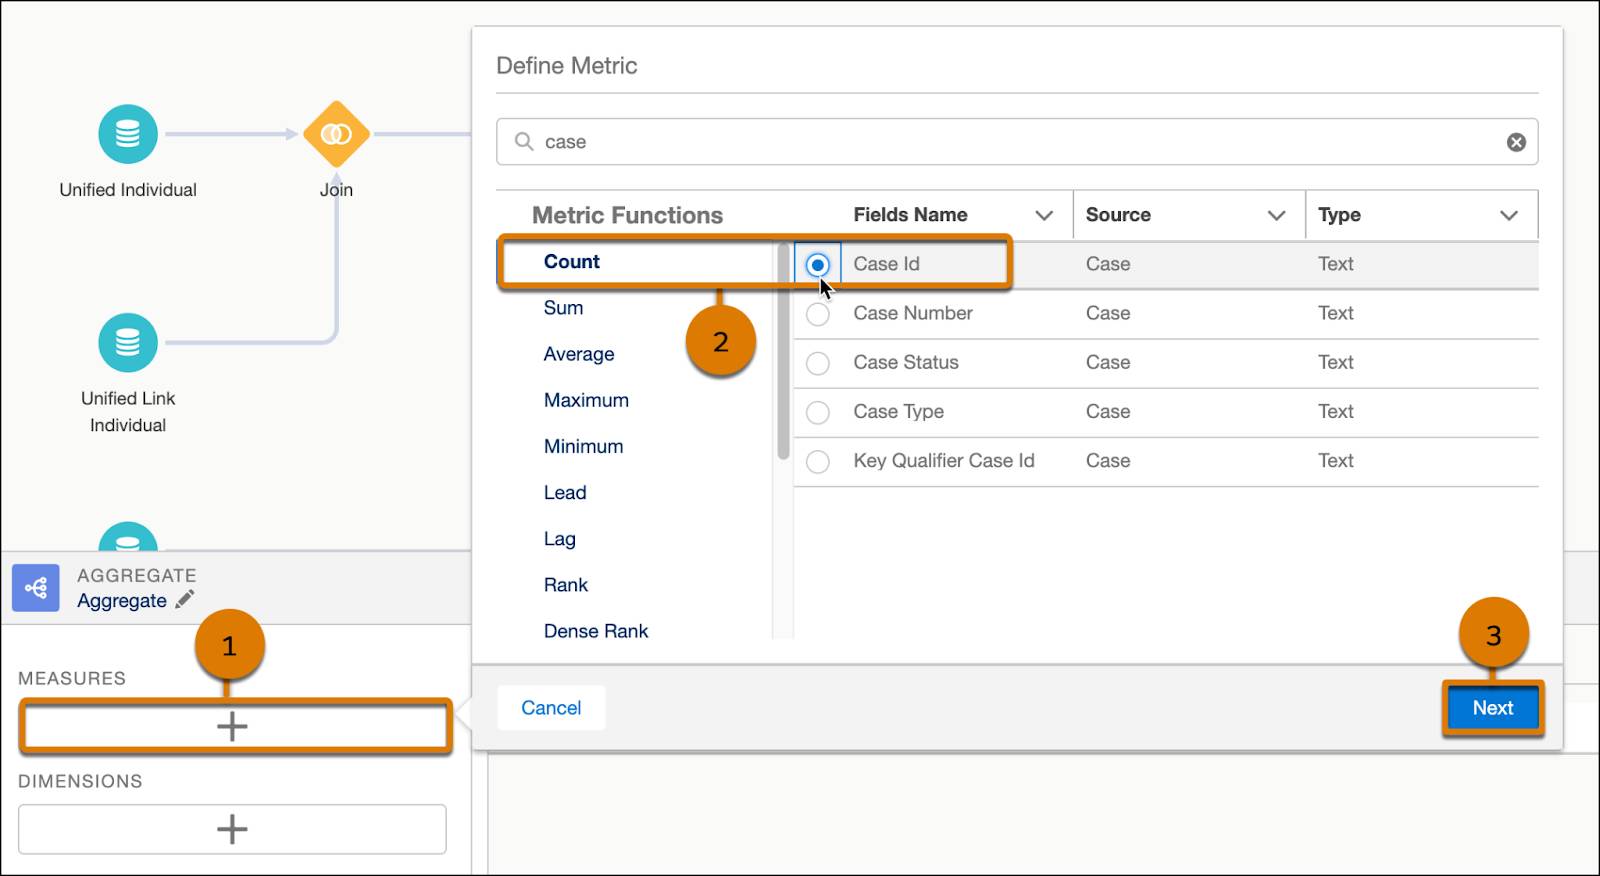
[Image: The measures button, metric function count, and Next button.]
STEPS:
1. Click the + on the last Join (or click the ellipses
if + does not work)
2. Select Aggregate
3. For Measures, click + (1). From the Count section,
search for and select Case Id (2)
4. Click Next (3)
5. For Metric Name, enter: Count Case ID
(Metric API Name auto-populates as Count_Case_ID)
6. Click Apply
Add Dimensions
Next, GROUP the data by adding dimensions — these determine
how your metric is sliced and organized.
ADD THREE DIMENSIONS:
1. Unified Individual Id (from the FIRST Unified
Individual source listed):
• Dimension Name: Unified Individual
• This groups results by unique customer
2. Case Status:
• Dimension Name: Case Status
• This shows the breakdown by case status
(Open, Closed, Escalated, etc.)
3. Last Name (from Unified Individual source):
• Dimension Name: Last Name
• This adds the customer surname for readability
For each dimension: click + under Dimensions, select the
field, click Next, enter the Dimension Name, click Apply.
After adding all three dimensions, click Apply for the
Aggregate selections to finalize.
Save Your Work and Publish
Finalize and publish your calculated insight.
SAVE AND RUN:
1. Select Save and Run
2. Name your calculated insight: Unified Individual
Case Counts, click Next
3. Leave the schedule as Not Scheduled, click Enable
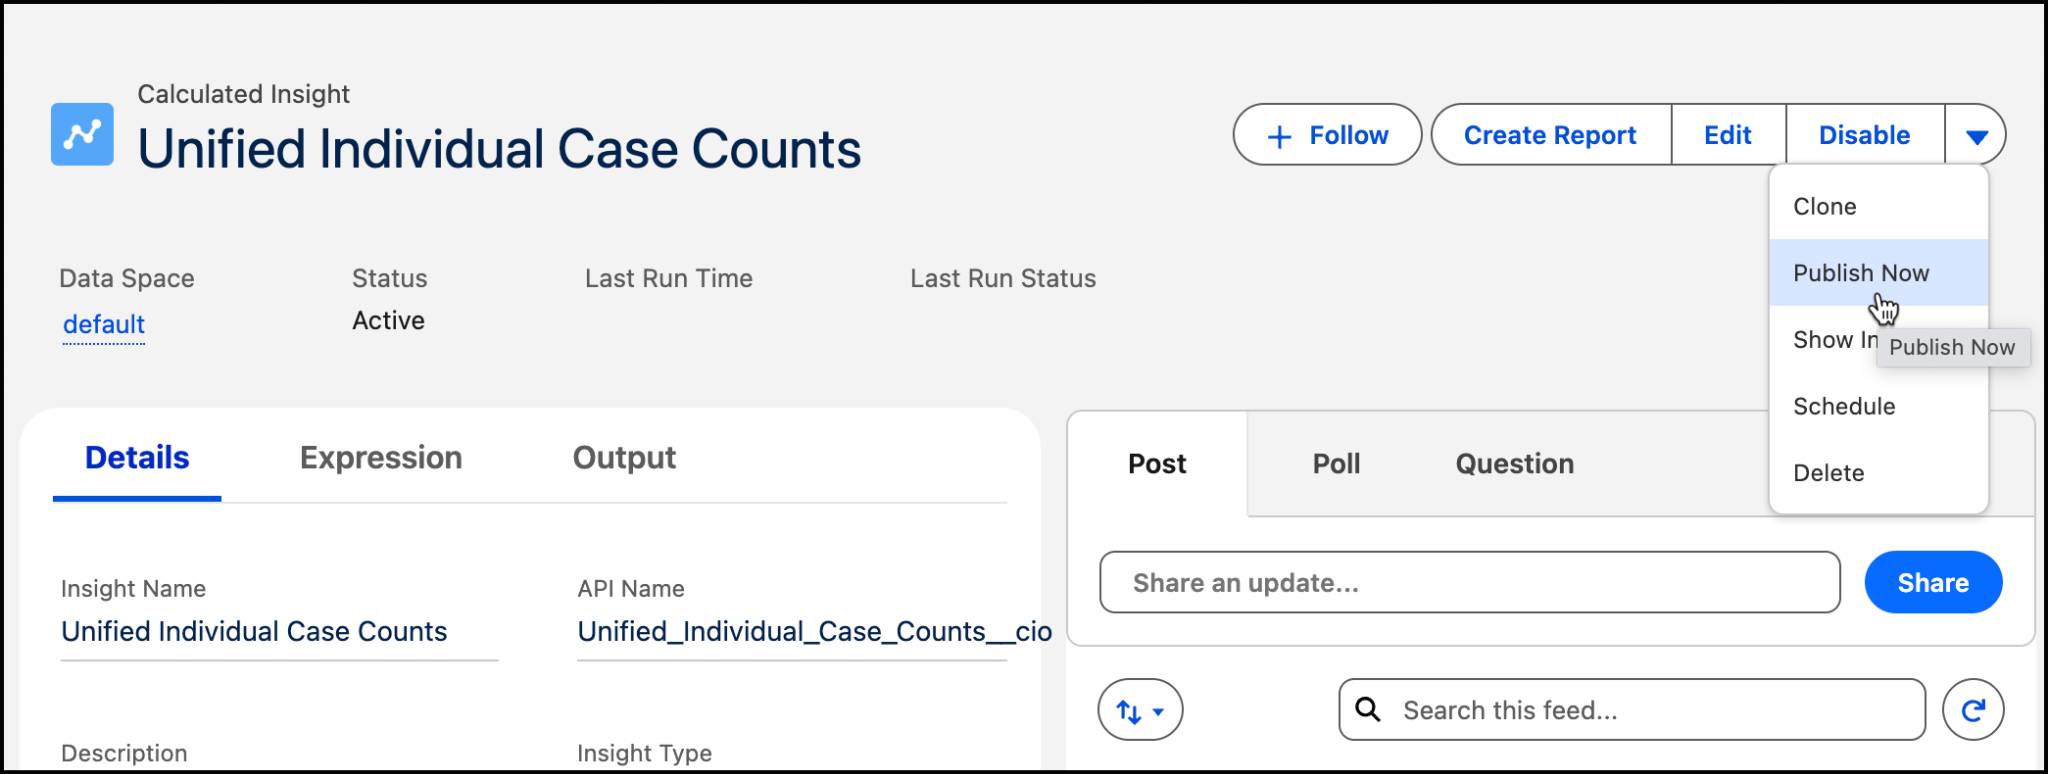
[Image: Click Publish Now to publish the insight.]
PUBLISH:
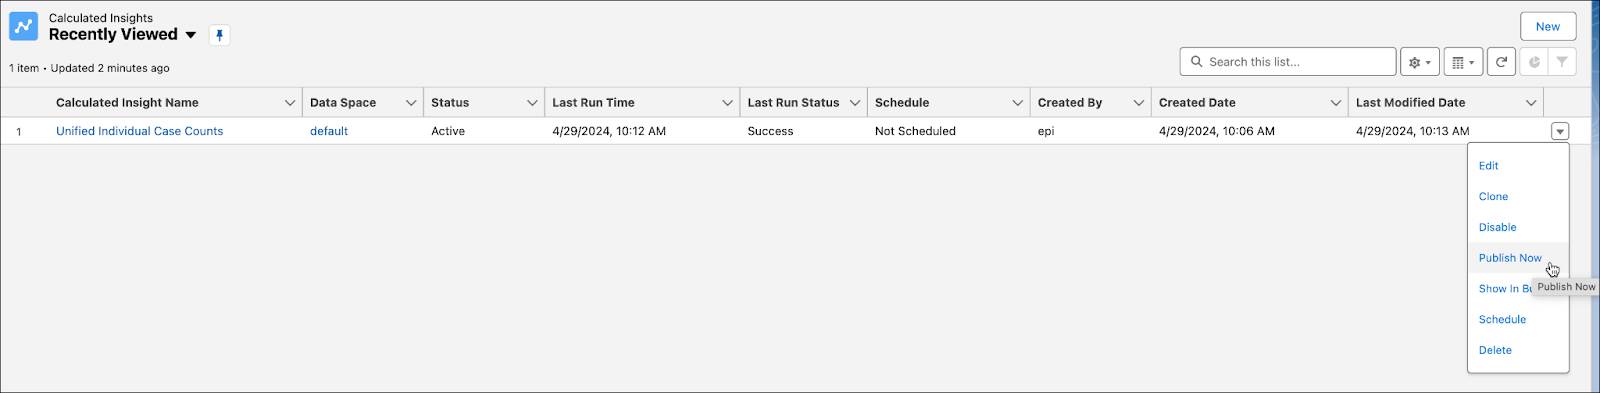
4. On the Calculated Insights tab, click Publish Now
from the dropdown menu
[Image: Publish Now selected from the Calculated insight tab.]
After publishing, Data 360 automatically manages your
insight. The status changes from Processing to Active
when it is ready to use.
This calculated insight — with a join, aggregate, and
dimensions — is now available for segmentation criteria
and personalization attributes in activations.
View Results
Once your insight has been processed, view the results
in Data Explorer. Note: even after the insight is Active,
it may take a few minutes for Data Explorer to return data.
STEPS:
1. Go to the Data Explorer tab
2. Select Calculated Insights from the dropdown
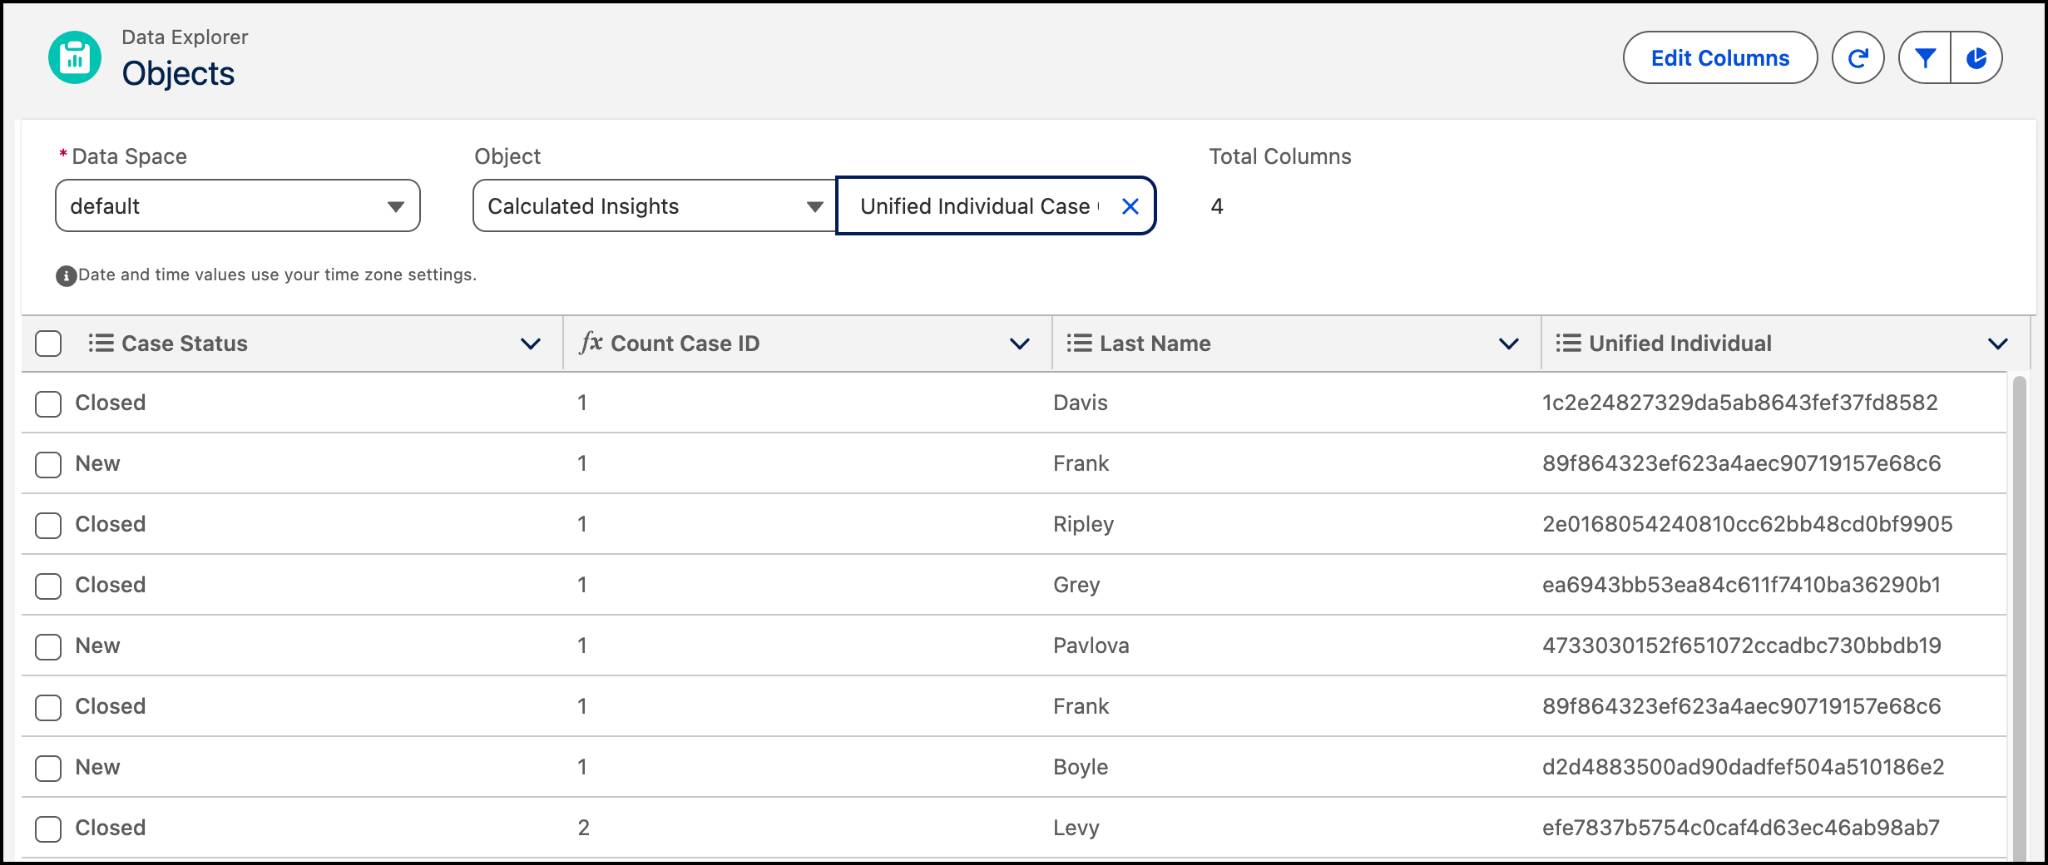
3. Select the Unified Individual Case Counts insight
[Image: Data Explorer view of the insight for the unified individual case.]
Data Explorer lets you browse the actual output of your
calculated insight — seeing each unified individual, their
case count, case status breakdown, and last name.
You do NOT need to wait for results before verifying
your work and moving on to the next unit.
Verify Your Work — Unit 04
Now that you have your calculated insight created, click
Verify Step to check your work.
RECAP — YOUR CALCULATED INSIGHT:
• Name: Unified Individual Case Counts
• Base Object: Unified Individual
• Join: Unified Individual → Case (auto-joined
through intermediate objects)
• Aggregate: Count of Case ID (Metric: Count Case ID)
• Dimensions: Unified Individual Id, Case Status,
Last Name
• Status: Published
For this exercise, the verify step checks that the insight
was set up correctly. In the next unit, you further
manipulate data by creating a segment and a report.
05 Build a Segment and Report
Segmentation • Activation Targets • Activations
Publish Segments • Create Reports
Learning Objectives — Unit 05
In this step, you will:
• Create a segment with filters using calculated insights
and formula fields
• Create an activation target and activate your segment
• Publish a segment to a DMO
• Build a report from your calculated insight
About Segmentation
When you are surrounded by a wealth of data, sometimes you
want to NARROW your focus to a specific group.
You do this by creating a SEGMENT FILTER within Data 360,
enabling you to COMPREHEND, TARGET, and ENGAGE your
customer base with precision.
In this step, you create a segment based on:
• The Is US Based FORMULA FIELD (from Unit 2)
• The Count Case ID CALCULATED INSIGHT (from Unit 4)
THE GOAL: Segment unified profiles who have a support
case OR are US–based. This demonstrates how Data 360’s
capabilities build on each other — formula fields and
calculated insights become segment filter criteria.
Create a Segment
Create a segment that identifies unified profiles who have
a support case OR are US–based.
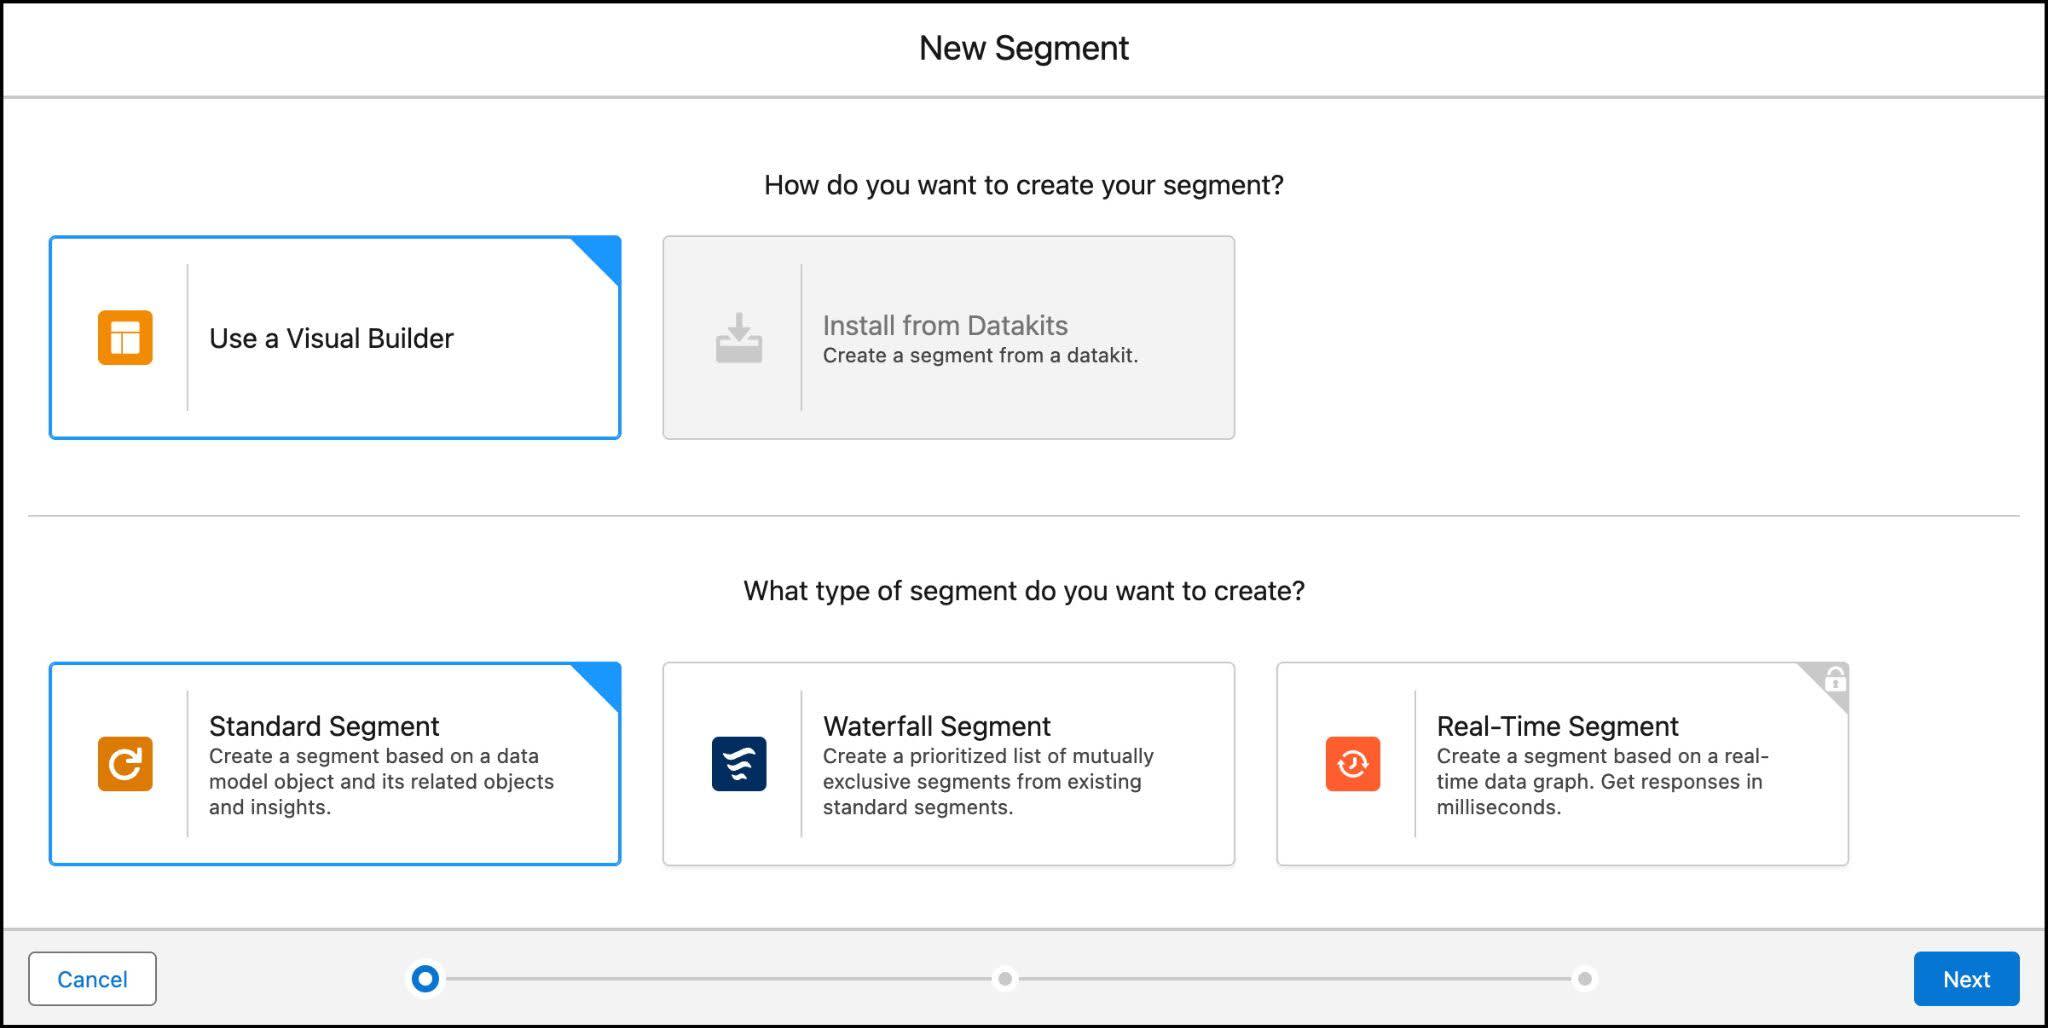
[Image: visual builder and standard segment selected.]
SETUP:
1. From Data Cloud, go to Segments tab (under More menu)
and click New
2. Leave Use a Visual Builder and Standard Segment
selected, click Next
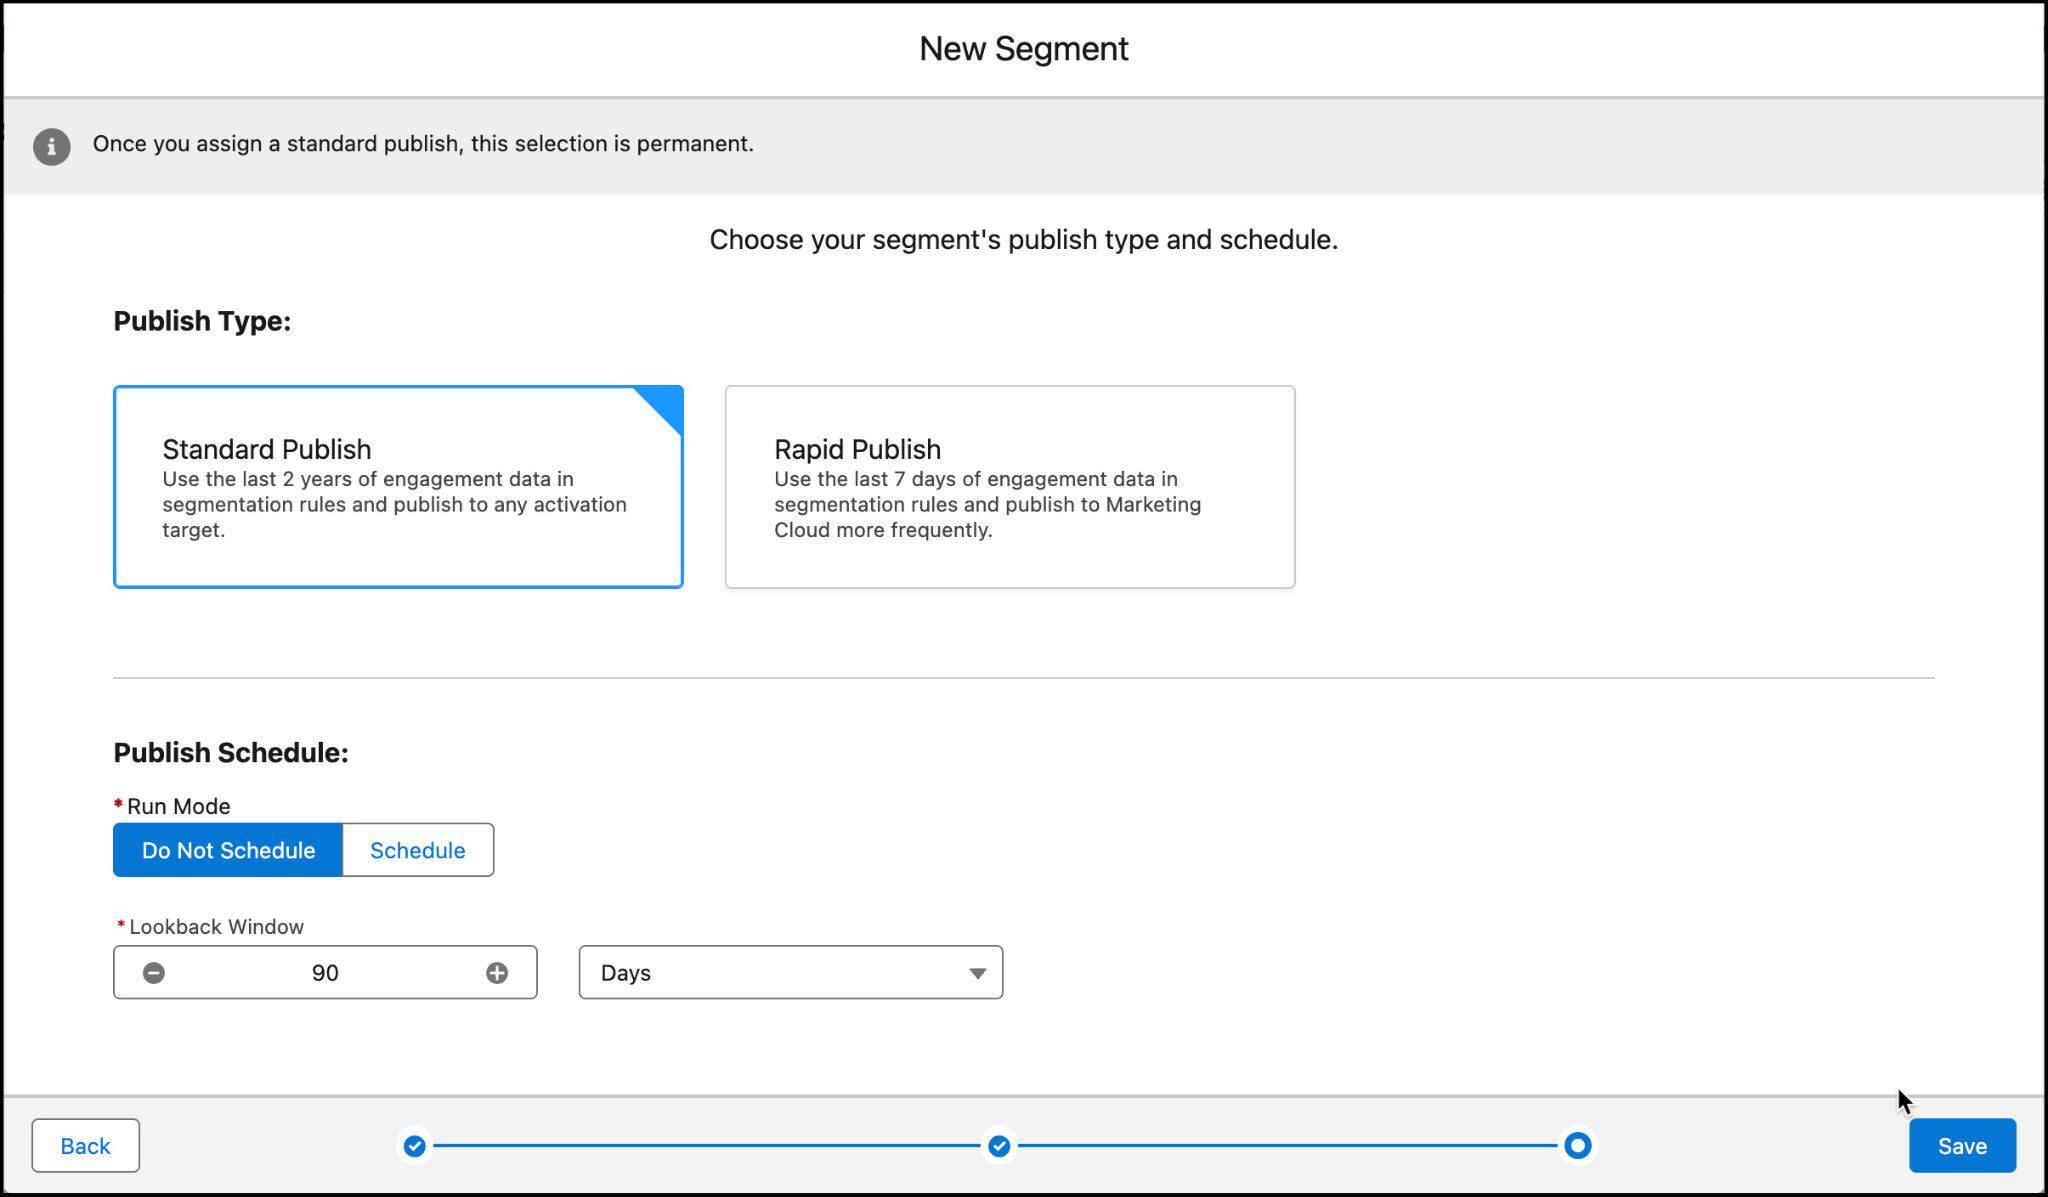
[Image: Create a new segment.]
3. Default Data Space auto-selected → from Segment On
dropdown, select Unified Individual
4. Name your segment: Lead Info. Add an optional
description
5. Click Next
6. Leave Standard Publish selected
7. Leave Do Not Schedule selected from Publish Schedule
8. Click Save
Now you are ready to select attributes and define filters.
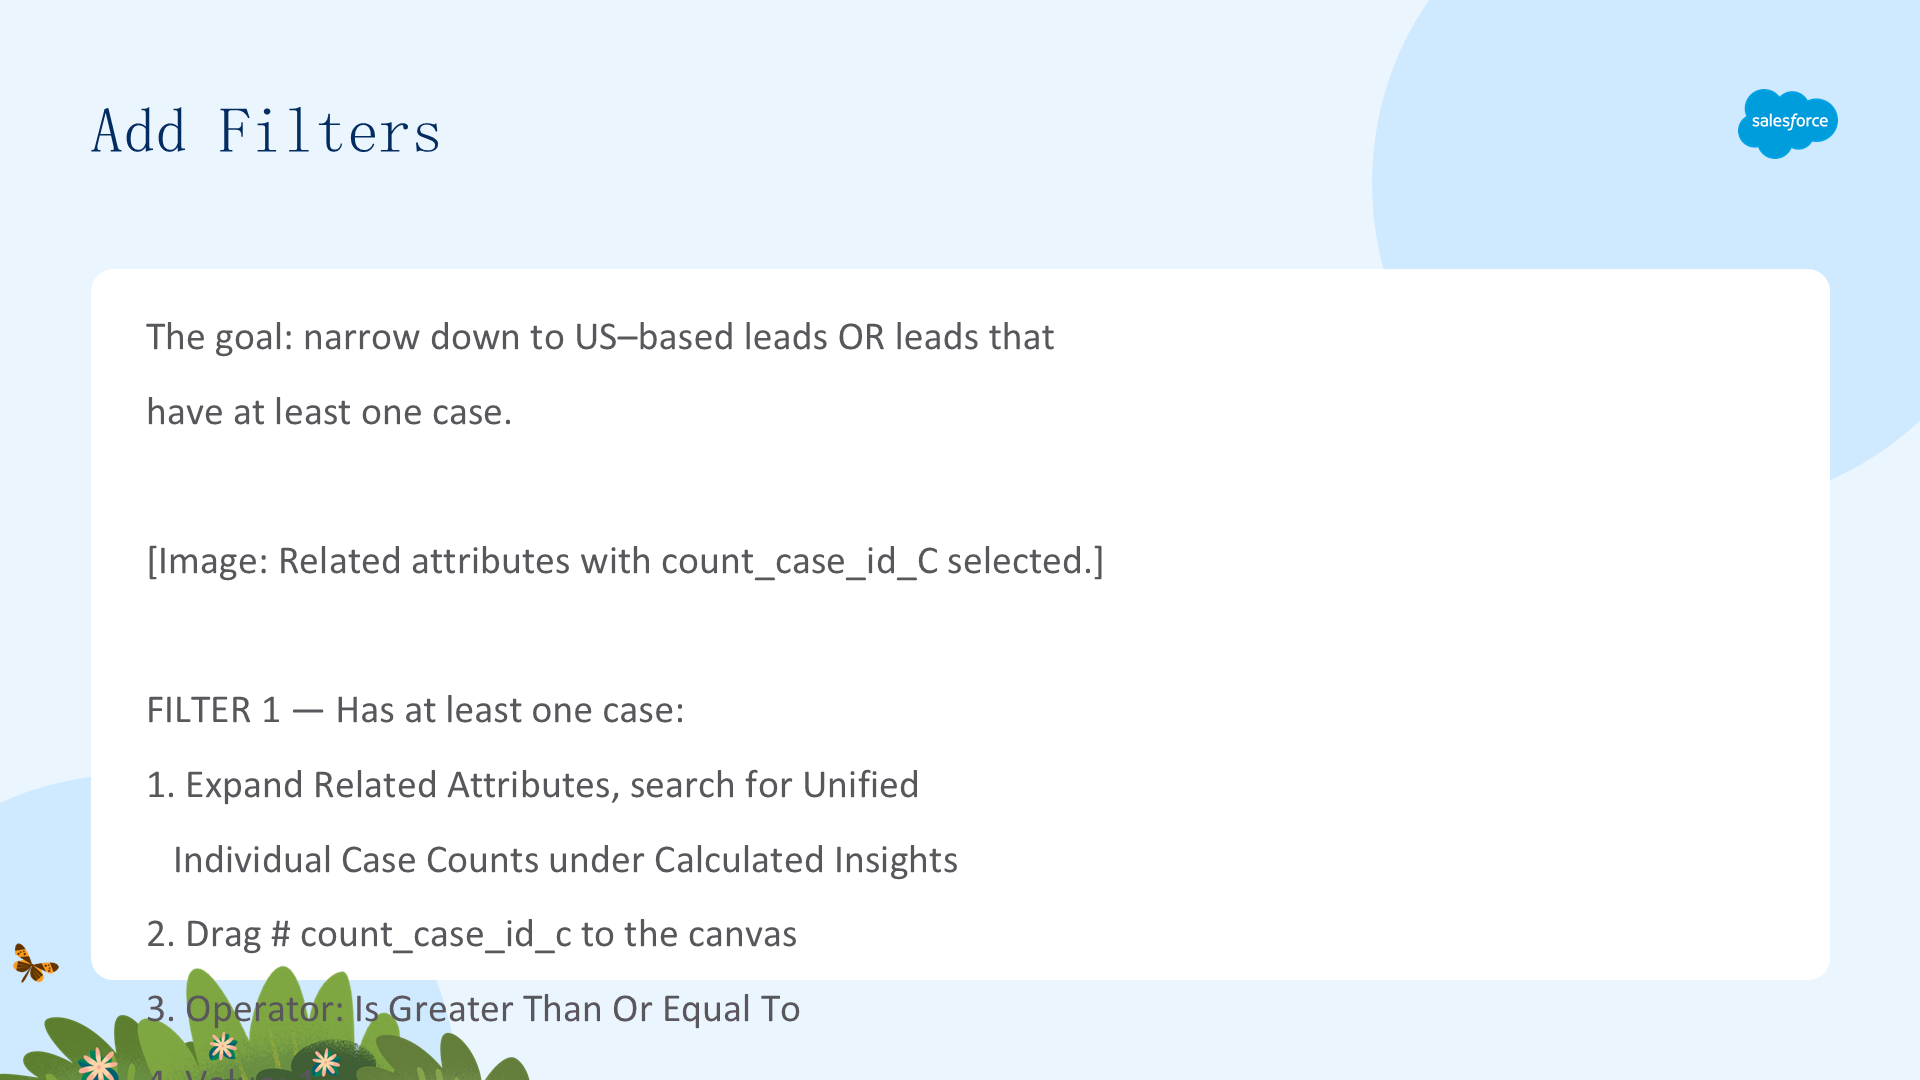
Add Filters
The goal: narrow down to US–based leads OR leads that
have at least one case.
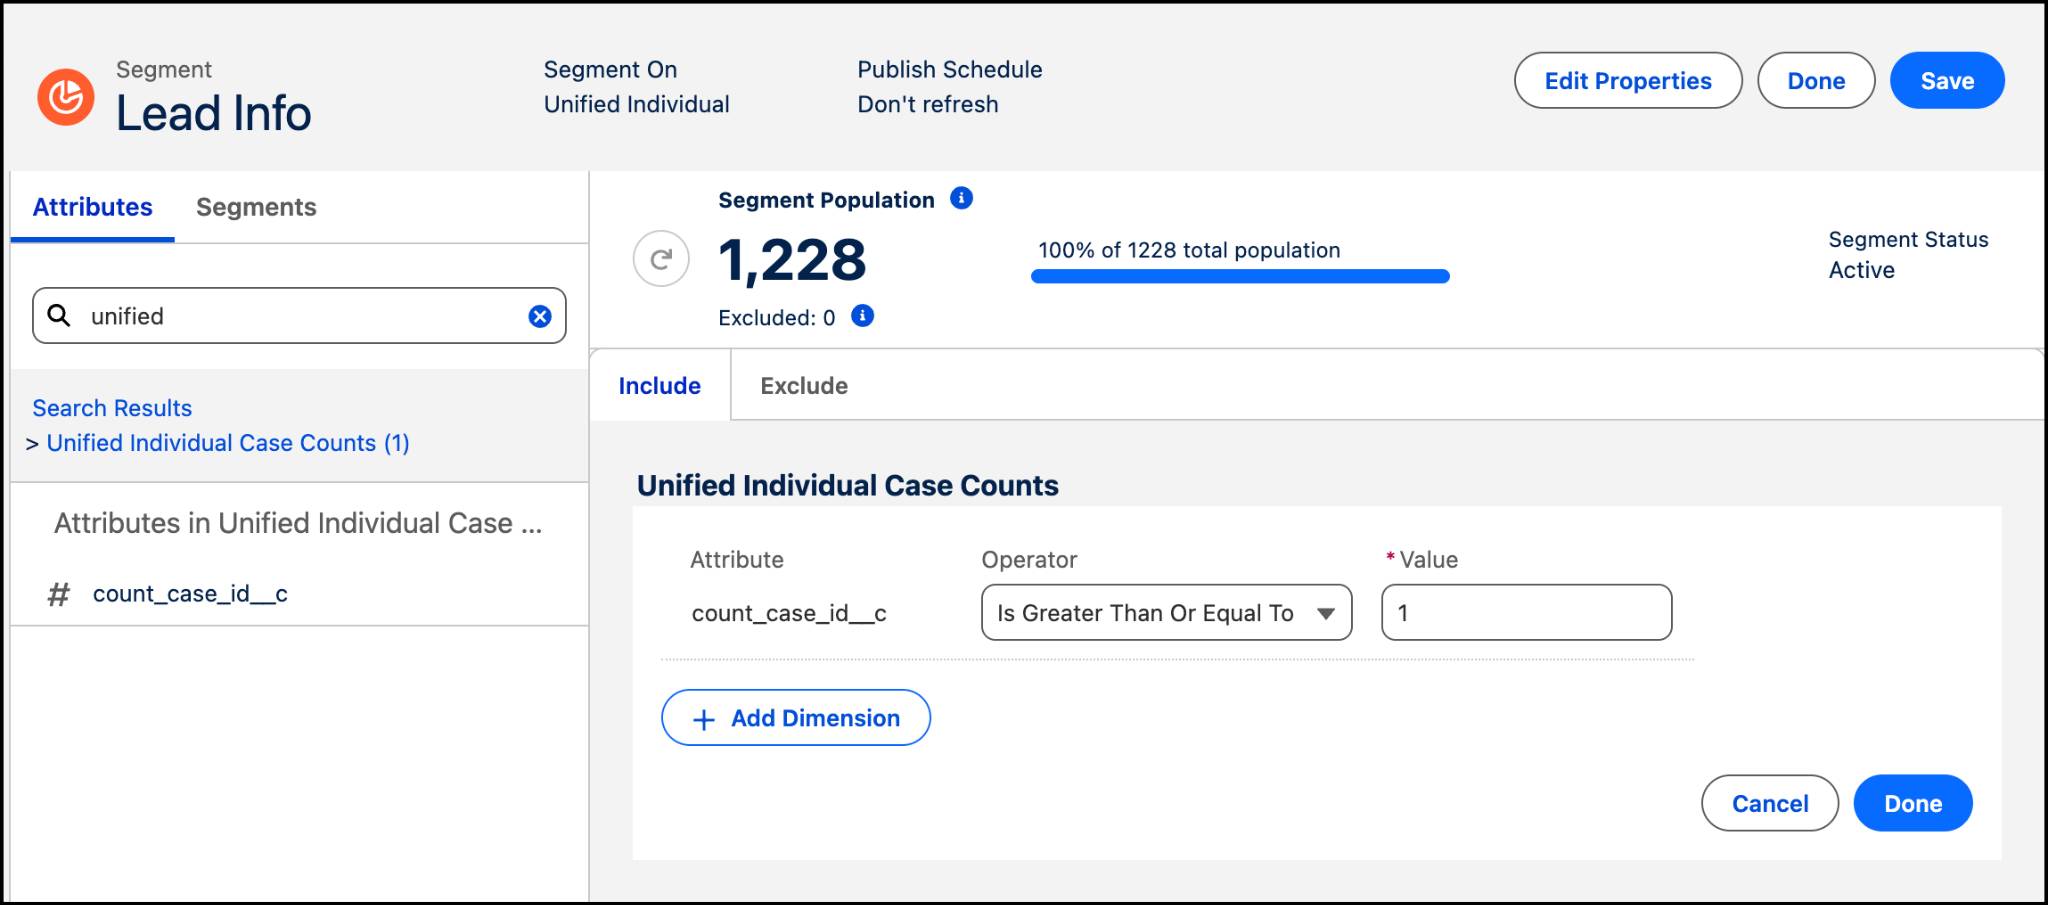
[Image: Related attributes with count_case_id_C selected.]
FILTER 1 — Has at least one case:
1. Expand Related Attributes, search for Unified
Individual Case Counts under Calculated Insights
2. Drag # count_case_id_c to the canvas
3. Operator: Is Greater Than Or Equal To
4. Value: 1
5. Click Done
FILTER 2 — US–based lead:
1. Search for Is US Based under the Lead category
2. Drag Is US Based to the canvas
3. Within the Lead container:
• Container Path: Lead.Party → Party.Individual →
Unified Individual.Unified Individual Id
• Measurement: Count
• Operator: At Least, Value: 1
• Next Operator: Is Equal To, Value: TRUE
4. Click Done
5. Change the operator BETWEEN the two filter containers
to OR and click Save
6. Once the number updates, click Done
Activate a Segment
After you create a segment in Data 360, you PUBLISH it
to an activation associated with an activation target.
An ACTIVATION TARGET stores authentication and authorization
information for a given activation platform. Supported
targets include:
• Marketing Cloud
• Data 360 (publish back to an Audience DMO)
• B2C Commerce
• Amazon Ads
• Google Audience Insights
• And many more
The activation target is the WHERE. The activation is
the WHAT (which segment, which attributes). The publish
is the GO — executing the activation and creating the
output records.
Create a New Activation Target
After creating a segment, you publish it to an activation
associated with an ACTIVATION TARGET. A target stores
authentication and authorization for a given platform.
Supported targets include: Marketing Cloud, Data 360, B2C
Commerce, Amazon Ads, Google Audience Insights, and more.
For this project, create a target to store data BACK in
Data 360 — useful when you do not have an external system
but still want to use the activated data.
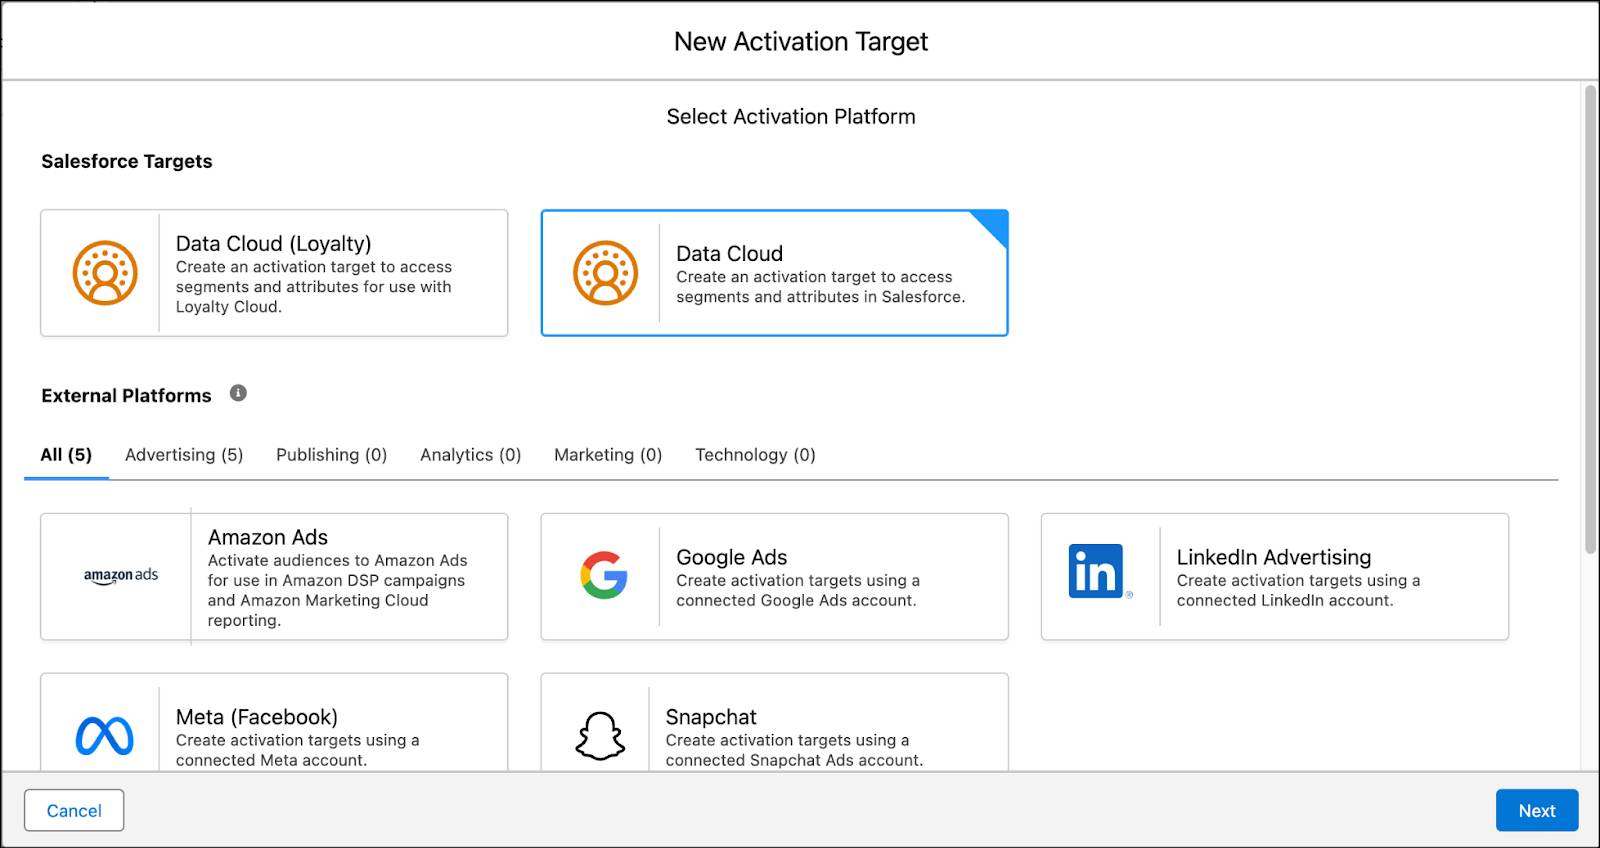
[Image: New Activation Target.]
STEPS:
1. Go to Activation Targets tab (under More menu)
2. Click New
3. Select Data Cloud (NOT Data Cloud Loyalty), click Next
4. Name: Data Cloud Segments. Add optional description
5. Select default for your Data Space
6. Click Save
Your activation target is now ready to receive the segment.
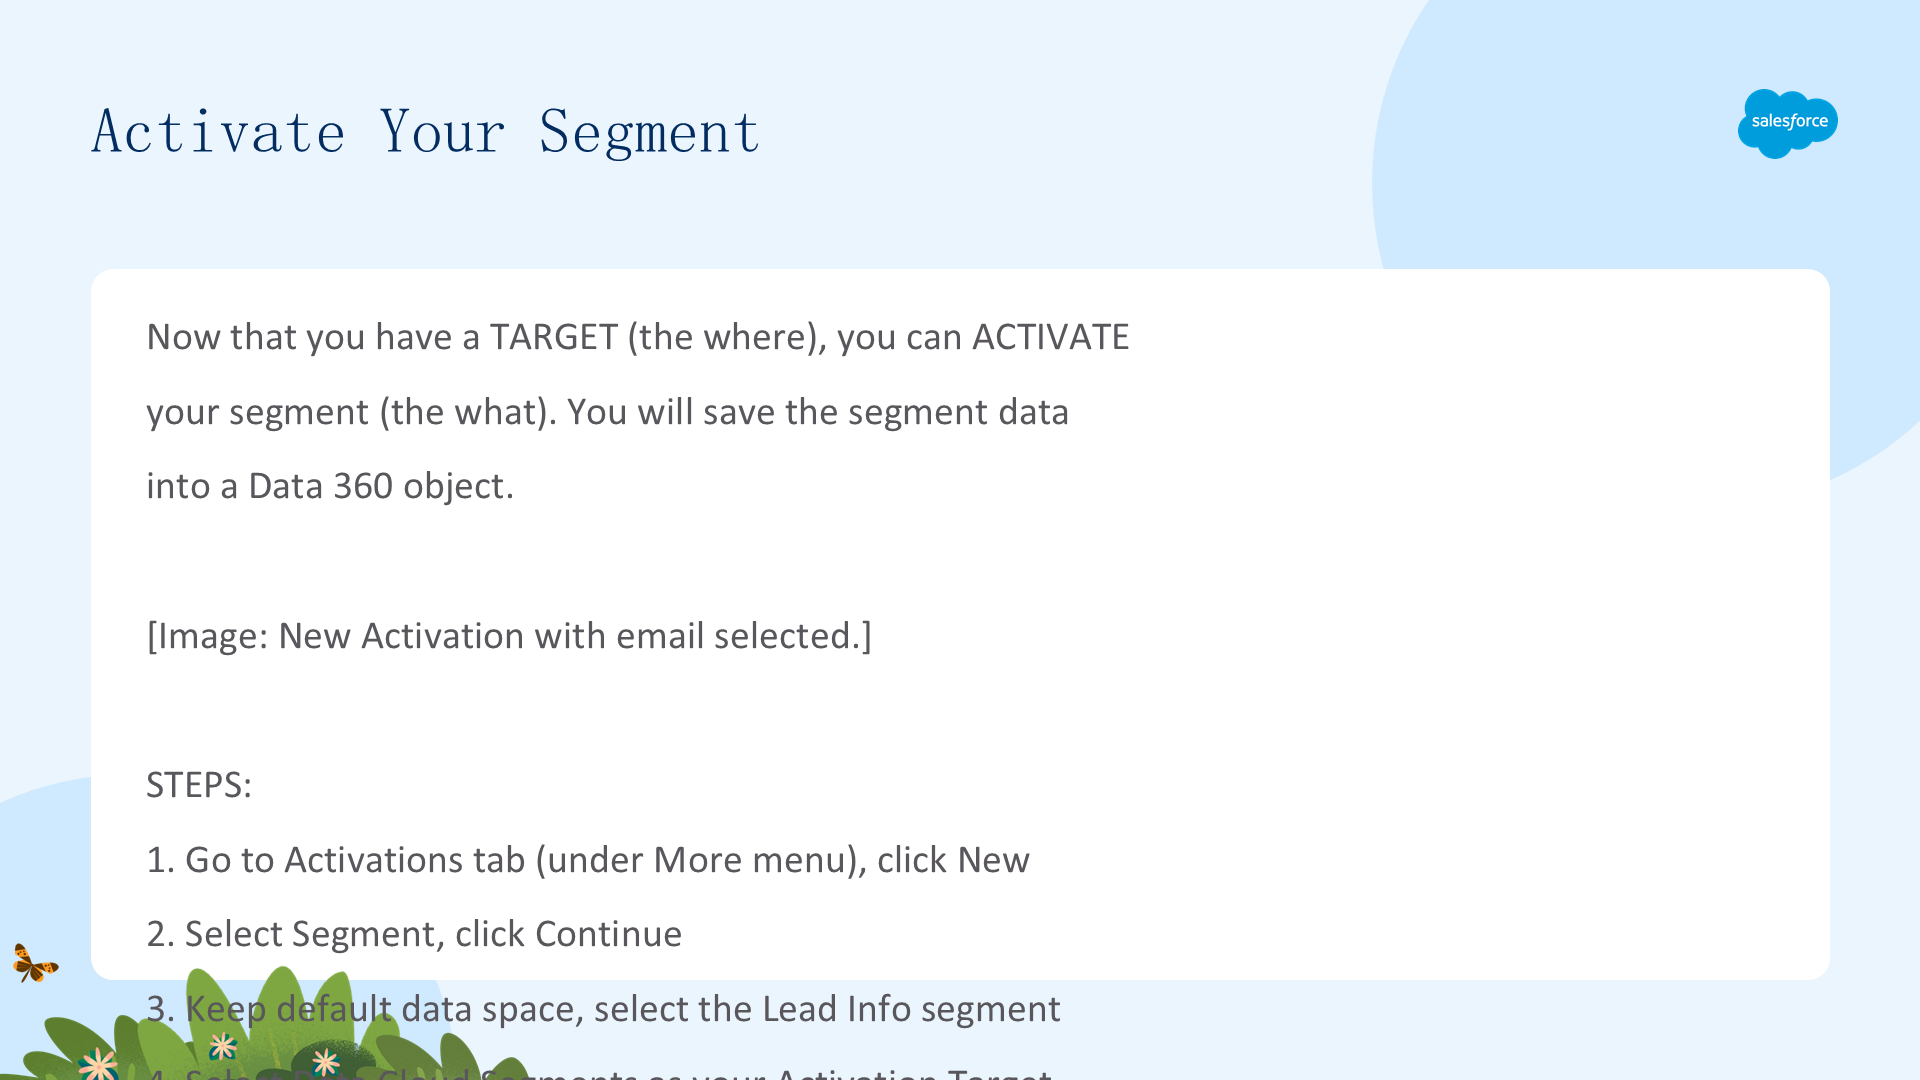
Activate Your Segment
Now that you have a TARGET (the where), you can ACTIVATE
your segment (the what). You will save the segment data
into a Data 360 object.
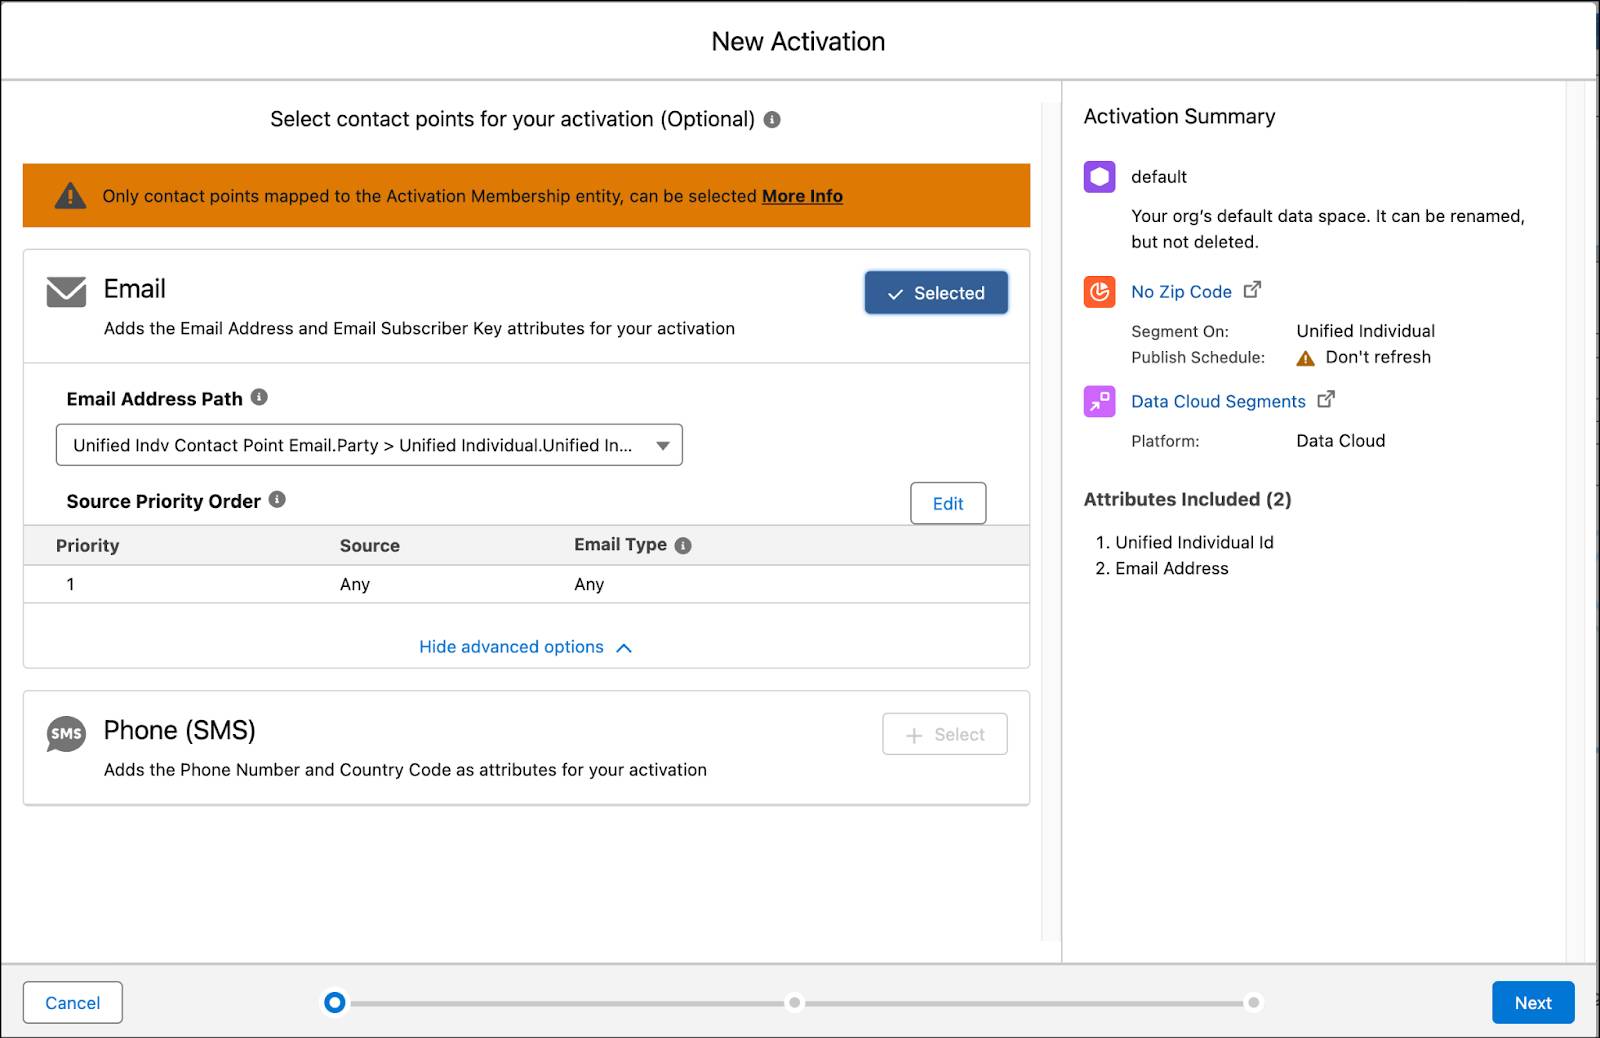
[Image: New Activation with email selected.]
STEPS:
1. Go to Activations tab (under More menu), click New
2. Select Segment, click Continue
3. Keep default data space, select the Lead Info segment
4. Select Data Cloud Segments as your Activation Target
5. For Activation Membership, select Unified Individual
6. Click Continue
7. Next to Email, click + Select, then Next
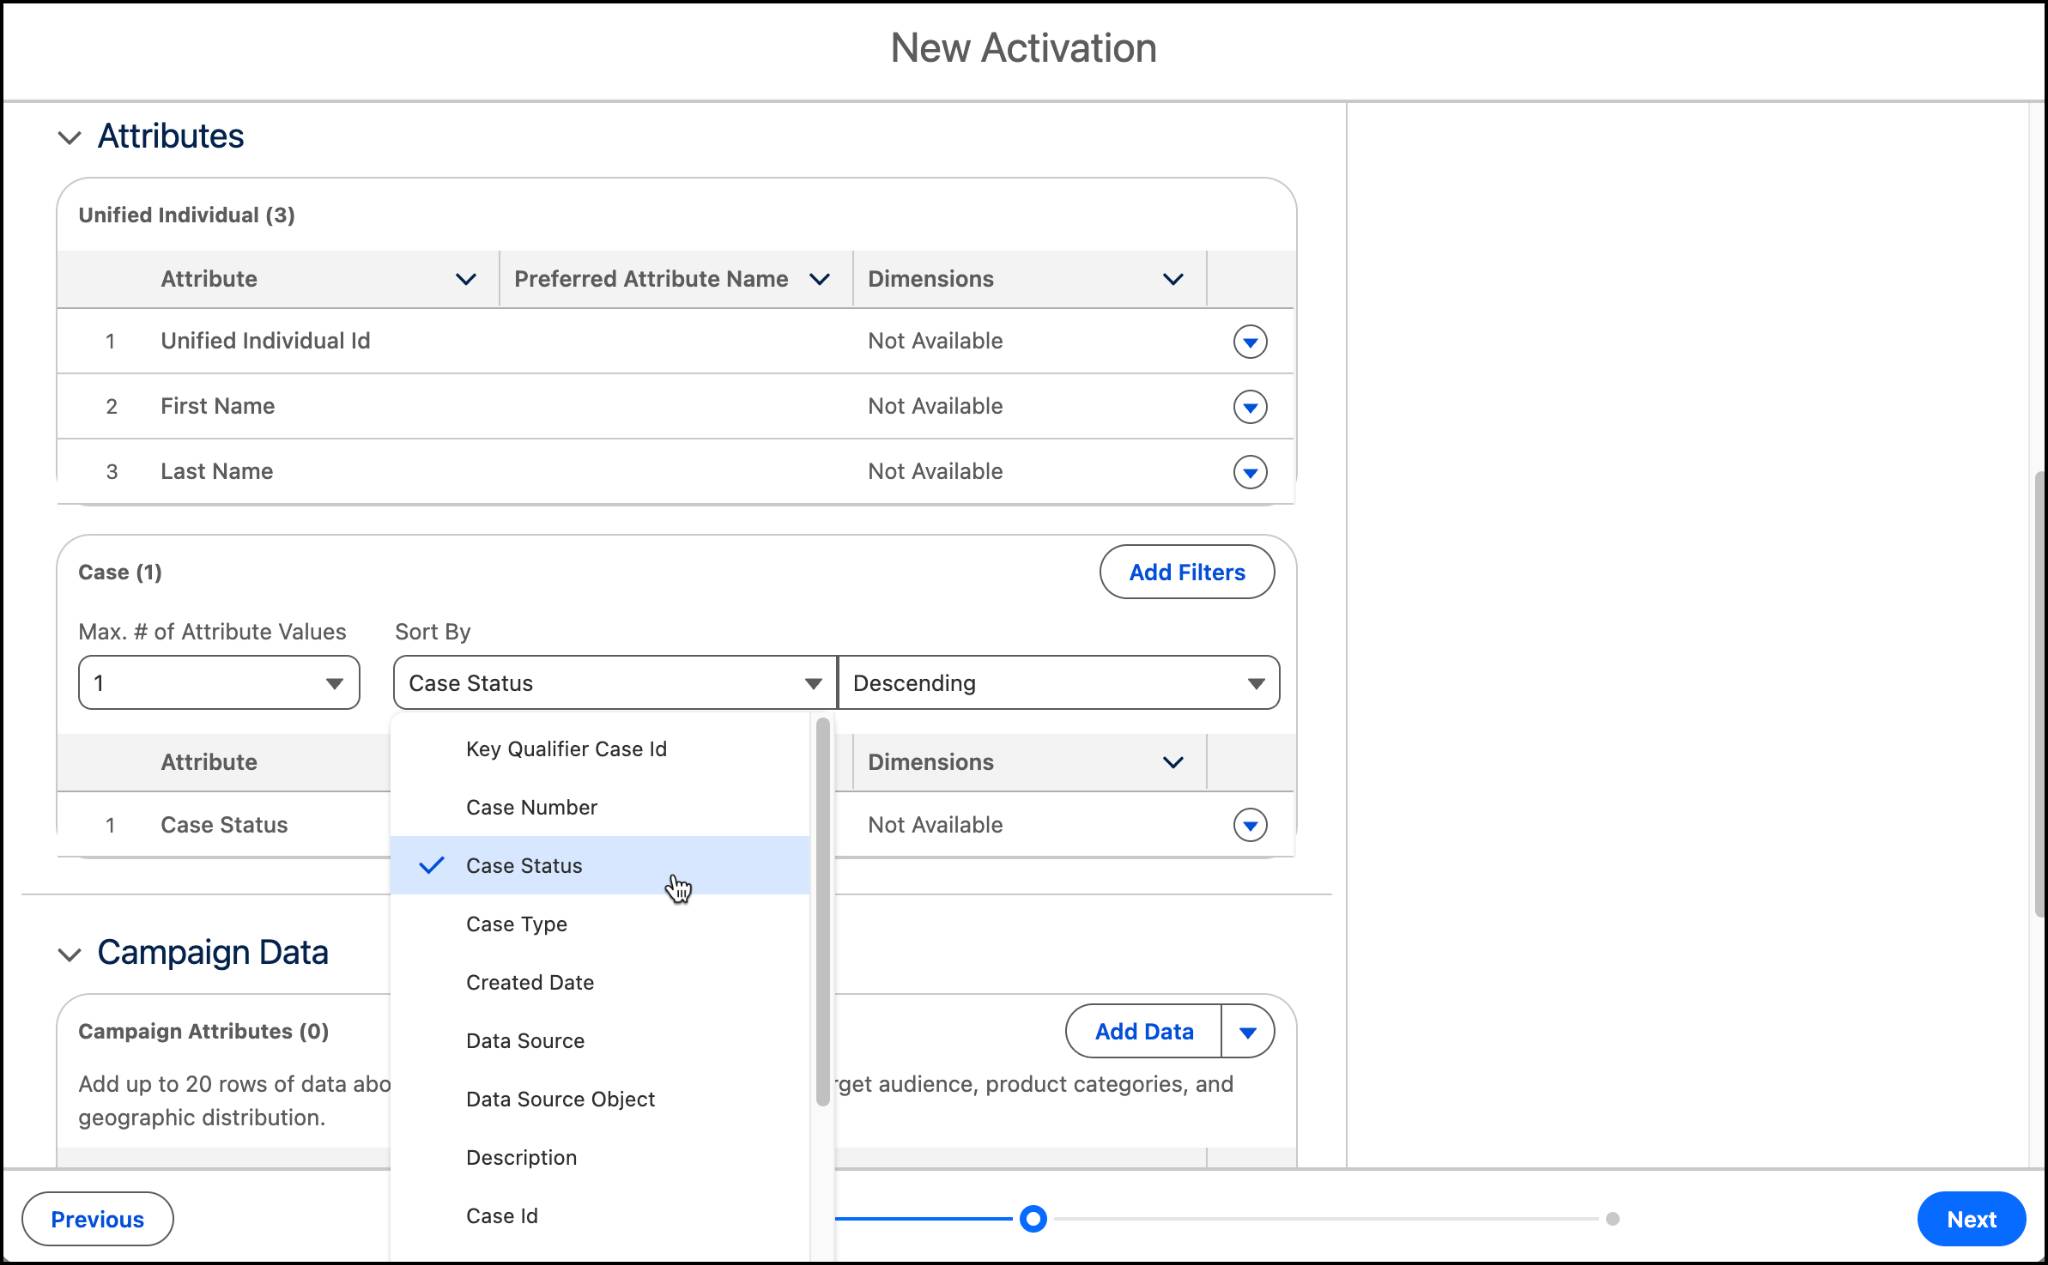
ADD ATTRIBUTES:
8. Click Add Attributes
9. Under Direct Attributes, expand Unified Individual:
drag First Name and Last Name next to the existing
Unified Individual Id
10. Under Related Attributes, expand Case: drag Case
Status to the canvas below Unified Individual
11. Click Save
SORT AND FINALIZE:
12. Under Case, select Case Status from Sort By dropdown
and Descending
[Image: From Case, sort by Case Status.]
13. Click Next
14. Name the activation: Cases
15. Confirm Incremental Refresh is selected, click Save
Publish Your Segment
Now that you have your segment, activation target, and
activation all configured, PUBLISH your segment.
[Image: Dropdown with Publish Now selected.]
STEPS:
1. Navigate back to Segments
2. Select your Lead Info segment
3. From the segment page dropdown, click Publish Now
Once the segment is published to the activation target,
an AUDIENCE DMO is created with the activated records.
To VIEW these records:
• Go to the Data Explorer tab
• Select the corresponding Audience DMO
Note: Processing can take some time. Segments activated
to Data 360 can also be retrieved using the Query API.
PUBLICATION FLOW SUMMARY:
Segment → Activation → Activation Target → Audience DMO
Create a Report
You can create reports based on insights and other objects
from the Reports tab or directly from Calculated Insights.
STEPS:
1. Navigate to Calculated Insights
2. Find the Unified Individual Case Counts insight
3. From the row dropdown, select Create Report
4. View the Groups and Columns, adjust order if desired
5. Click Save & Run
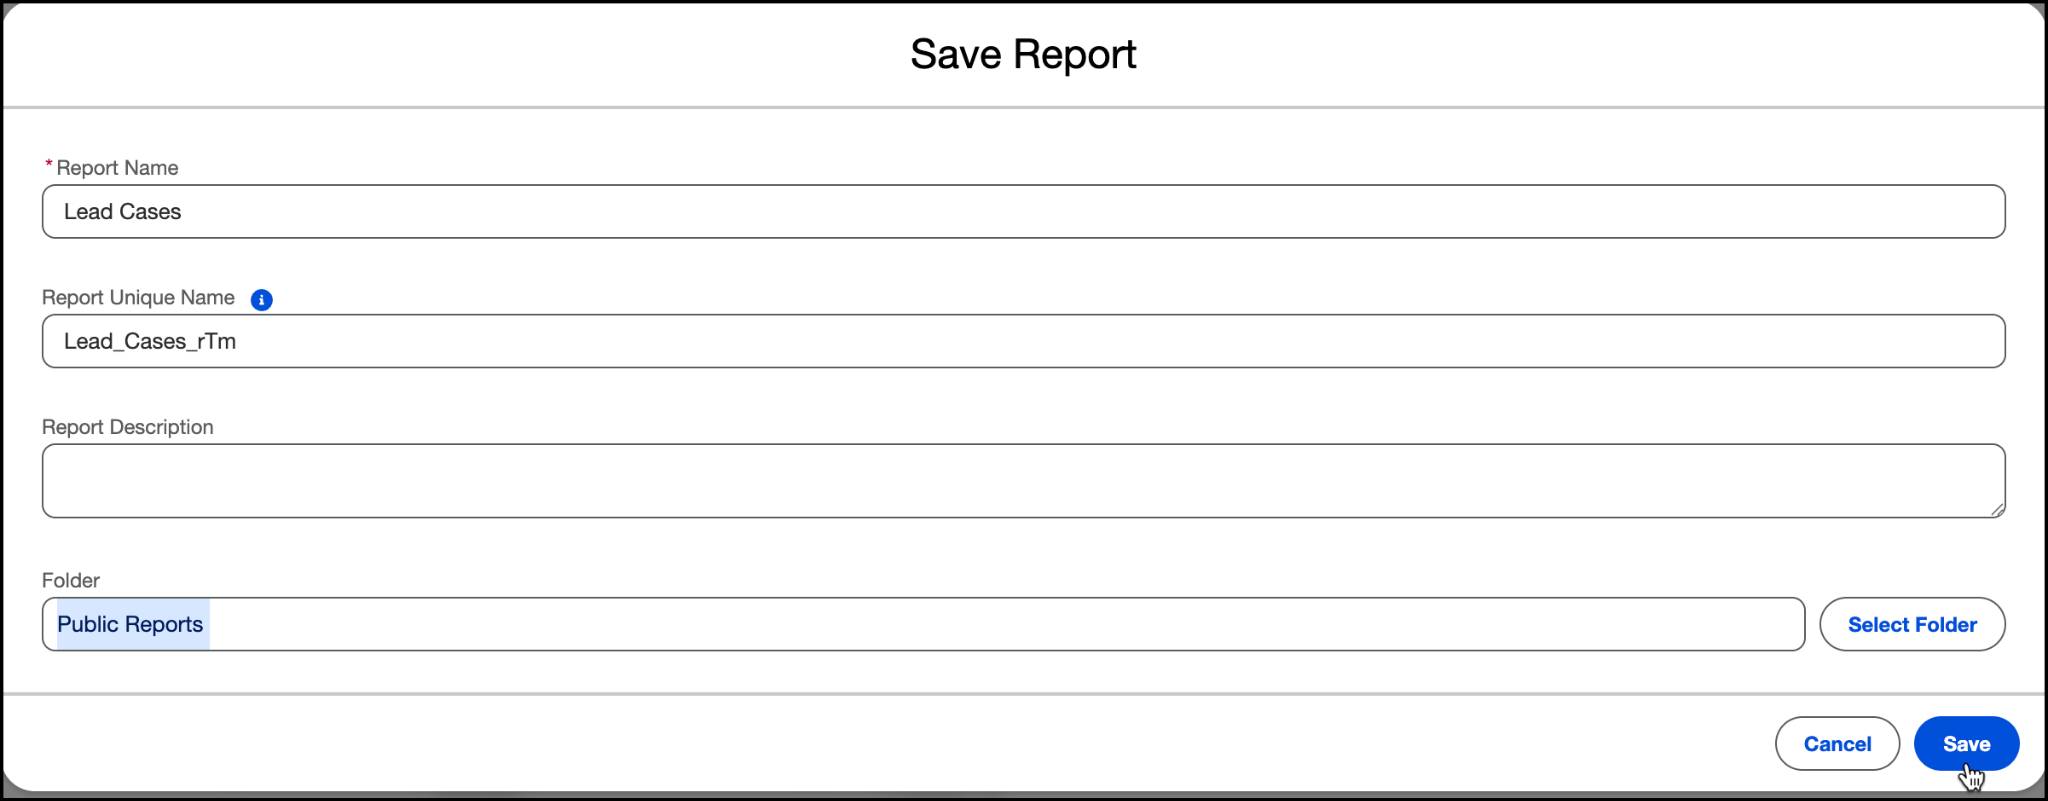
[Image: Save Lead Cases report.]
6. Name your report: Lead Cases
7. Click Select Folder, select Public Reports,
then click Select Folder again
8. Click Save
The report runs against your calculated insight data,
showing case counts grouped by unified individual,
case status, and last name. Reports can be scheduled,
subscribed to, and shared like any Salesforce report.
Verify Your Work — Unit 05
Now that you have your segment and activation created,
click Verify Step to check your work.
RECAP — YOUR SEGMENT AND ACTIVATION:
• Segment: Lead Info (Unified Individual, OR logic)
• Filter 1: Count Case ID ≥ 1
• Filter 2: Is US Based = TRUE
• Activation Target: Data Cloud Segments
• Activation: Cases (Segment → Data Cloud Segments)
• Attributes: First Name, Last Name, Case Status
• Sorted by: Case Status Descending
• Activation Membership: Unified Individual
• Report: Lead Cases (from Unified Individual Case
Counts calculated insight)
For this exercise, the verify step checks that the segment
and activation were set up correctly. You do not have to
wait for the activation to process.
Hands-on Journey
CONGRATULATIONS on finishing this hands-on journey through
Data 360! Here is what you accomplished across all five units:
• DATA STREAMS — connected Sales and Service Cloud data
using bundles and direct object selection
• FORMULA FIELDS — created Is US Based with validation
• DATA MAPPING — mapped DLO fields to DMOs including
custom fields and unification-required contact points
• IDENTITY RESOLUTION — configured a ruleset with fuzzy
match rules and source-priority reconciliation
• CALCULATED INSIGHTS — built a multi-object insight with
joins, aggregates, and dimensions
• SEGMENTATION — created an OR-logic segment using
formula fields and calculated insights as filters
• ACTIVATION — set up a target, activation, and published
the segment to create an Audience DMO
• REPORTING — generated a report from calculated insight
These skills enable you to effectively manage and use your
unified data to achieve a deeper understanding of your
customers and make more impactful business decisions.