为用户界面有条件地呈现Visualforce页面
在上一步中,我们让服务器从Visualforce更新标准样式表。虽然页面看起来不错,但只要做一点工作,就可以更接近Lightning Experience的外观。所以这个练习我们将会:
- 确定用户正在使用的UX环境(Salesforce Classic或Lightning Experience)
- 将条件呈现逻辑添加到页面以提供来自SLDS的其他样式
- 使用SLDS中的其他类来调整页面元素
第1部分 - 将用户主题的检查添加到Apex控制器
当用户在Salesforce中请求页面时,系统可以识别用户是处于Salesforce Classic还是Lightning Experience。有了这些知识,我们可以包含或排除页面的区域,以确保用户的正确体验。
- 在开发人员控制台中,单击 File > Open > Classes 然后选择DreamhouseProspects Apex 类,然后单击 Open.
在public String sortOrder {set; get;} 行,添加下面的方法来检测用户的当前主题:
public Boolean getIsClassic() {
    return (UserInfo.getUiThemeDisplayed() == 'Theme3');
}
- Apex类现在应该是这样的:
public with sharing class DreamhouseProspects {
    public String sortOrder {set; get;}

    public Boolean getIsClassic() {
        return (UserInfo.getUiThemeDisplayed() == 'Theme3');
    }

    public List<Lead> getLeads() {
        if (sortOrder == null) {
            sortOrder = 'LastName';
        }
        return Database.query('SELECT Description,Email,FirstName,Id,LastName,Phone FROM Lead WHERE Company=\'Dreamhouse\' ORDER BY '+sortOrder);
    }

    public pageReference sortList() {
        getLeads();
        return null;
    }
}
- 保存Apex类并关闭其在开发者控制台中的标签。
第2部分 - 根据用户的主题添加动态块
- 在开发者控制台中,通过在打开的<apex:page>标记之后添加一个新行,将指令添加到DreamHouseLeads.vfp页面:
<apex:slds />
- 将
rendered="{! !isClassic}" 添加到 <apex:slds /> 标签中:
<apex:slds rendered="{! !isClassic}" />
因此,如果用户在Lightning中,则可以使用来自SLDS的样式和标记,而在Classic中,该页面仍然像以前一样。
第3部分 - 添加SLDS标题
页面的自动样式看起来相当不错,但页面标题与Lightning Experience中的其他页面不完全相同。请注意,它缺少标题旁边的标准图标,选择列表看起来像标准浏览器选择。此外,选择和排序按钮太靠近表格。如果没关系,那就巧妙地移动。为了这个项目的目的,让我们继续前进,使之与Lightning Experience完全匹配。
- 交换<apex:sectionHeader>和<apex:form>元素(在第4行和第5行左右)。
为了有条件地传递页面的元素,我们需要能够用<apex:outputPanel>标签包装完整的元素。所以,我们刚刚在窗体中移动了节标题,以便我们可以用New按钮,选择列表和排序按钮将它们包装在一起。
- 使用<apex:outputPanel rendered =“{!isClassic}”> ... </ apex:outputPanel>将整个代码从<apex:sectionHeader>包装到<apex:commandButton>(从第5-14行开始)。你的代码现在应该是这样的:
<apex:page controller="DreamhouseProspects" lightningStylesheets="true">
    <apex:slds rendered="{! !isClassic}" />
    <apex:pageBlock >
        <apex:form >
            <apex:outputPanel rendered="{!isClassic}">
                <apex:sectionHeader title="Leads" subtitle="Home"/>
                <div style="text-align:center;">
                    <apex:commandButton action="{!URLFOR($Action.Lead.New)}" value="New"/>
                </div>
                <apex:outputLabel value="Sort: " for="sortList" />
                <apex:selectList value="{! sortOrder}" size="1" id="sortList">
                    <apex:selectOption itemvalue="LastName" />
                    <apex:selectOption itemvalue="FirstName" />
                </apex:selectList>
                <apex:commandButton value="Sort Table" action="{!sortList}" reRender="leads_list"/>
            </apex:outputPanel>
            <apex:pageBlockTable value="{! leads }" var="ct" id="leads_list">
                <apex:column headerValue="First Name">
                    <apex:outputLink value="/{! ct.Id}">{! ct.FirstName }</apex:outputLink>
                </apex:column>
                <apex:column value="{! ct.LastName }"/>
                <apex:column value="{! ct.Email }"/>
                <apex:column value="{! ct.Phone }"/>
            </apex:pageBlockTable>
        </apex:form>
    </apex:pageBlock>
</apex:page>
- 保存页面并重新加载到浏览器中。
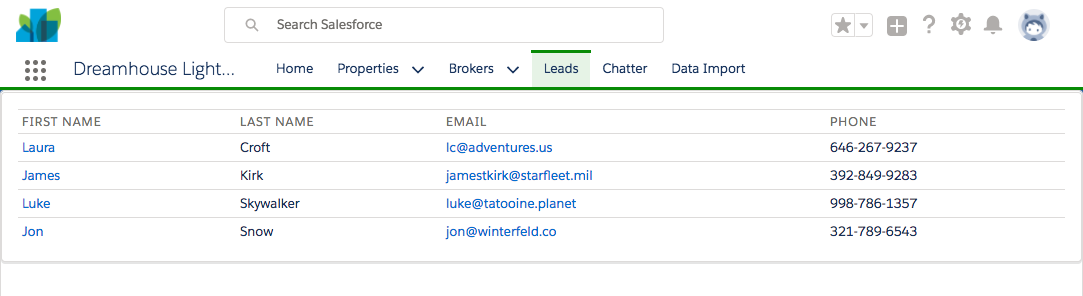 您已经丢失了整个页面标题和按钮,因为现在只会在{!isClassic}解析为true时才呈现。所以,现在我们可以添加一个匹配Lightning Experience的页面标题。
虽然我们完全可以创建自己的HTML标记和CSS,但Visualforce开发人员可以做的更多,我们的目标是确保页面看起来与Lightning Experience完全一样。这正是Salesforce UX团队创建SLDS的原因。我们可以简单地将标记从SLDS复制并粘贴到我们的页面中,并修改其占位符内容以显示我们所需的内容。
您已经丢失了整个页面标题和按钮,因为现在只会在{!isClassic}解析为true时才呈现。所以,现在我们可以添加一个匹配Lightning Experience的页面标题。
虽然我们完全可以创建自己的HTML标记和CSS,但Visualforce开发人员可以做的更多,我们的目标是确保页面看起来与Lightning Experience完全一样。这正是Salesforce UX团队创建SLDS的原因。我们可以简单地将标记从SLDS复制并粘贴到我们的页面中,并修改其占位符内容以显示我们所需的内容。
- 导航到SLDS站点。点击侧边栏中的组件,然后点击页面标题,熟悉标记和样式。
您看到的每个组件的预览都是由您在预览下方看到的标记构建的。这是您可以简单地复制/粘贴,然后修改的标记。
但是,请注意,对于每个组件(在本例中为页眉),页面的右侧都有变体和状态。这些是所选组件的不同版本。当您选择变体或状态时,示例标记会更改。所以请确保您正在复制所需的变体或状态。
为了让你更容易,我们已经复制了Object Home变体,并对其进行了修改。
- 返回到开发者控制台,在最后一步添加的</ apex:outputPanel>(可能是第16行)之后的新行中添加以下代码:
<apex:outputPanel rendered="{! !isClassic}">
    <div class="slds-page-header">
        <div class="slds-grid">
            <div class="slds-col slds-has-flexi-truncate" xmlns="http://www.w3.org/2000/svg" xmlns:xlink="http://www.w3.org/1999/xlink">
                <div class="slds-media slds-no-space slds-grow">
                    <div class="slds-media__figure">
                        <svg class="slds-icon slds-icon-standard-user .slds-icon_small" aria-hidden="true">
                            <use xlink:href="{!URLFOR($Asset.SLDS, 'assets/icons/standard-sprite/svg/symbols.svg#lead')}"></use>
                        </svg>
                    </div>
                    <div class="slds-media__body">
                        <p class="slds-text-title_caps slds-line-height_reset">Lead</p>
                        <h1 class="slds-page-header__title slds-m-right_small slds-align-middle slds-truncate"
                            title="this should match the Record Title">Home</h1>
                    </div>
                </div>
                <div class="slds-grid slds-grid_vertical-align-end slds-m-vertical_small">
                    <div class="slds-size_1-of-6 ">
                        <apex:outputLabel value="Sort: " for="sortListLightning" styleClass="slds-form-element__label" />
                        <div class="slds-select_container">
                            <apex:selectList value="{! sortOrder}" size="1" id="sortListLightning" styleClass="slds-select">
                                <apex:selectOption itemvalue="LastName" />
                                <apex:selectOption itemvalue="FirstName" />
                            </apex:selectList>
                        </div>
                    </div>
                    <div class="slds-no-flex slds-m-left_x-large">
                        <apex:commandButton value="Sort" action="{!sortList}" reRender="leads_list" styleClass="slds-button slds-button_neutral"/>
                    </div>
                </div>
            </div>
            <div class="slds-col slds-no-flex slds-grid slds-align-top">
                <apex:commandButton action="{!URLFOR($Action.Lead.New)}" value="New" styleClass="slds-button slds-button_neutral"/>
            </div>
        </div>
    </div>
</apex:outputPanel>
- 保存文件并在Lightning Experience中重新加载页面以查看您的更改。
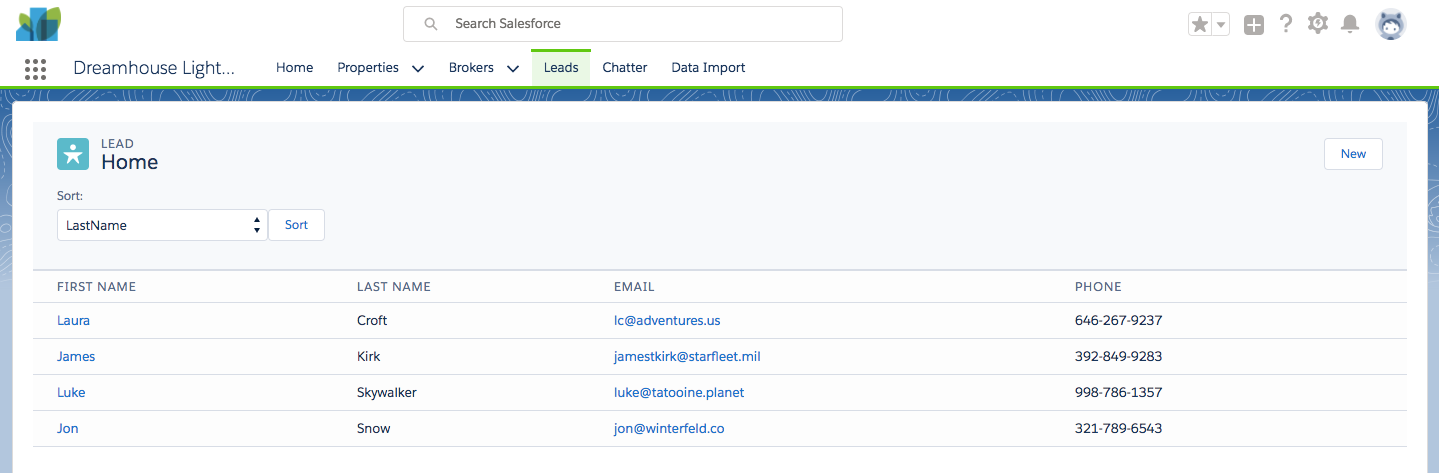 现在,你不得不承认这很酷,对吗?通过对页面进行一些更改,我们现在可以在Lightning Experience中正确呈现标准Visualforce页面,同时在Salesforce Classic中保持其原始外观。
以防万一你的页面倒下,并轰然倒地...这是代码应该看起来的样子:
现在,你不得不承认这很酷,对吗?通过对页面进行一些更改,我们现在可以在Lightning Experience中正确呈现标准Visualforce页面,同时在Salesforce Classic中保持其原始外观。
以防万一你的页面倒下,并轰然倒地...这是代码应该看起来的样子:
<apex:page controller="DreamhouseProspects" lightningStylesheets="true">
    <apex:slds rendered="{! !isClassic}"/>
    <apex:pageBlock >
        <apex:form >
            <apex:outputPanel rendered="{! isClassic}">
                <apex:sectionHeader title="Leads" subtitle="Home"/>
                <div style="text-align:center;">
                    <apex:commandButton action="{!URLFOR($Action.Lead.New)}" value="New"/>
                </div>
                <apex:outputLabel value="Sort: " for="sortList" />
                <apex:selectList value="{! sortOrder}" size="1" id="sortList">
                    <apex:selectOption itemvalue="LastName" />
                    <apex:selectOption itemvalue="FirstName" />
                </apex:selectList>
                <apex:commandButton value="Sort Table" action="{!sortList}" reRender="leads_list"/>
            </apex:outputPanel>
            <apex:outputPanel rendered="{! !isClassic}">
                <div class="slds-page-header">
                    <div class="slds-grid">
                        <div class="slds-col slds-has-flexi-truncate" xmlns="http://www.w3.org/2000/svg" xmlns:xlink="http://www.w3.org/1999/xlink">
                            <div class="slds-media slds-no-space slds-grow">
                                <div class="slds-media__figure">
                                    <svg class="slds-icon slds-icon-standard-user .slds-icon_small" aria-hidden="true">
                                        <use xlink:href="{!URLFOR($Asset.SLDS, 'assets/icons/standard-sprite/svg/symbols.svg#lead')}"></use>
                                    </svg>
                                </div>
                                <div class="slds-media__body">
                                    <p class="slds-text-title_caps slds-line-height_reset">Lead</p>
                                    <h1 class="slds-page-header__title slds-m-right_small slds-align-middle slds-truncate"
                                        title="this should match the Record Title">Home</h1>
                                </div>
                            </div>
                            <div class="slds-grid slds-grid_vertical-align-end slds-m-vertical_small">
                                <div class="slds-size_1-of-6 ">
                                    <apex:outputLabel value="Sort: " for="sortListLightning" styleClass="slds-form-element__label" />
                                    <div class="slds-select_container">
                                        <apex:selectList value="{! sortOrder}" size="1" id="sortListLightning" styleClass="slds-select">
                                            <apex:selectOption itemvalue="LastName" />
                                            <apex:selectOption itemvalue="FirstName" />
                                        </apex:selectList>
                                    </div>
                                </div>
                                <div class="slds-no-flex slds-m-left_x-small">
                                    <apex:commandButton value="Sort" action="{!sortList}" reRender="leads_list" styleClass="slds-button slds-button_neutral"/>
                                </div>
                            </div>
                        </div>
                        <div class="slds-col slds-no-flex slds-grid slds-align-top">
                            <apex:commandButton action="{!URLFOR($Action.Lead.New)}" value="New" styleClass="slds-button slds-button_neutral"/>
                        </div>
                    </div>
                </div>
            </apex:outputPanel>
            <apex:pageBlockTable value="{! leads }" var="ct" id="leads_list">
                <apex:column headerValue="First Name">
                    <apex:outputLink value="/{! ct.Id}">{! ct.FirstName }</apex:outputLink>
                </apex:column>
                <apex:column value="{! ct.LastName }"/>
                <apex:column value="{! ct.Email }"/>
                <apex:column value="{! ct.Phone }"/>
            </apex:pageBlockTable>
        </apex:form>
    </apex:pageBlock>
</apex:page>